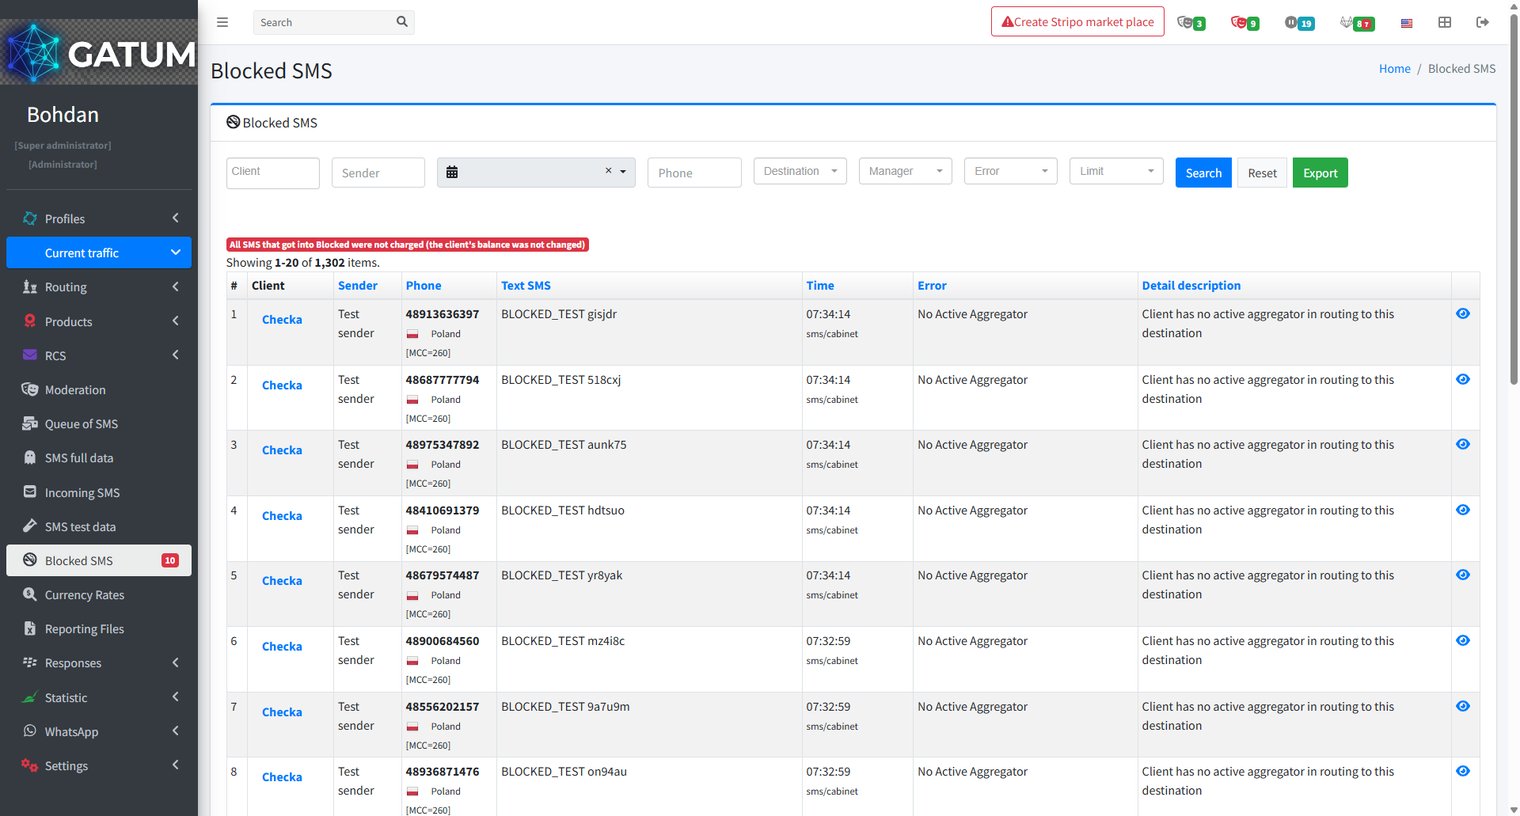
When the platform cannot deliver a message, it moves it to Blocked SMS instead of sending it. Each blocked message includes an error code and a description that explains why it was stopped. Reviewing this page is the fastest way to diagnose routing, pricing, or configuration issues.
Blocked SMS Page
Go to Current traffic → Blocked SMS.
ⓘ Blocked messages are never charged. The client's balance is not affected.
Each row shows the Client, Sender, Phone, Text SMS, Time, Error code, and Detail description. Use the filters at the top – Client, Sender, date range, Phone, Destination, Manager, Error, Limit – to find specific messages.
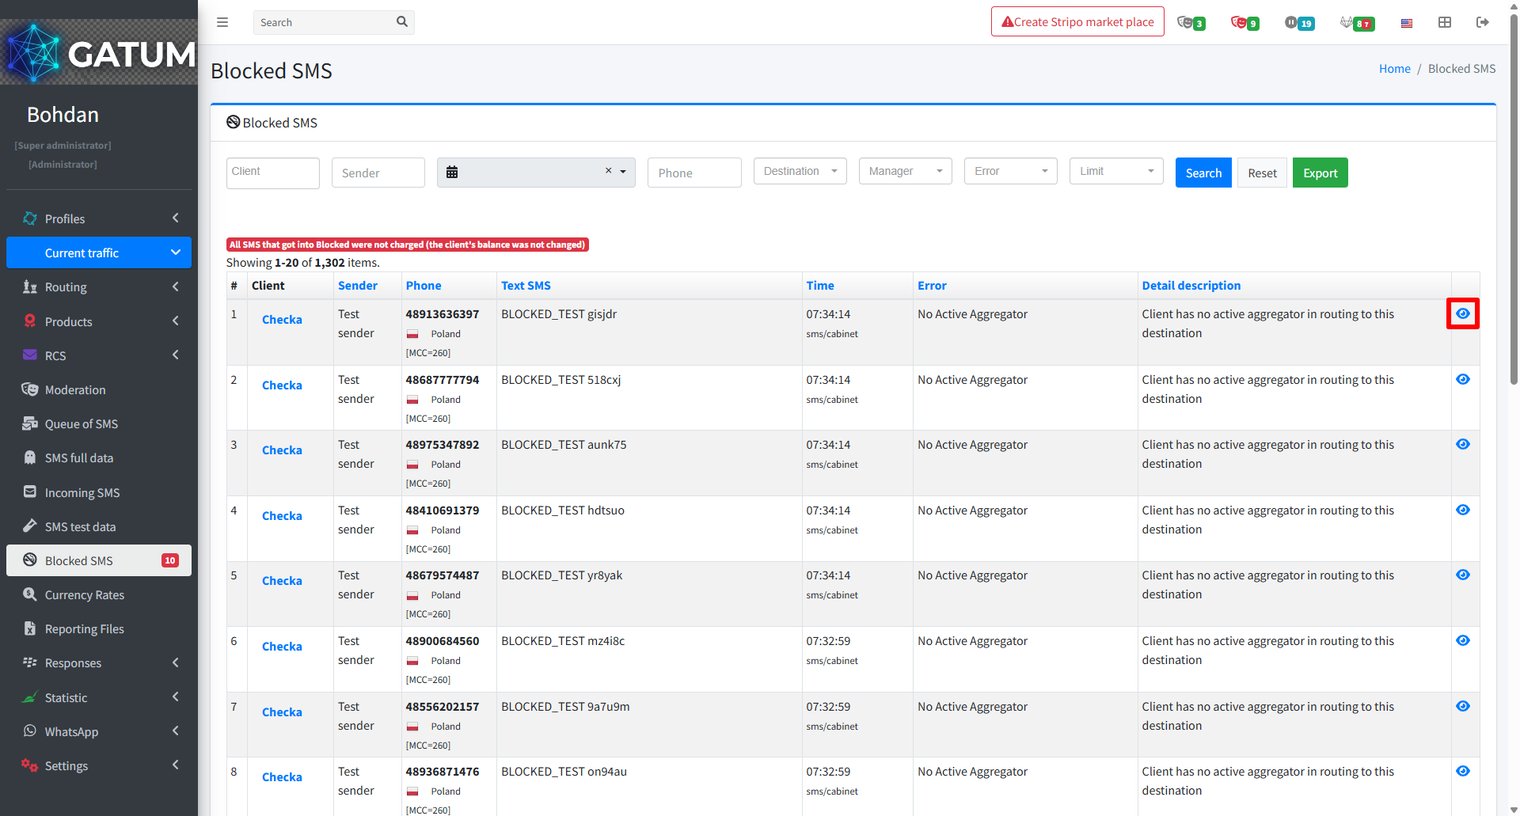
Click the eye icon in any row to open the full detail view for that message.
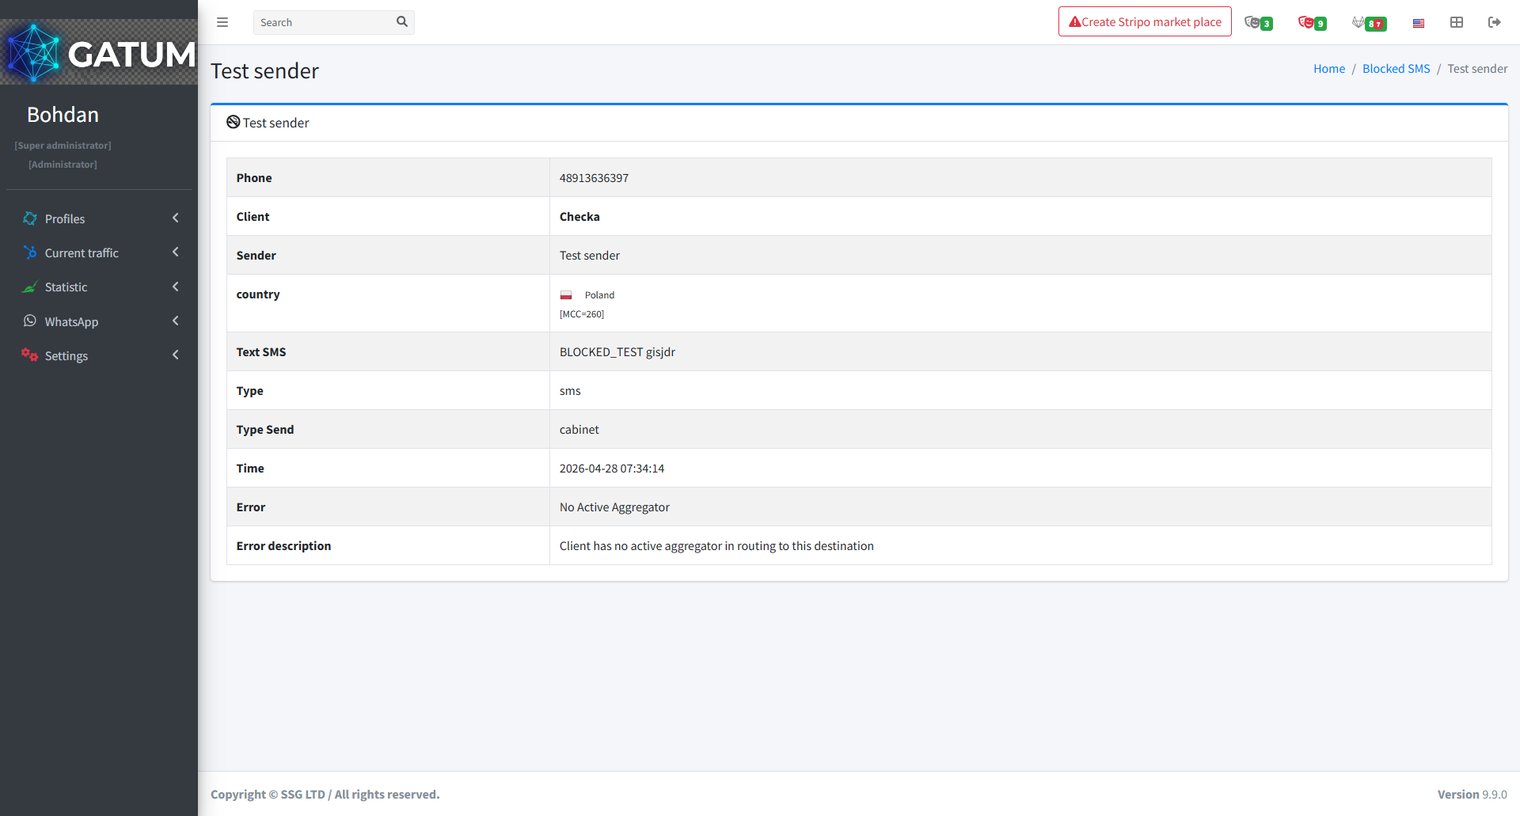
The detail page shows the Phone, Client, Sender, Country, Text SMS, Type, Type Send, Time, Error, and Error description for that specific message.
Error Codes
Error
Description
no_money
Insufficient funds in the client's balance.
reseller_no_money
Insufficient funds in the reseller's balance. The client should contact their account manager.
phone_code_client
The destination is not open for this client.
package_reseller
The route has no funds.
phone_code_reseller
The destination is not open for the reseller.
blocked_sender
The sender name is in the aggregator's blacklist.
no_aggr_price
The destination is not open – no aggregator price exists.
no_client_price
The client has no price set for this destination.
no_reseller_price
No price is set for this destination on the reseller level.
no_source_price
No cost price exists for the aggregator.
no_mcc_mnc
The destination could not be identified from the phone number.
phone_in_black_list
The recipient phone number is in the blacklist.
uses_not_allowed_sending_to_this_aggregator
The client's settings do not allow sending traffic to this aggregator.
reseller_not_allowed_sending_to_this_aggregator
The route settings do not allow sending to this network.
no_active_aggregator
No active aggregator is available for this destination.
not_registry_originator
The sender name is not allowed.
incorrect_originator
The sender format is invalid. Numeric senders must be 3–15 characters; alphanumeric senders must not exceed 11 characters.
blocked_by_moderation
The message was blocked by a moderation rule.
ip_block
The request was blocked by IP restriction.
invalid_message_length
The message exceeds the allowed length.
incorrect_phone
The recipient phone number is in an incorrect format.
blocked_originator
The sender name is blocked in the aggregator's configuration.
unsupported_encoding
The message content uses an encoding that is not supported.
If a message is blocked due to a configuration issue – such as a missing price or a closed destination – fixing the underlying setting and resending the message is all that is needed. The client is not charged for blocked messages, so there is no financial impact while you investigate.
Content Autoreplacement Rules for Aggregator: How to Create?
Content replacement rules let you automatically modify the text of outgoing SMS messages at the aggregator level. Any traffic sent through a given aggregator – regardless of which client sent it – passes through these rules before delivery. This is useful when an aggregator has specific content requirements, or when you need to strip, replace, or transform certain words or phrases across all traffic for that connection.
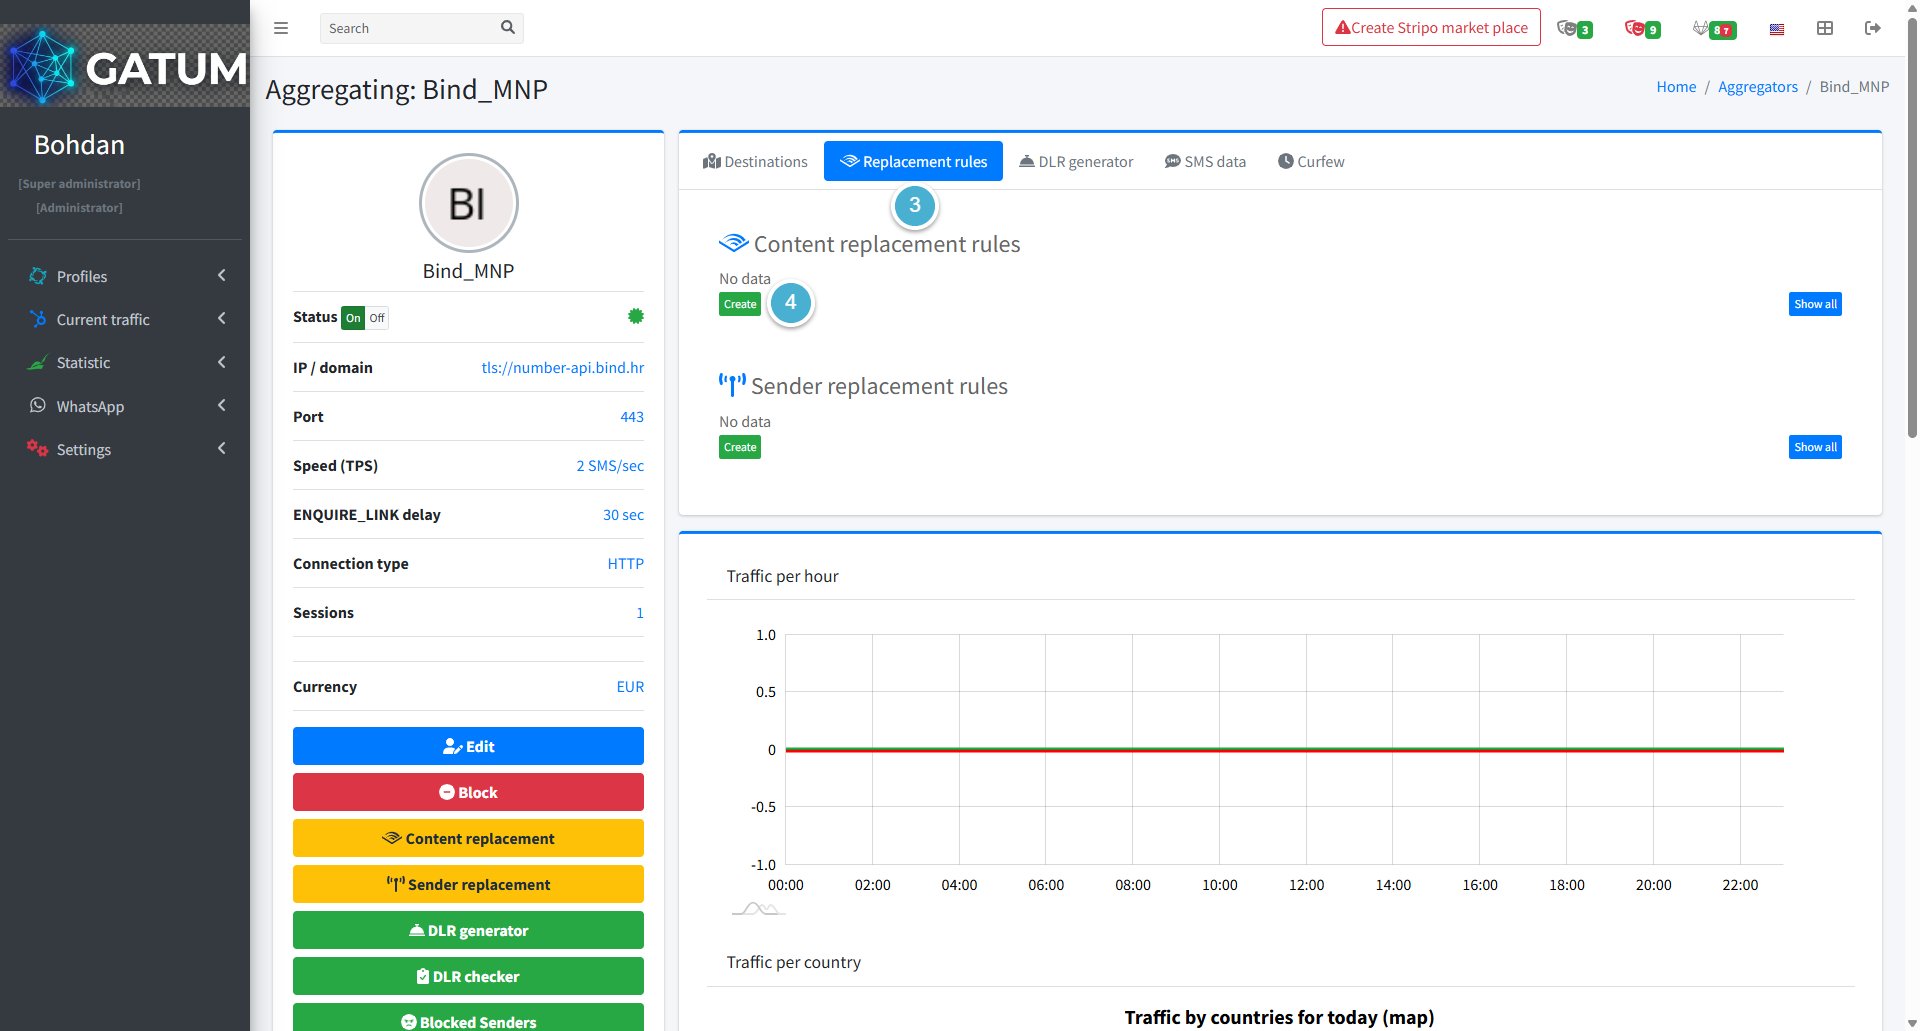
Go to Current traffic → Routing → Aggregators.
Click the eye icon next to the aggregator you want to configure.
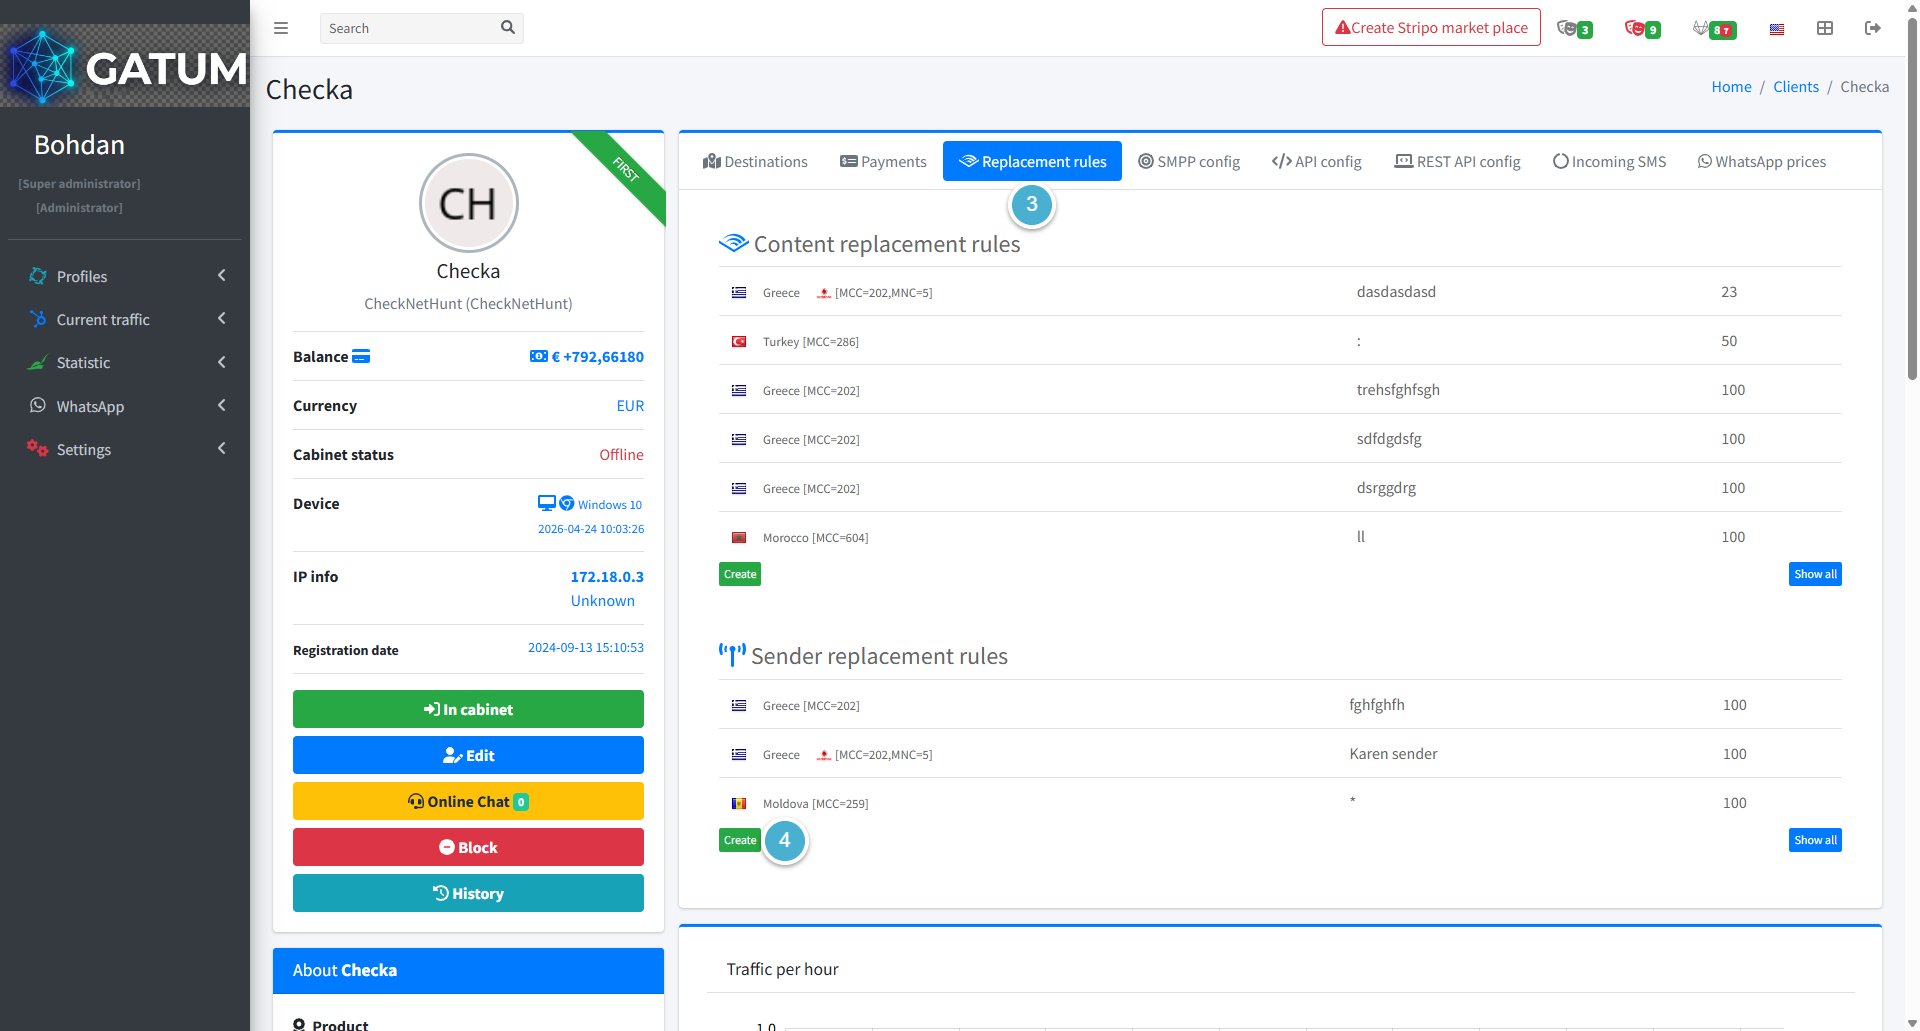
Open the Replacement rules tab.
Click Create in the Content replacement rules block.
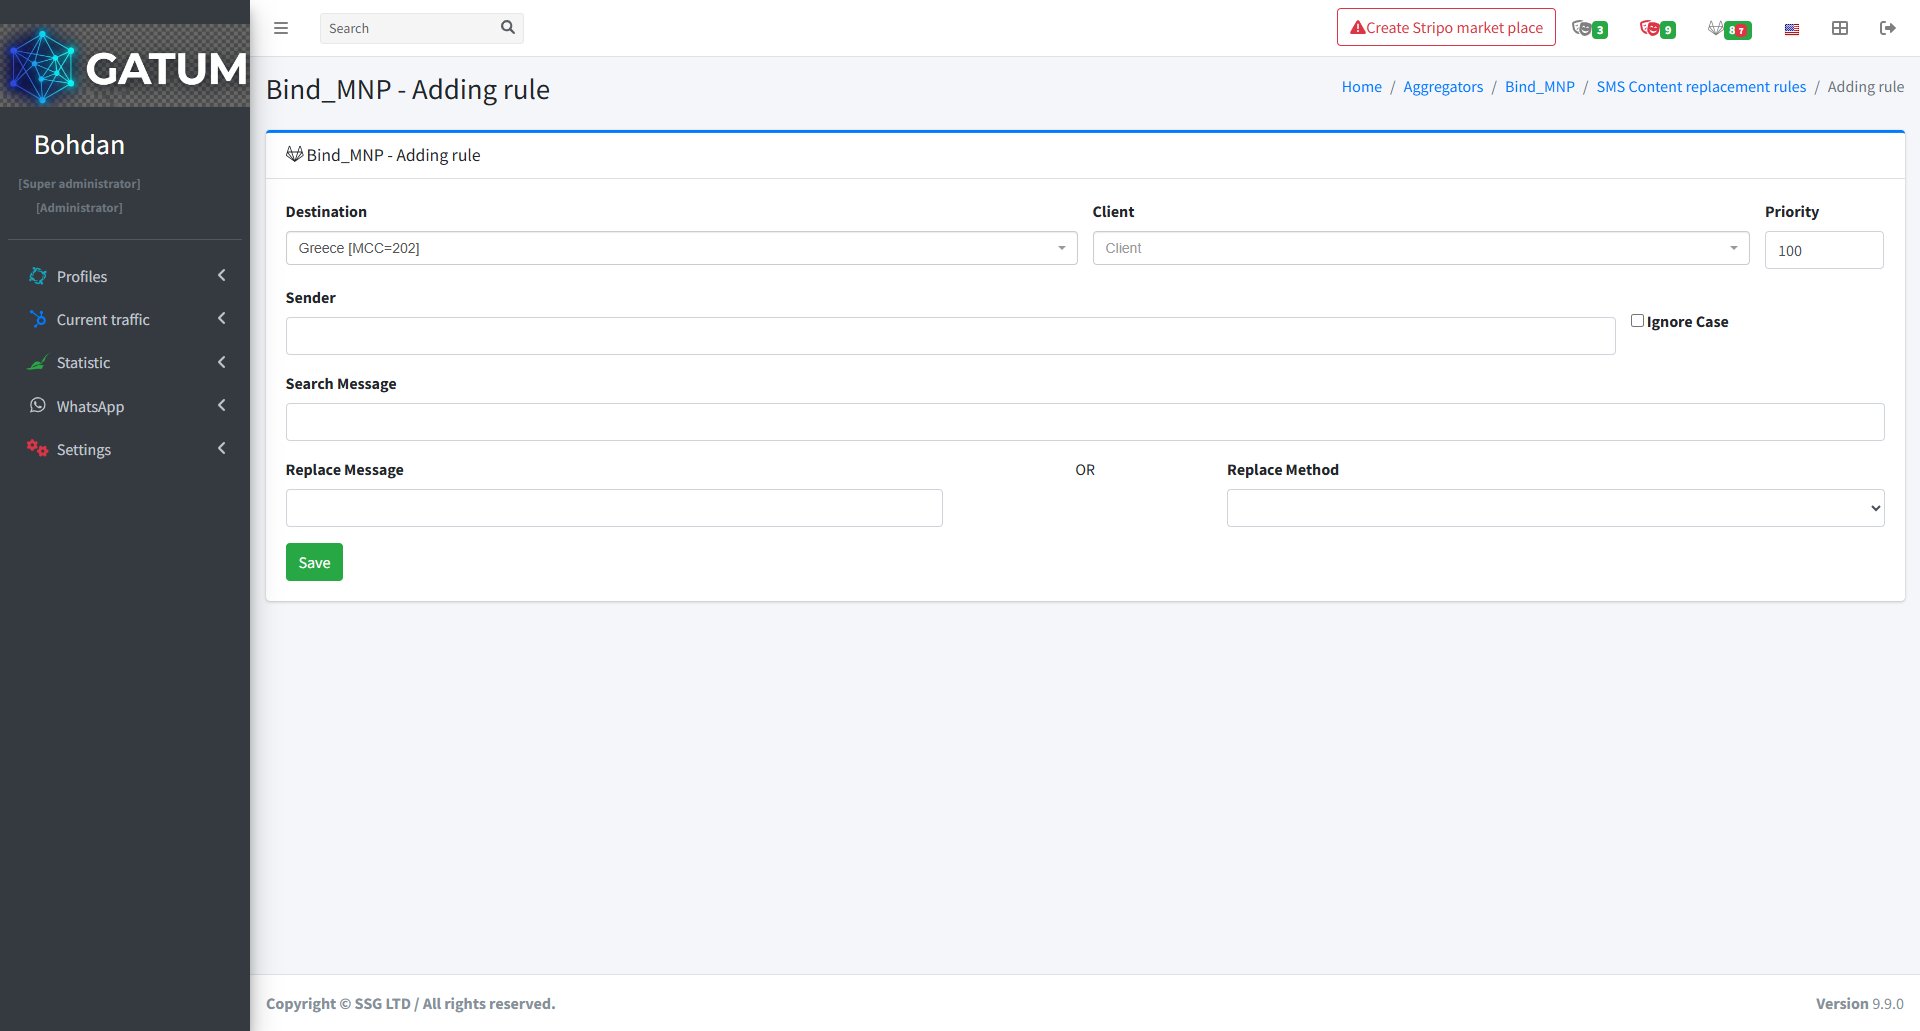
In the window that opens:
Fill in the fields:
Field
Description
Destination
The country or destination this rule applies to.
Client (optional)
Limit the rule to a specific client. If left empty, the rule applies to all clients sending through this aggregator.
Priority
The order in which rules run when multiple rules exist. Lower numbers run first – a rule with priority 1 executes before a rule with priority 100.
Sender (optional)
Apply the rule only to messages with this sender name. Leave empty to match any sender. Check Ignore Case to match regardless of letter capitalisation.
Search Message
The word or phrase to find in the SMS content.
Replace Message
The text to substitute in place of the matched phrase. Use this for straightforward text replacements.
Replace Method
A built-in macro to apply instead of a plain text substitution. See Available Replace Methods below.
Click Save.
Once saved, the rule applies to all traffic routed through this aggregator. If you configure multiple rules – for example, one to locate a value and another to reinsert it elsewhere in the message – use the Priority field to define the exact sequence they run in.
Available Replace Methods
Instead of entering a replacement phrase, you can select a built-in macro in the Replace Method field. Macros perform predefined transformations on message content and do not require a value in Replace Message unless noted.
Macro
What it does
{SAVEDIGITS}
Finds and remembers a standalone number sequence (digits surrounded by spaces or empty). Does not replace it – use together with {BEGIN} or {END} to reinsert the saved value using {DIGITS}.
{SAVEURL}
Finds and remembers a standalone URL in the message. Reinsert using {URL} in a subsequent {BEGIN} or {END} rule.
{SAVEPHONE}
Finds and remembers a phone number in the message. Reinsert using {PHONE} in a subsequent {BEGIN} or {END} rule.
{EMPTY}
Matches messages with no text content at all and replaces them with the value in Replace Message. Useful as a fallback when other rules might strip the message completely.
{BEGIN}
Inserts the value from Replace Message at the start of the message. Supports {DIGITS}, {URL}, and {PHONE} placeholders to reinsert values saved by earlier rules.
{END}
Inserts the value from Replace Message at the end of the message. Supports the same placeholders as {BEGIN}.
{TRIM}
Removes leading and trailing spaces. Spaces between words are preserved.
{TRIM-RTL}
Removes the right-to-left override character. Used with Arabic or Hebrew content to prevent unintended text direction changes.
{UPPERCASE}
Converts the entire message to uppercase.
{LOWERCASE}
Converts the entire message to lowercase.
{CLEAR}
Erases all message content.
{CUTONEPART}
Keeps only the first SMS part and removes everything after it.
{CUTIFMORE}
Removes extra SMS parts that appeared as a result of content replacement.
{CUTBYLENGTH}
Truncates the message to the number of characters specified in Replace Message. Helps prevent unintended multipart messages from increasing delivery cost.
{RANDOM_SYMBOLS_BEGIN}
Inserts a random character sequence at the start of the message. Set the character count in Replace Message.
{RANDOM_SYMBOLS_END}
Inserts a random character sequence at the end of the message.
{RANDOM_DIGITS_BEGIN}
Inserts random digits at the start of the message. Set the digit count in Replace Message.
{RANDOM_DIGITS_END}
Inserts random digits at the end of the message.
If none of the available macros cover your use case, contact Gatum support – custom macros can be built to automate specific content transformations for your traffic.
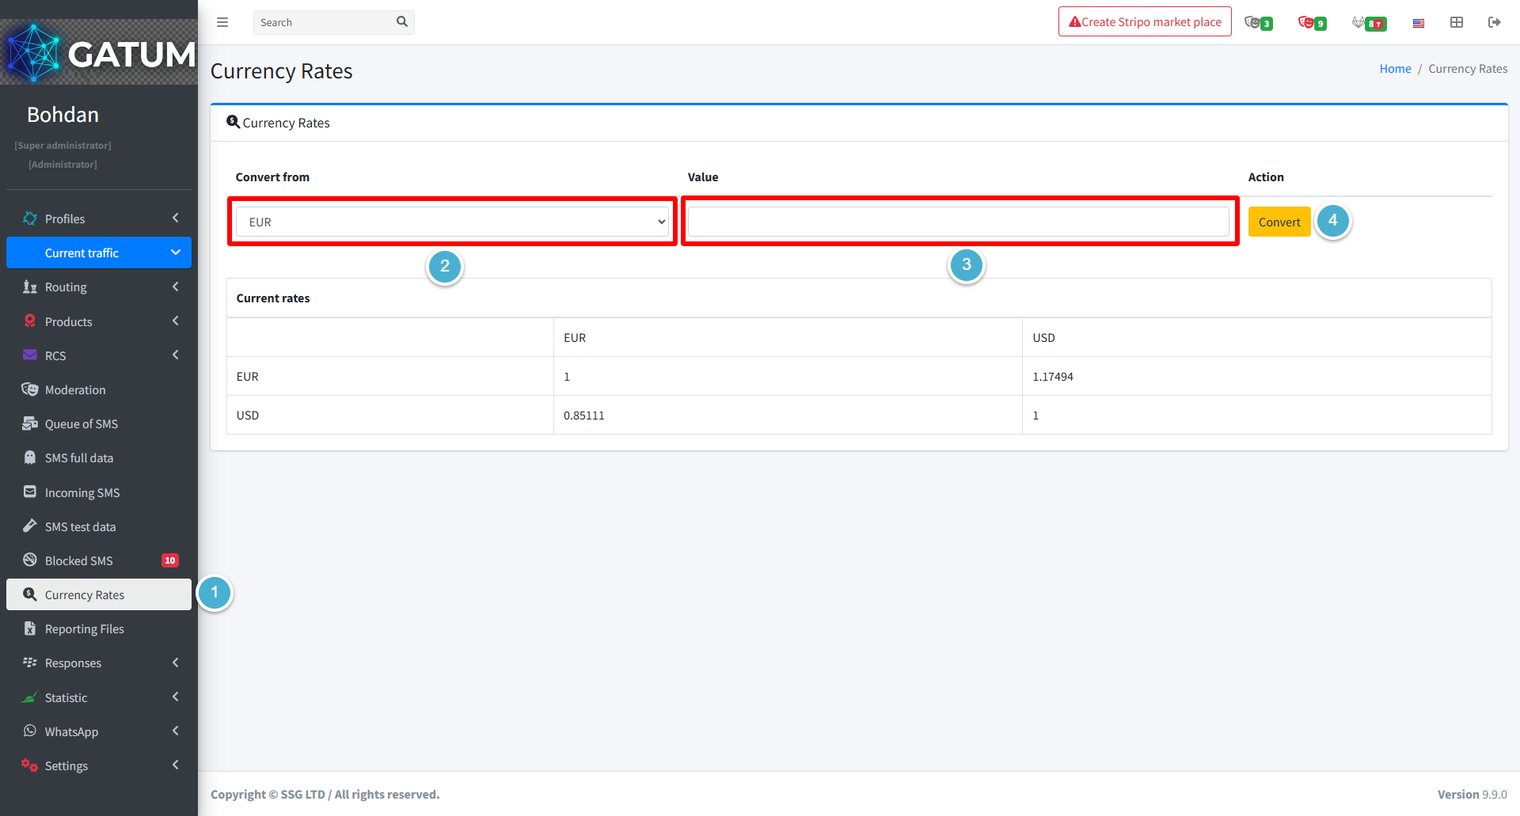
Exchange Rate and Currency Conversion on the Platform
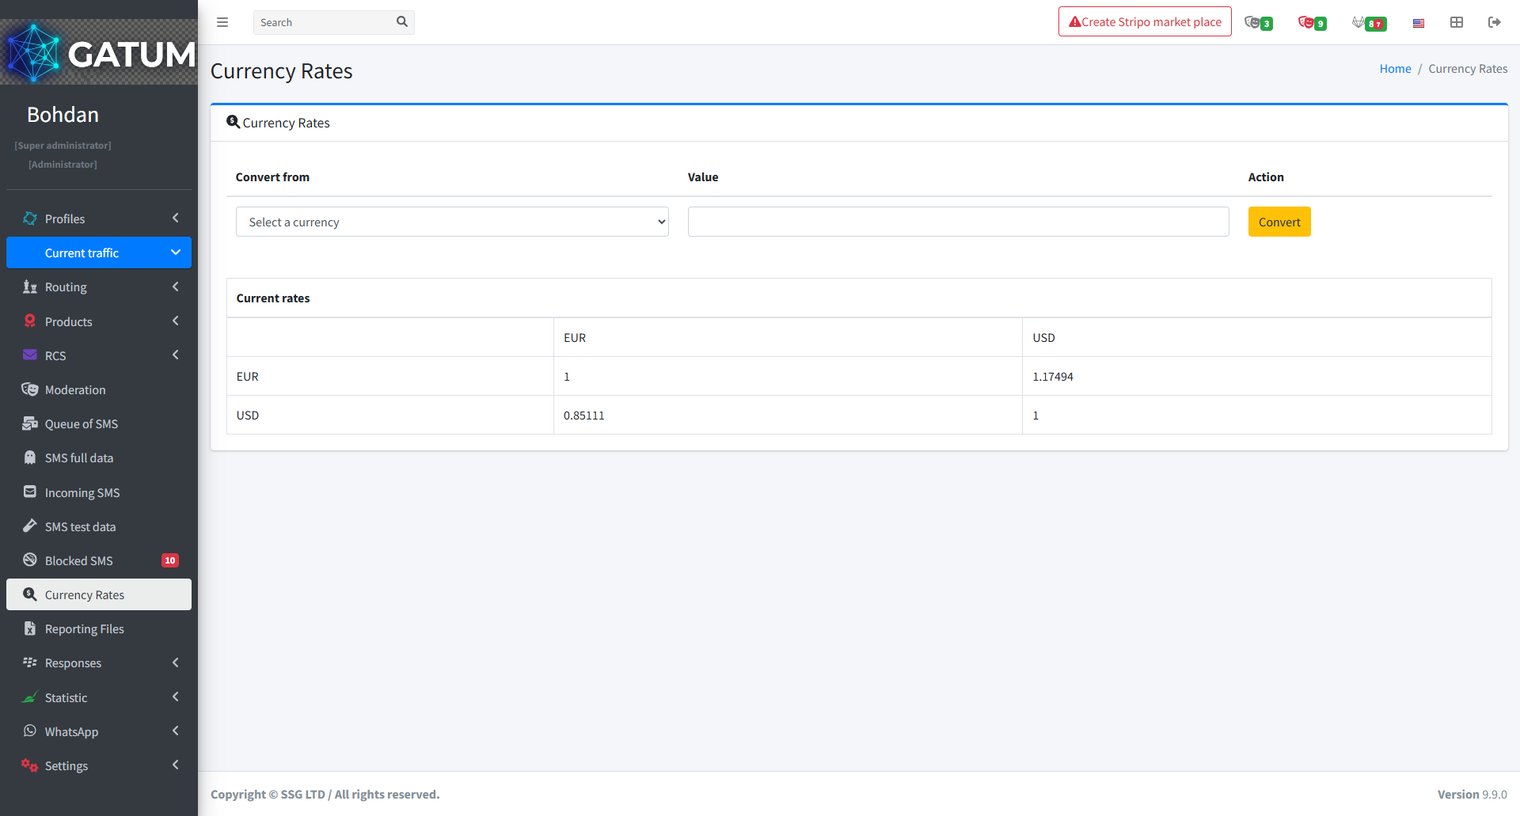
The platform supports working with multiple currencies simultaneously. EUR and USD are enabled by default. The Currency Rates page lets you check current exchange rates, convert amounts between currencies, and connect an external service to keep rates updated automatically.
View Current Rates
Go to Current traffic → Currency Rates.
The Current rates table at the bottom of the page shows all active currencies and their exchange ratios relative to each other. Rates are updated automatically every hour if you have a currency service integration enabled.
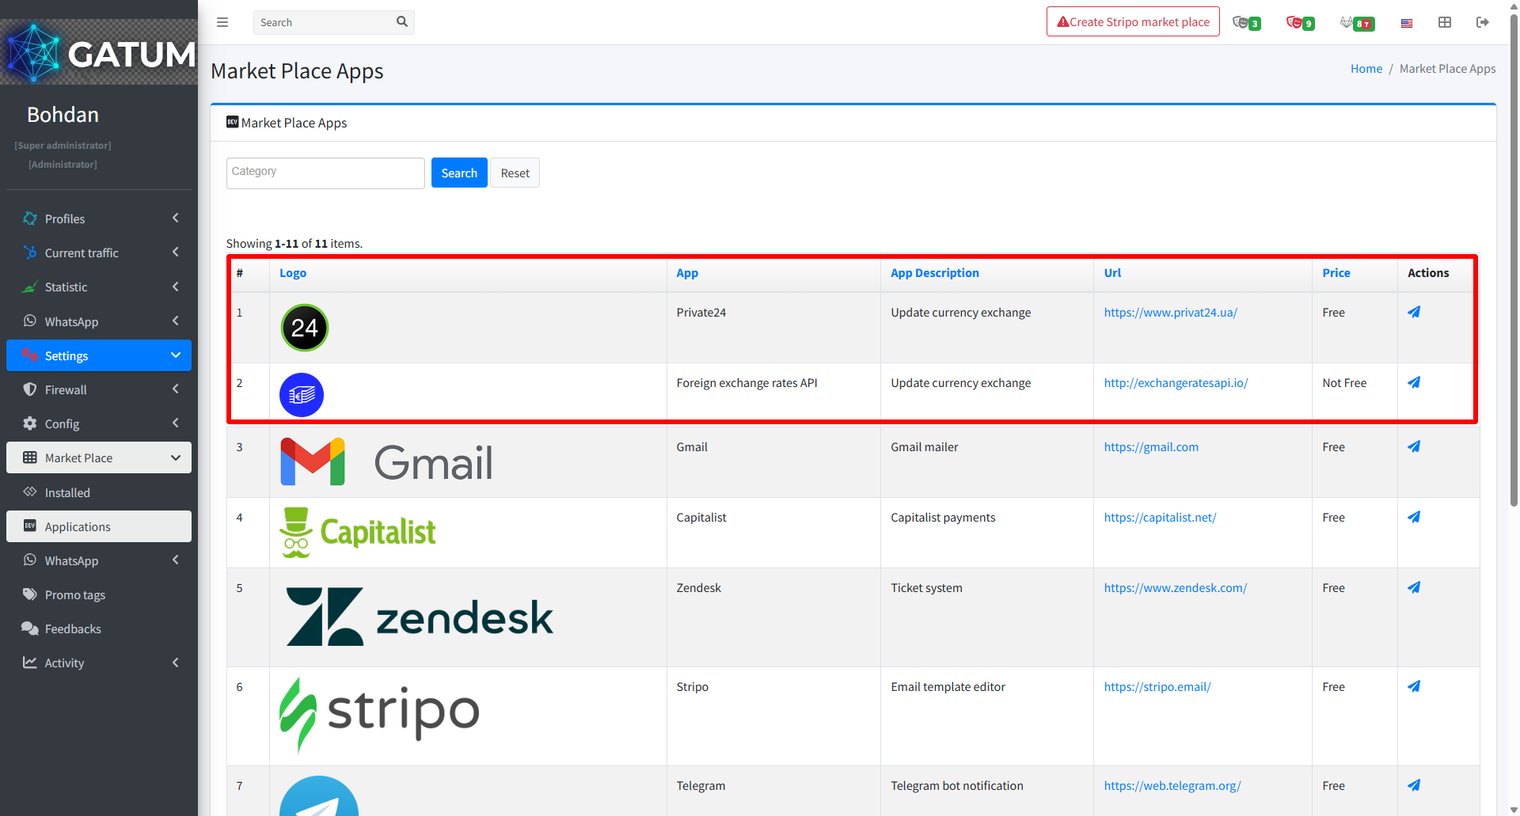
To connect an automatic exchange rate feed, go to Settings → Market Place → Applications and install one of the available currency apps.
Two apps support currency rate updates: Private24 (free, uses PrivatBank rates) and Foreign exchange rates API (paid, uses a broader market feed). Click the send icon in the app's row to install it and configure the connection.
Convert an Amount
Go to Current traffic → Currency Rates.
In the Convert from dropdown, select the source currency.
In the Value field, enter the amount you want to convert.
Click Convert.
The result appears immediately to the right of the Value field, showing the equivalent amount in all currencies currently active on your platform.
HLR Before SMS — How It Works?
HLR (Home Location Register) before SMS is a feature that verifies whether a recipient's number is active before the SMS is actually sent. Instead of sending to a potentially inactive number and receiving a failed delivery report, the platform first sends a silent HLR lookup to the aggregator and only forwards the SMS if the response confirms the number is reachable.
How It Works
When HLR checking is enabled on a client price for a destination, the following happens for each outgoing message:
The platform sends an HLR request to the aggregator configured in the client's HLR route for that destination.
The aggregator queries the operator network and returns the current MCC and MNC for the number.
If the number is active, the platform uses the MCC and MNC from the HLR response to route the SMS to the correct operator, not the original operator assigned by prefix.
If the number is inactive, the platform does not send the SMS and immediately returns a non-delivery report to the client.
The client is not aware that an HLR is being run — it is invisible in their interface, and they are not charged separately for it. The SMS price you set for the client should account for the cost of the HLR lookup.
When to Use HLR Before SMS
HLR before SMS is most useful for traffic going to MNP countries, where numbers are frequently ported between operators. Without it, the platform routes based on prefix alone, which may be incorrect for ported numbers — leading to failed delivery or billing at the wrong rate.
The main trade-off is speed: HLR checking limits sending throughput to roughly 10–50 SMS/sec. This makes it unsuitable for high-volume campaigns, but it is a good fit for transactional or time-sensitive traffic where delivery accuracy matters more than throughput.
How Can a Client Connect API Integration?
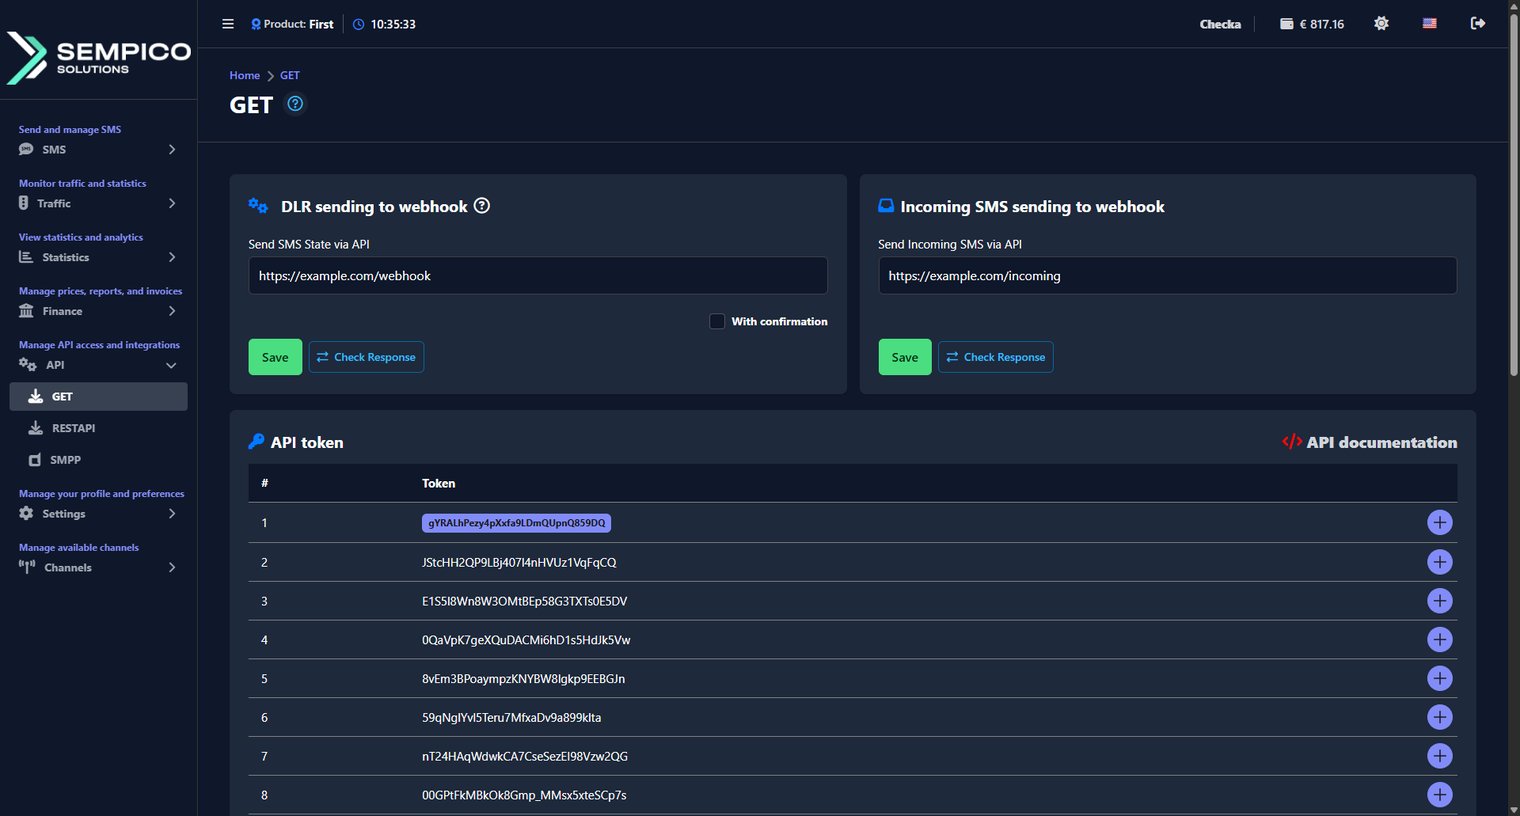
To start sending SMS via API, you need to generate an API token and configure the webhook URLs for delivery reports and incoming SMS. All of this is done directly from your web panel — no need to contact your manager.
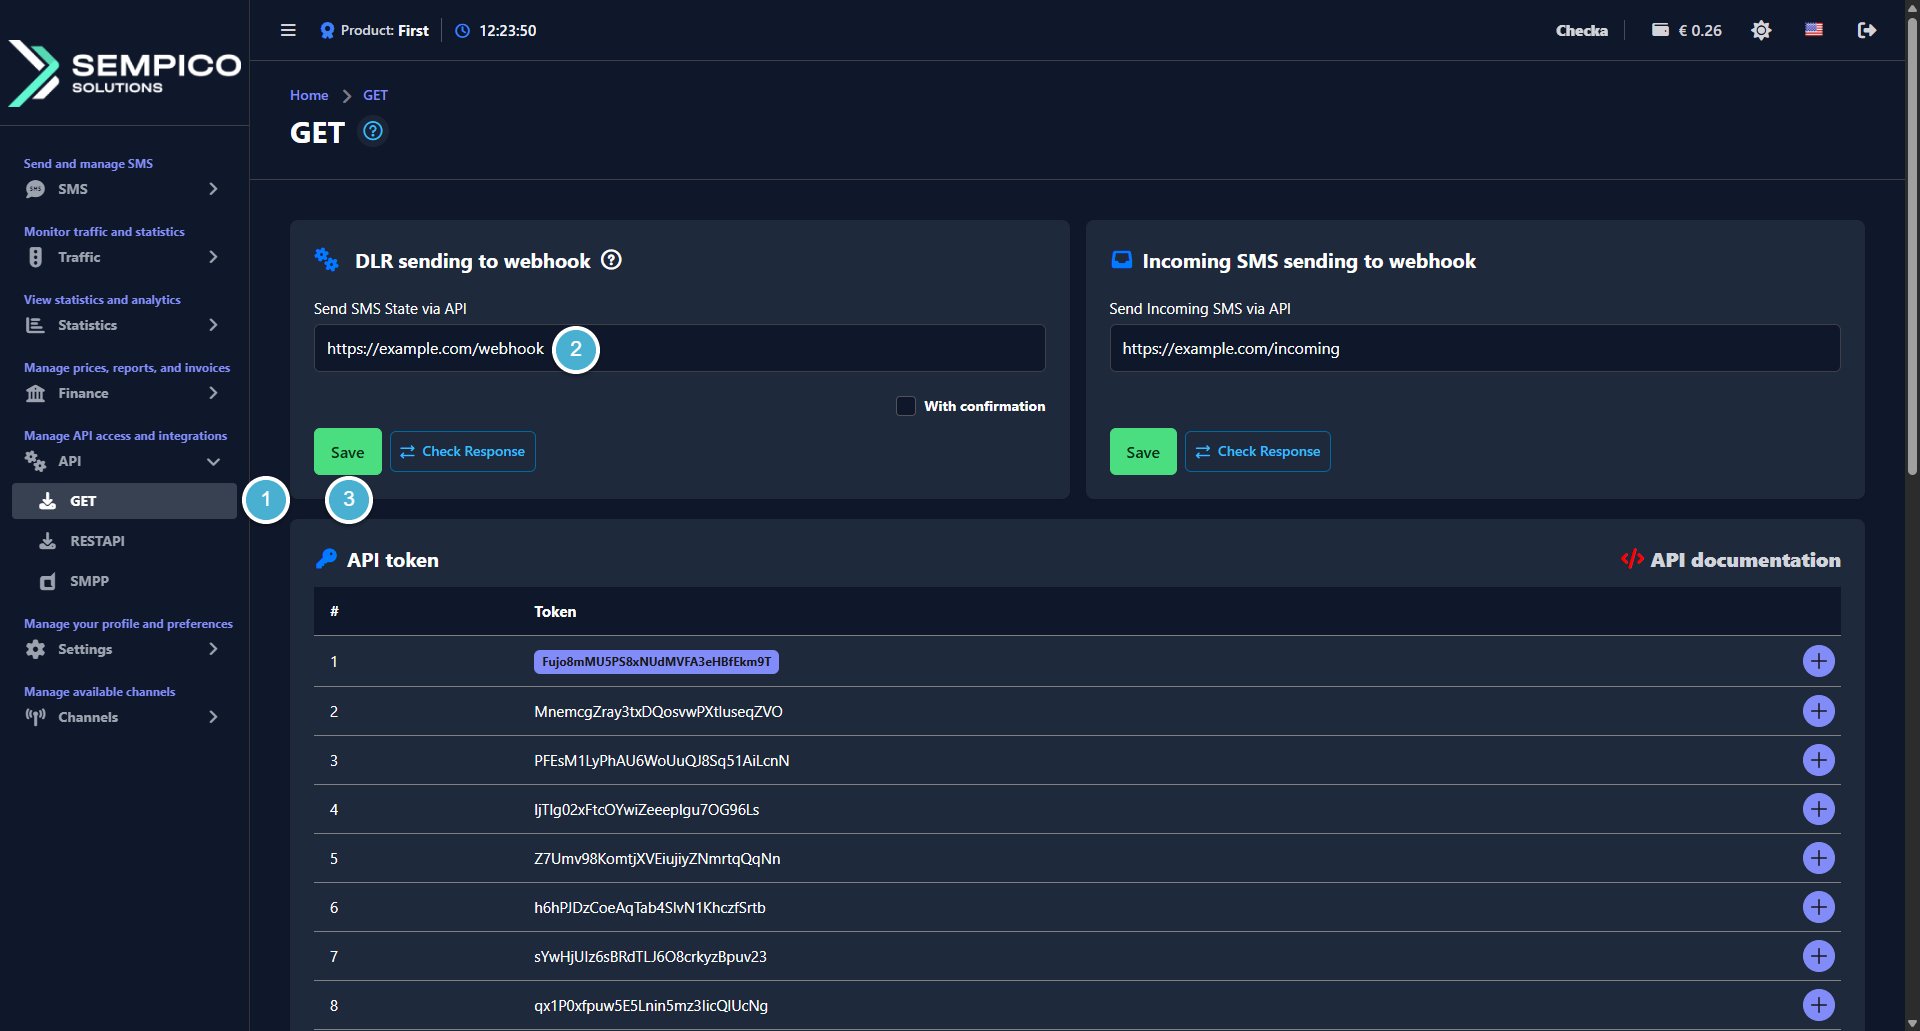
Go to API → GET.
The page is divided into five sections: DLR Sending to Webhook, Incoming SMS Sending to Webhook, API Token, Example of Using API, and API IP. Go through each section below to complete your setup.
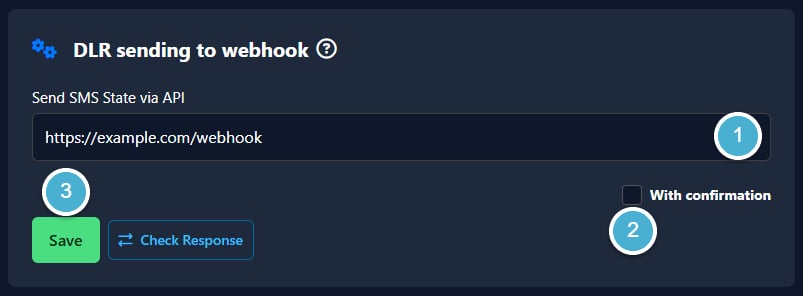
DLR Sending to Webhook
This section lets you set a webhook URL that will automatically receive delivery status updates for SMS sent via API.
Enter your webhook URL in the Send SMS State via API field.
Enable With confirmation, if you want the platform to expect a confirmation response from your server.
Click Save:
To verify the connection, click Check Response.
To see the format of the delivery report and possible statuses, click the ? icon. A window will open showing an example response and the following possible statuses:
Status
Description
DELIVRD
The message was delivered
UNDELIV
The message was not delivered
EXPIRED
The message lifetime expired before delivery
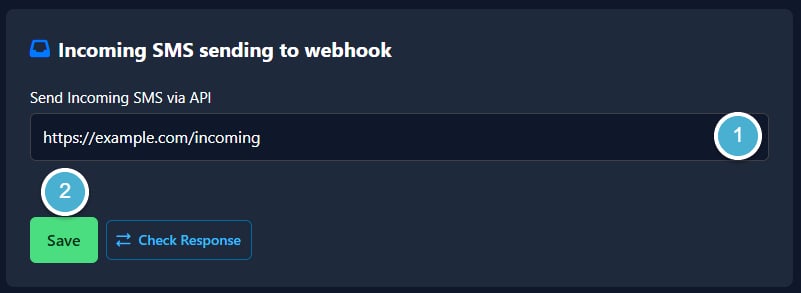
Incoming SMS Sending to Webhook
This section lets you set a webhook URL that will automatically receive incoming SMS messages.
Enter your webhook URL in the Send Incoming SMS via API field.
Click Save:
To verify the connection, click Check Response.
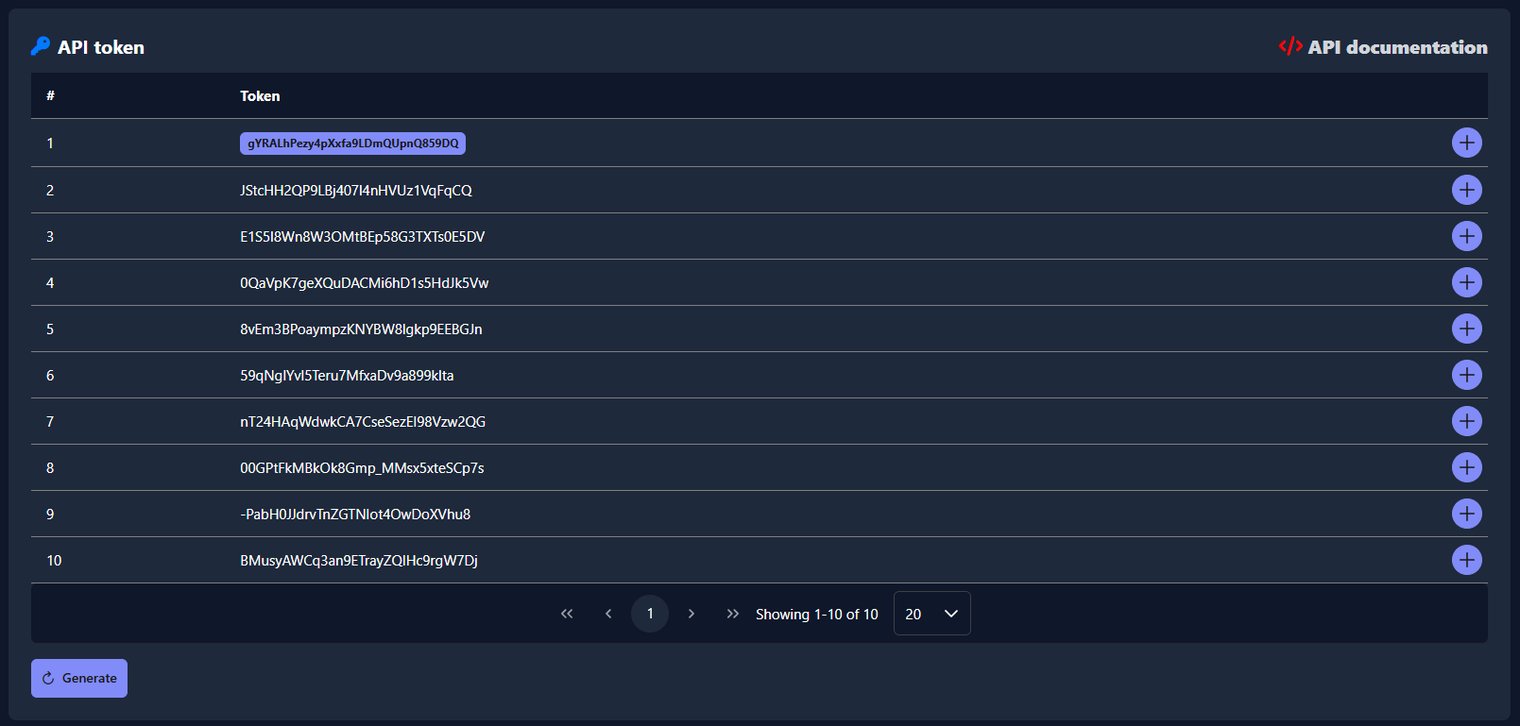
API Token
This section shows all your available API tokens. You use these tokens to authenticate API requests.
To generate a new token:
Click the Generate button. The system will automatically create a new token and add it to the list.
To delete a token:
Click the + button on the right side of the token row, then click Delete. A confirmation window will appear — click Delete to confirm.
To view the full API documentation, click the API documentation link in the top right corner of the page.
Example of Using API
This section displays a sample GET request with example parameters — token, phone number, message text, and Sender ID. Use it as a reference when building your API integration.
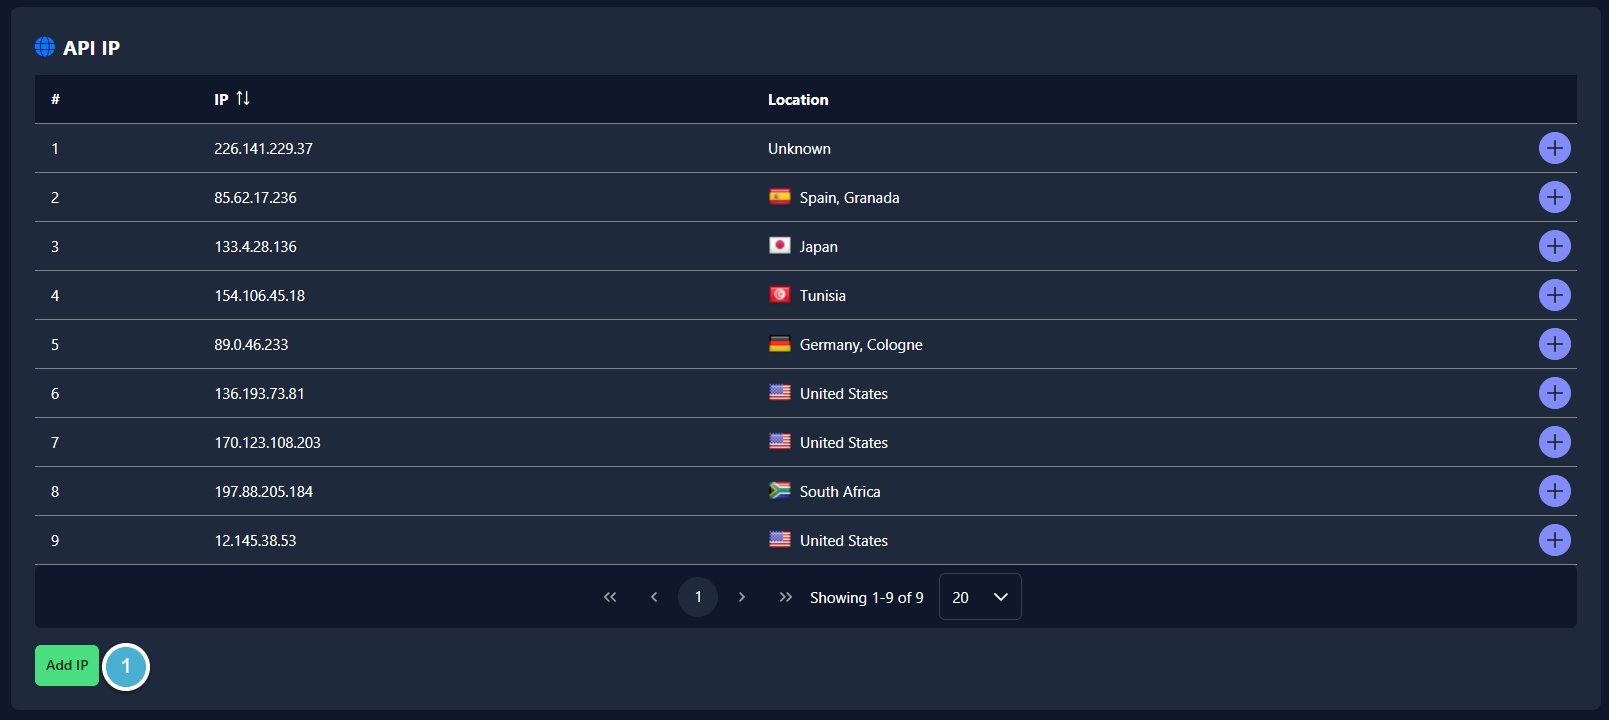
API IP Whitelist
This section shows the list of IP addresses that are allowed to make API requests. Adding IPs to the whitelist restricts API access to only those addresses.
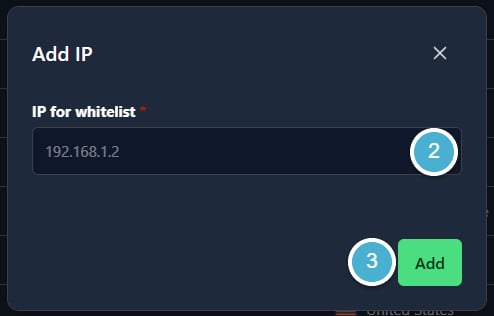
To add a new IP address:
Click the Add IP button:
In the window that opens, enter the IP address in the IP for whitelist field.
Click Add IP.
To delete an IP address:
Click the + button on the right side of the row, then click Delete. A confirmation window will appear — click Delete to confirm.
Once your token is generated and webhooks are configured, your API integration is ready to use.
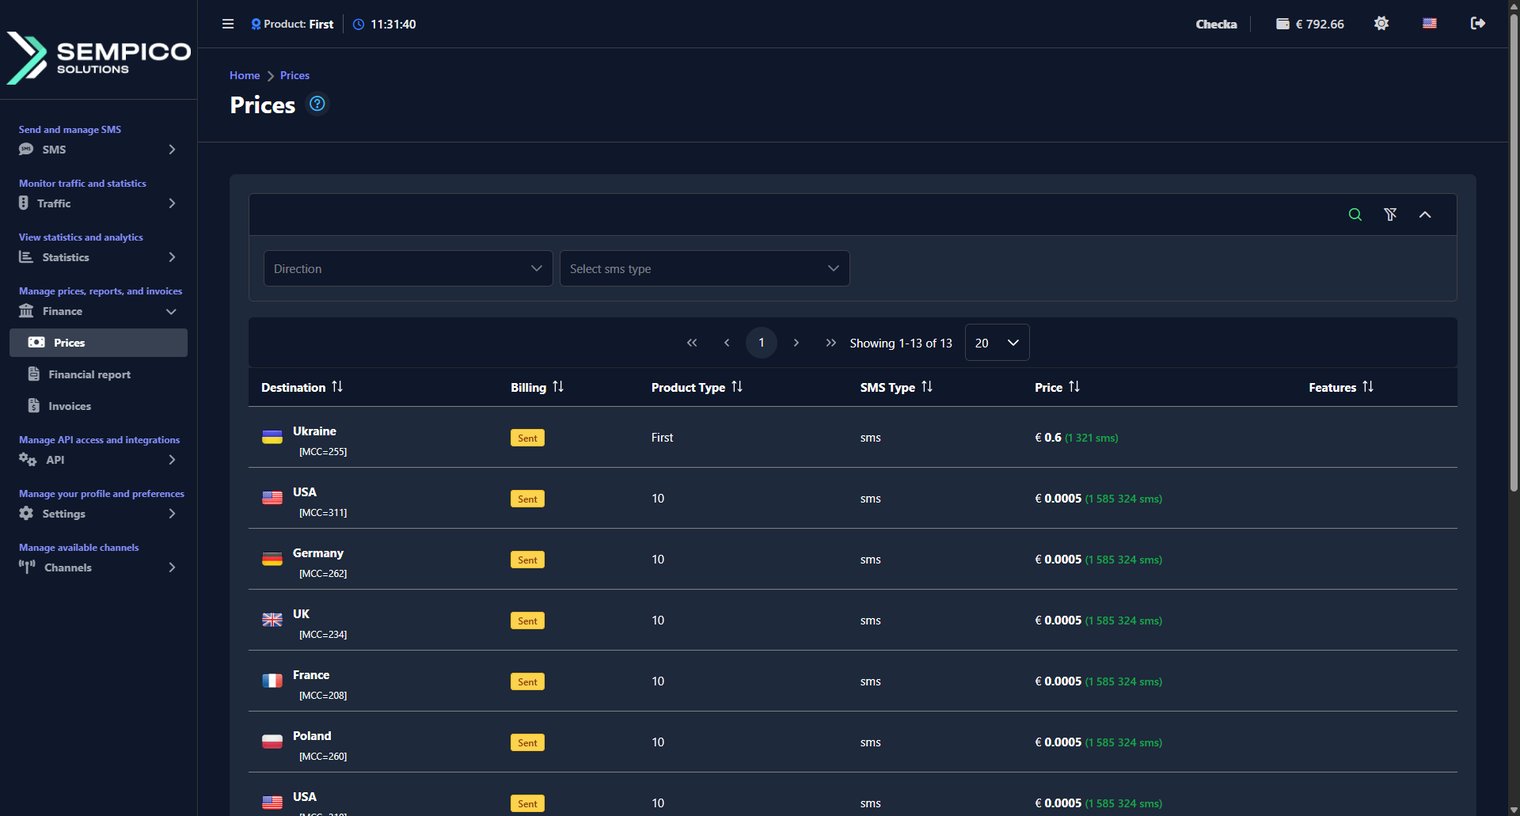
How Can a Client See SMS Prices?
The Prices page shows the SMS rates set for your account by direction. You can always check how much you pay per message and how many SMS you can still send with your current balance.
Go to Finance → Prices.
You can filter the list by Direction or SMS type.
Each row in the table shows the pricing details for one direction:
Column
What it shows
Destination
The country and MCC code
Billing
The billing type — for example by Sent or by Delivered
Product Type
The product used for this direction
SMS Type
The type of message — for example: sms, HLR, MNP, etc.
Price
The price per SMS. The number in brackets shows how many SMS you can send with your current balance in this direction
Features
Any additional features applied to this direction
The prices are set by your Gatum manager and update automatically when any changes are made to your account.
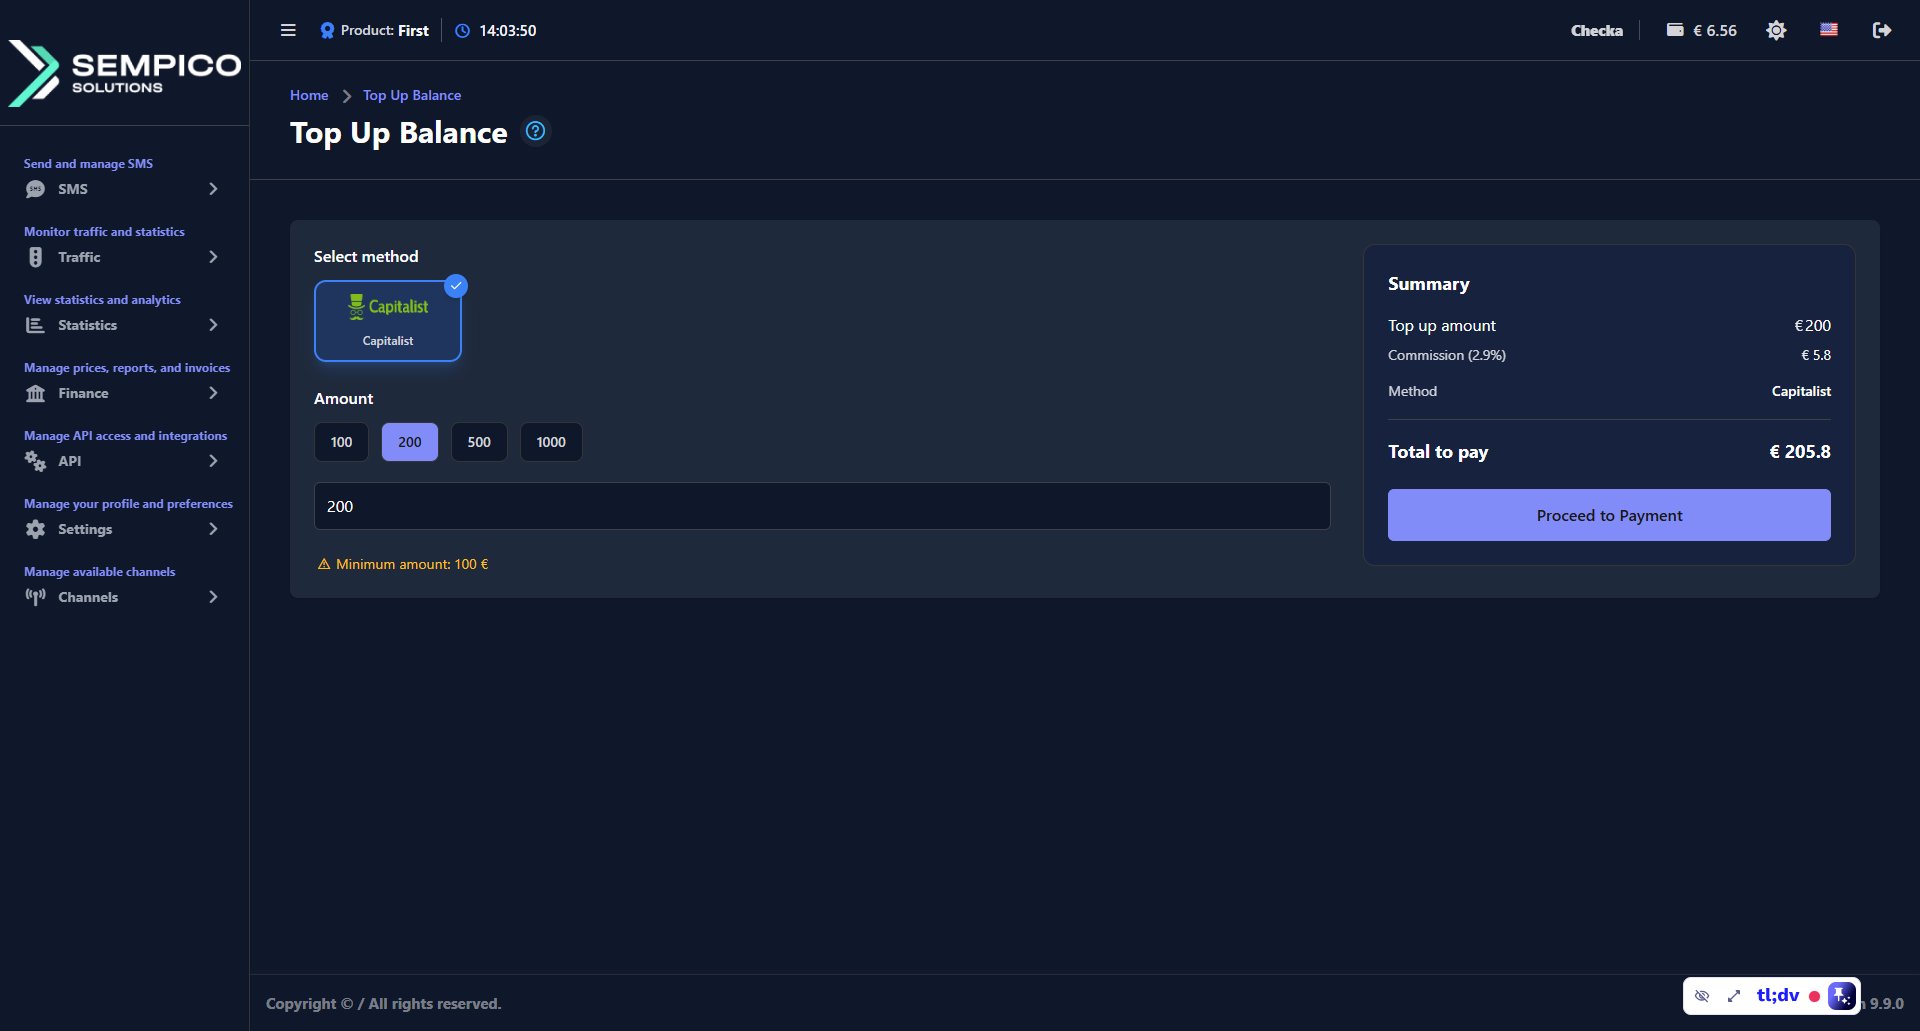
How Can a Client Top Up His Balance Online Using Capitalist?
Clients can top up their balance directly from their web cabinet using Capitalist — without contacting their manager. The option appears automatically once the Capitalist integration is enabled in the admin panel.
Before You Start
The Capitalist integration must be installed in the admin panel.
Top Up Balance via Capitalist
In the client cabinet, click the balance indicator in the top right corner of the screen, or go to Finance → Top Up Balance.
On the Top Up Balance page, select Capitalist as the payment method. Enter the amount — the minimum top-up is €100. The Summary panel on the right shows the top-up amount, the Capitalist commission (2.9%), and the total to pay.
Click Proceed to Payment.
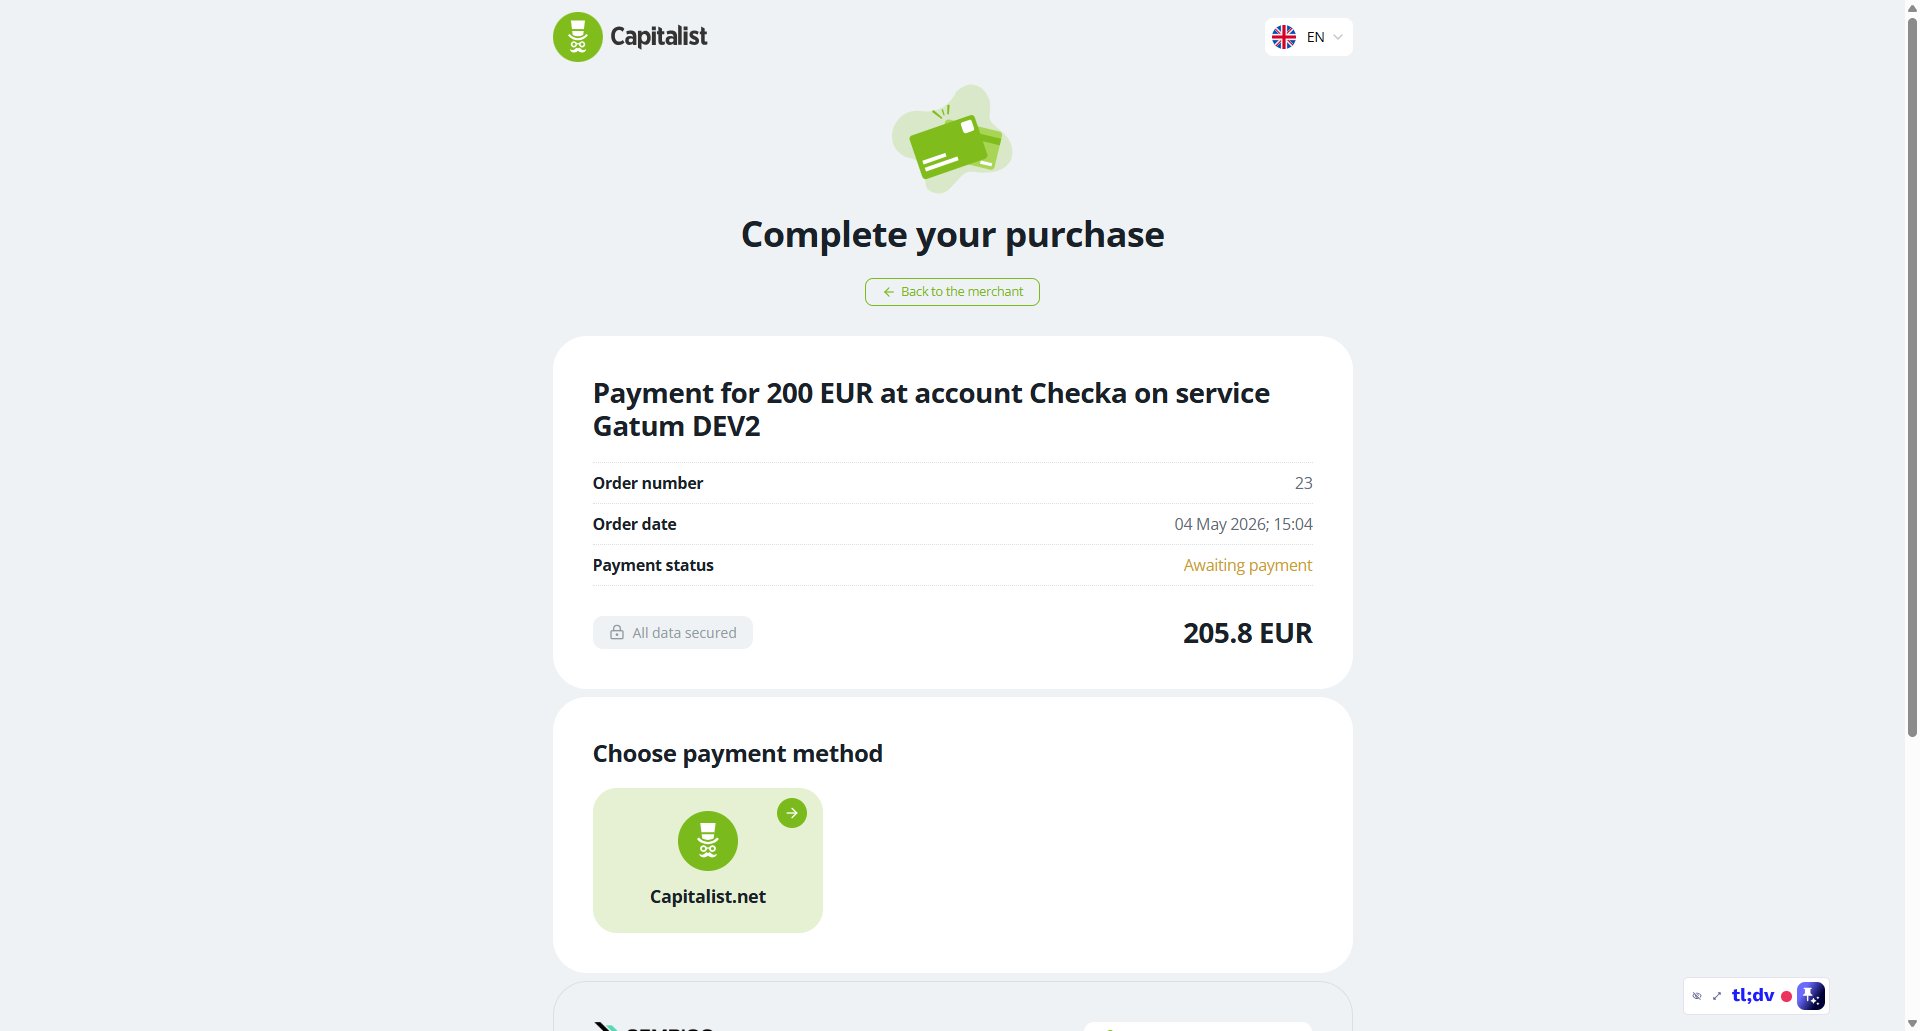
You are redirected to the Capitalist payment page. Confirm the order details and select Capitalist.net as the payment method.
Once the payment is confirmed, the amount is credited to the client's balance on the platform automatically. The updated balance is visible immediately in the top right corner of the cabinet.
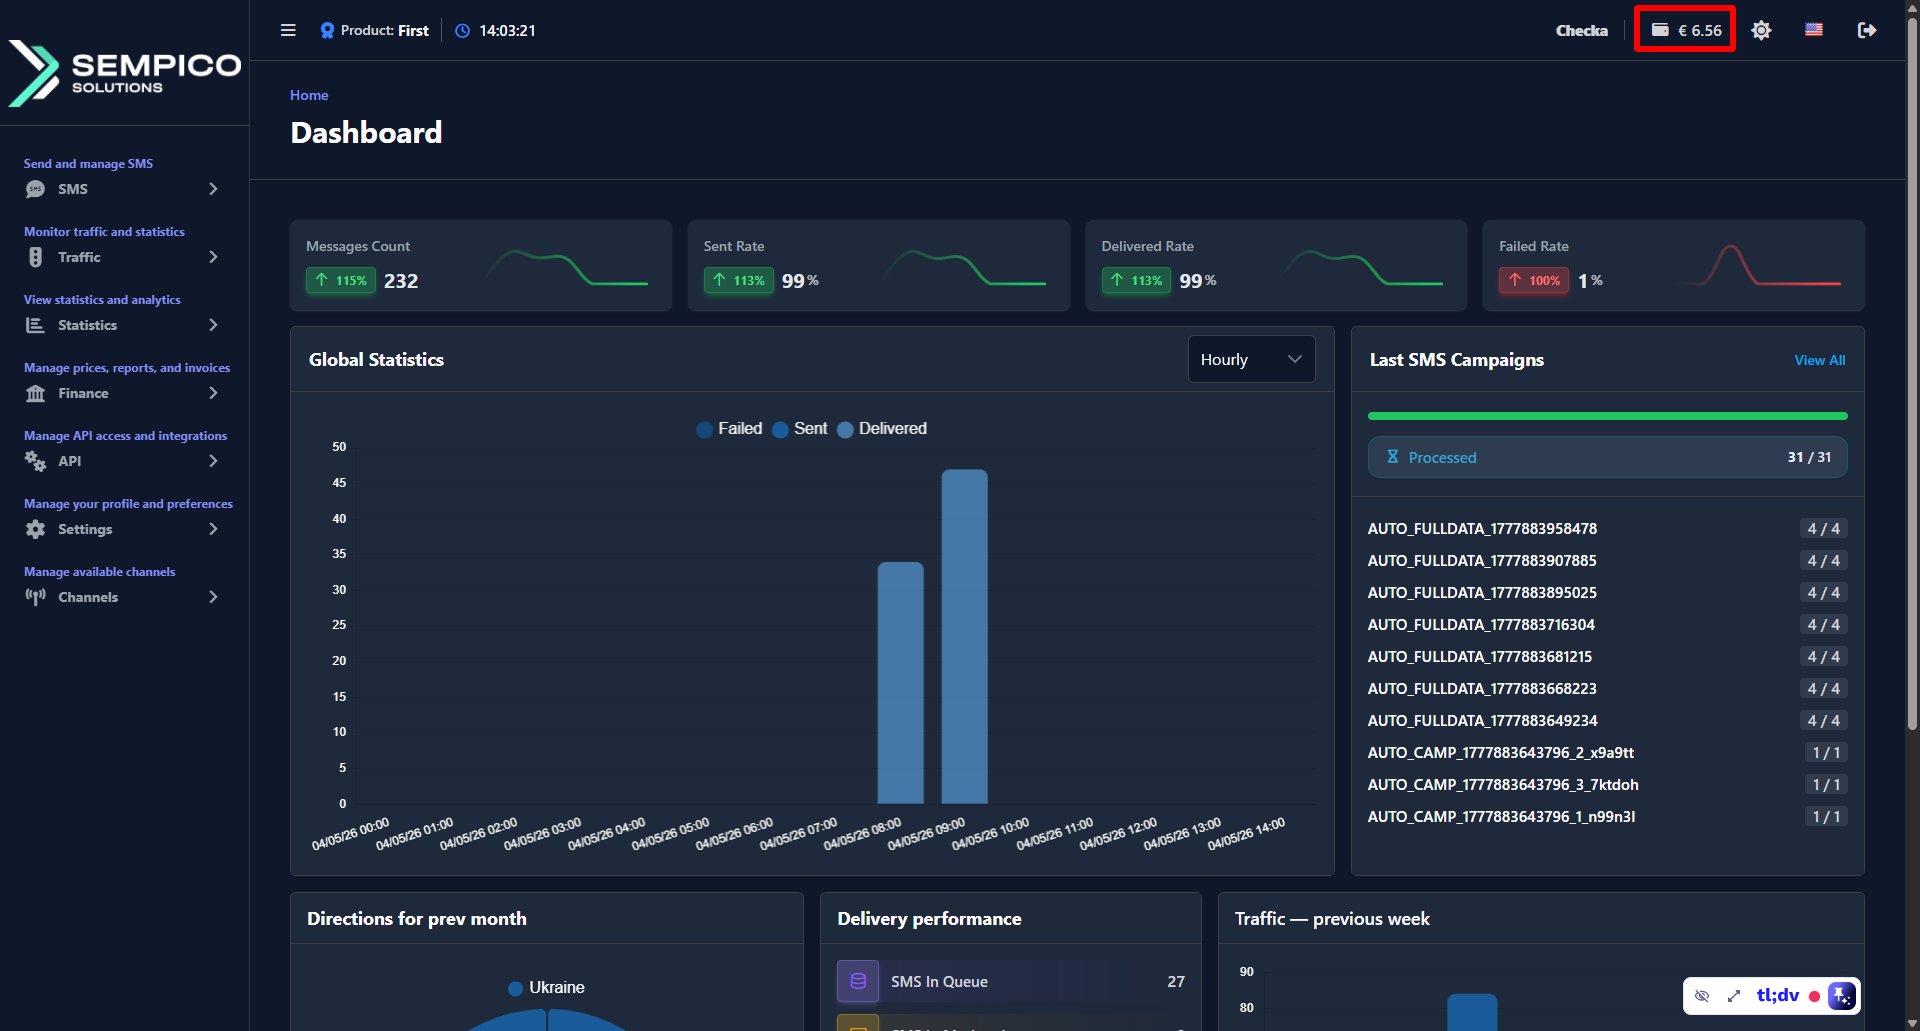
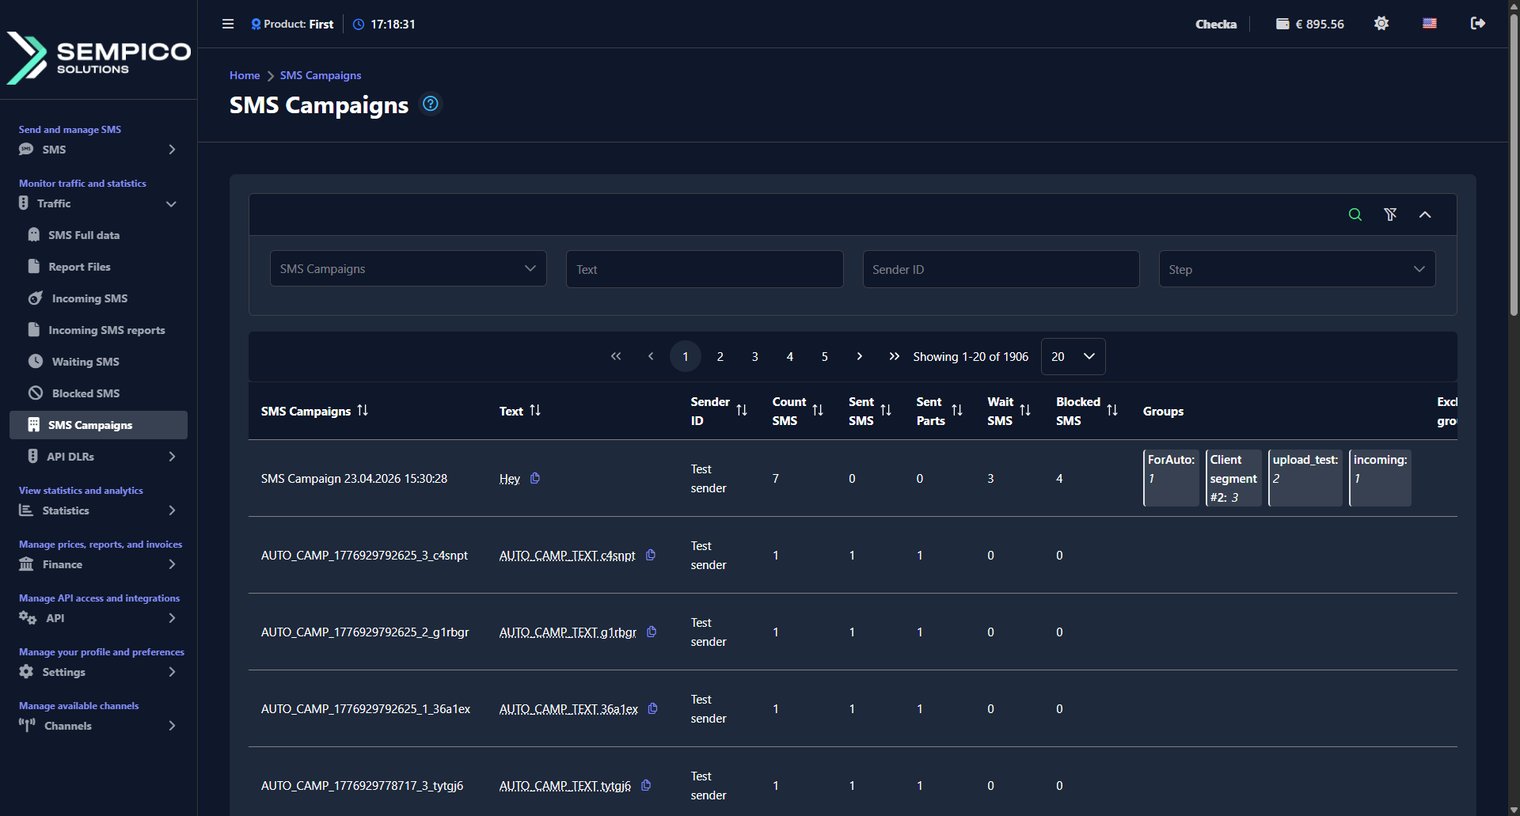
How can a client view data on SMS campaigns?
The SMS Campaigns page shows a summary of all your sent campaigns — how many messages were sent, delivered, blocked, and how many are still waiting.
Go to Traffic → SMS Campaigns.
You can filter the list by SMS Campaigns, Text, Sender ID, or Step.
Each row in the table represents one campaign. The columns show the following information:
Column
What it shows
SMS Campaigns
The name of the campaign
Text
The message text
Sender ID
The sender name used for the campaign
Count SMS
The total number of messages in the campaign
Sent SMS
The number of successfully sent messages
Sent Parts
The number of SMS parts sent
Wait SMS
The number of messages currently in the waiting queue
Blocked SMS
The number of messages that were blocked
Groups
The contact databases included in the campaign
Excluded groups
The contact databases excluded from the campaign
Count of numbers
The total number of recipients
Send Time
The date and time the campaign was sent
Step
The current status of the campaign
This page gives you a full picture of every campaign — from how many messages were sent to how many are still waiting or got blocked.
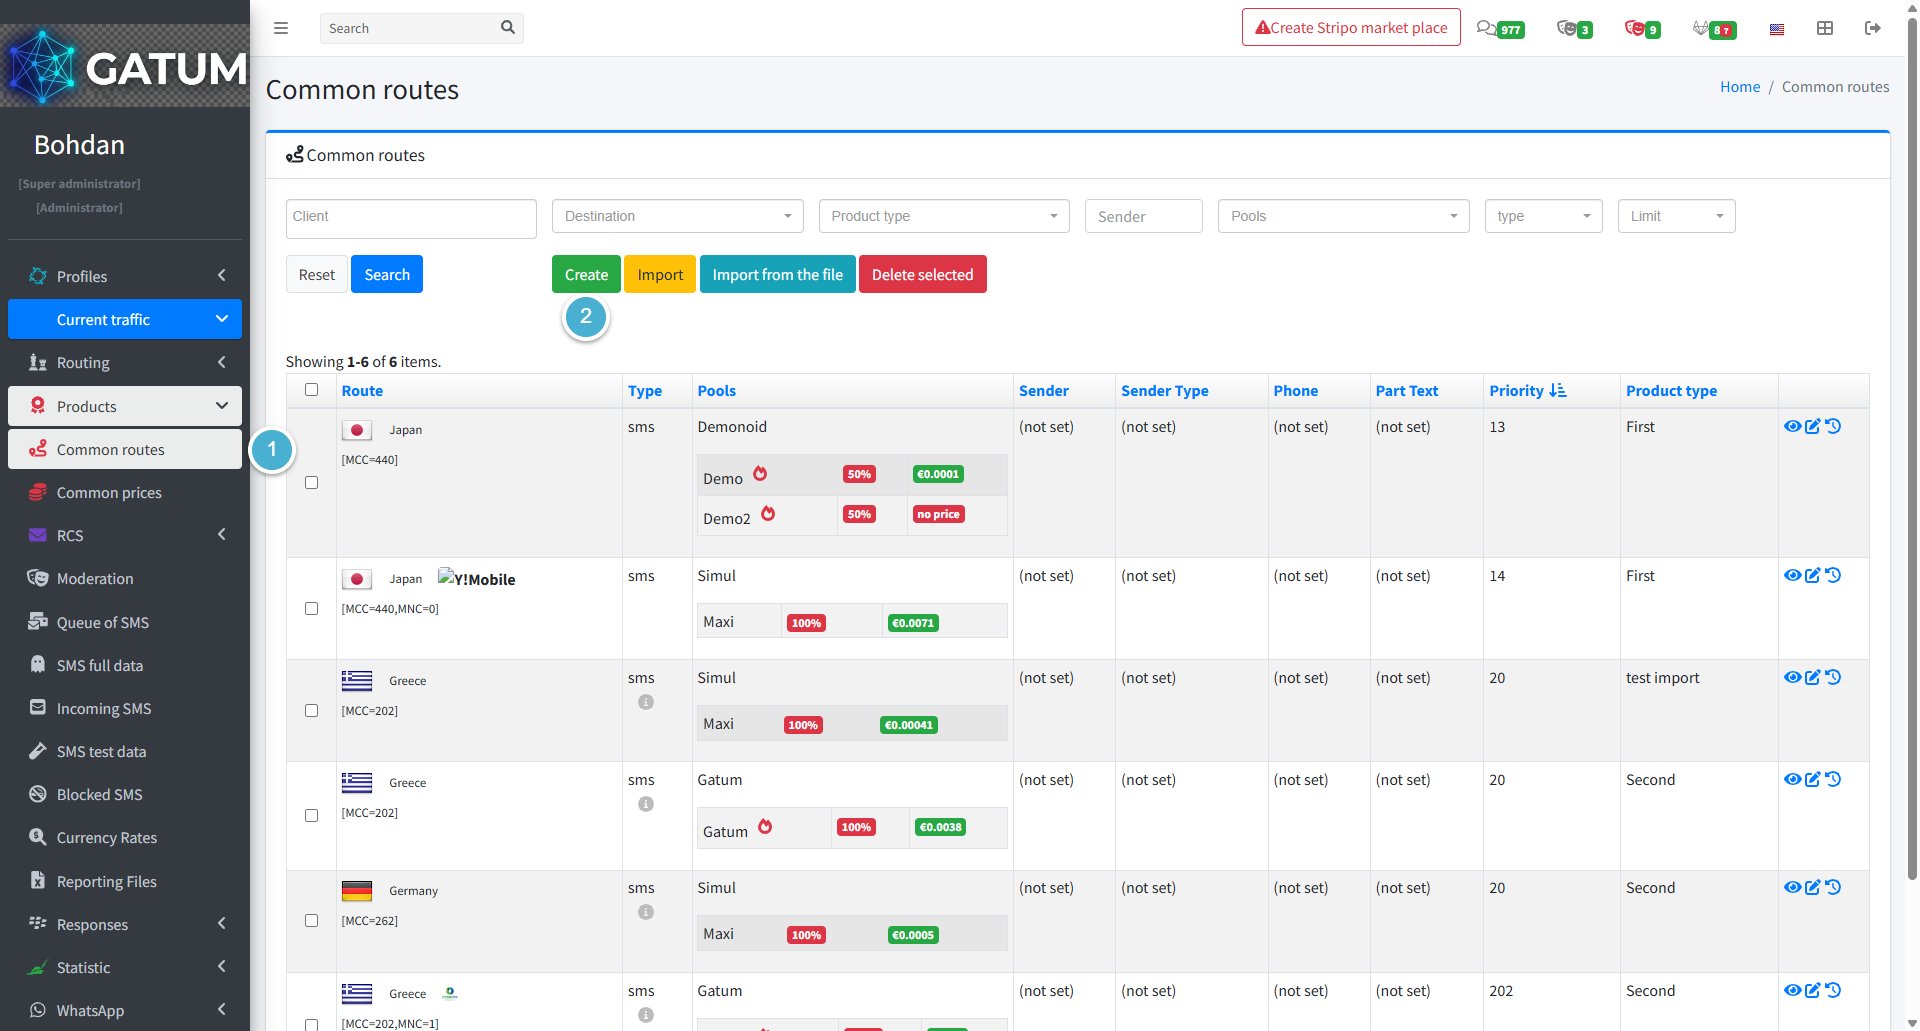
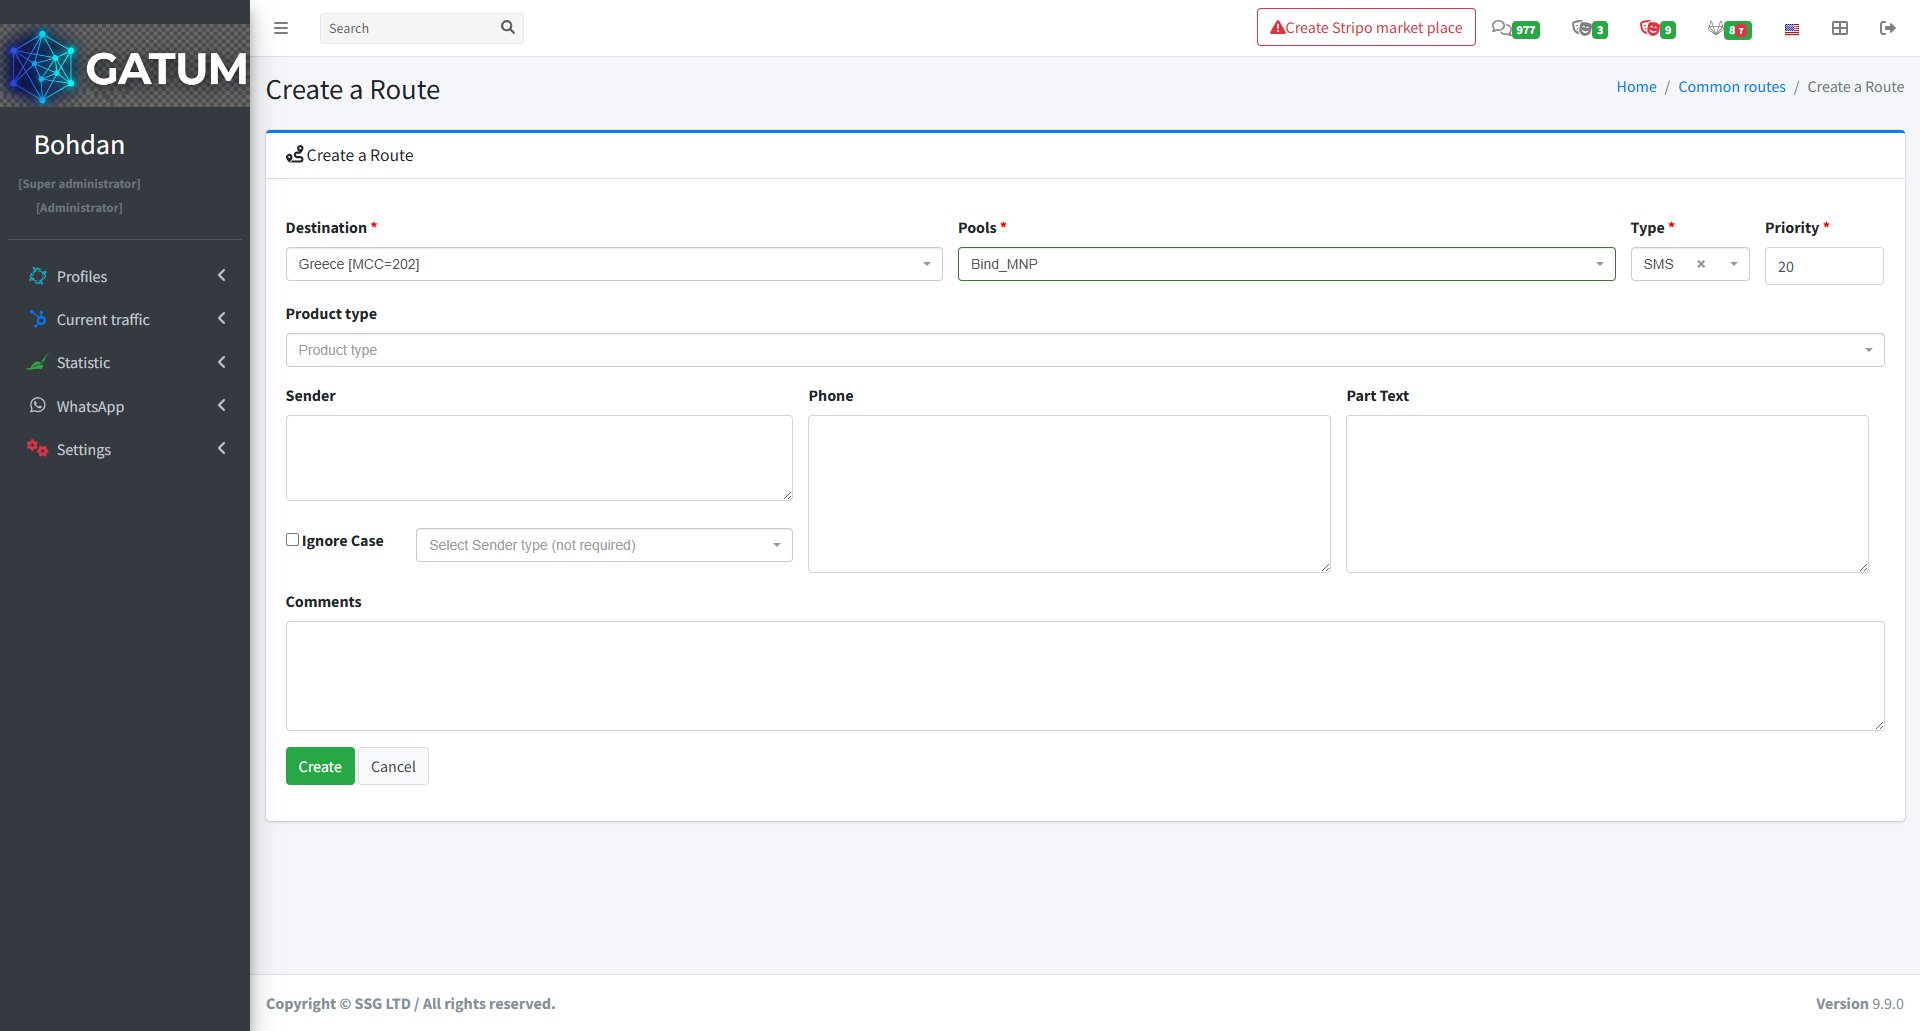
How to Add a Route to a Product?
Products in Gatum are presets that let you manage routing and pricing for multiple clients at once. Adding a route to a product means all clients on that product will automatically use it for sending traffic.
Go to Current Traffic → Products → Common Routes.
Click Create:
In the window that opens:
Fill in the fields:
Field
Description
Destination
The country or network this route applies to
Pools
The pool that distributes traffic between aggregators
Type
Message type for this route (e.g. SMS)
Priority
Order in which routes are used — lower number means higher priority
Product type (optional)
The product this route will be assigned to
Sender (optional)
Restrict this route to a specific sender name
Phone (optional)
Restrict this route to a specific phone number
Part Text (optional)
Restrict this route by message content
Ignore Case (optional)
Ignore case when matching the sender or text
Sender type (optional)
Restrict this route to a specific sender type
Comments (optional)
Internal notes for this route
ⓘ
A route with priority 20 will be used before one with priority 100. Use this to control which route gets traffic first when multiple routes match the same destination.
Click Create.
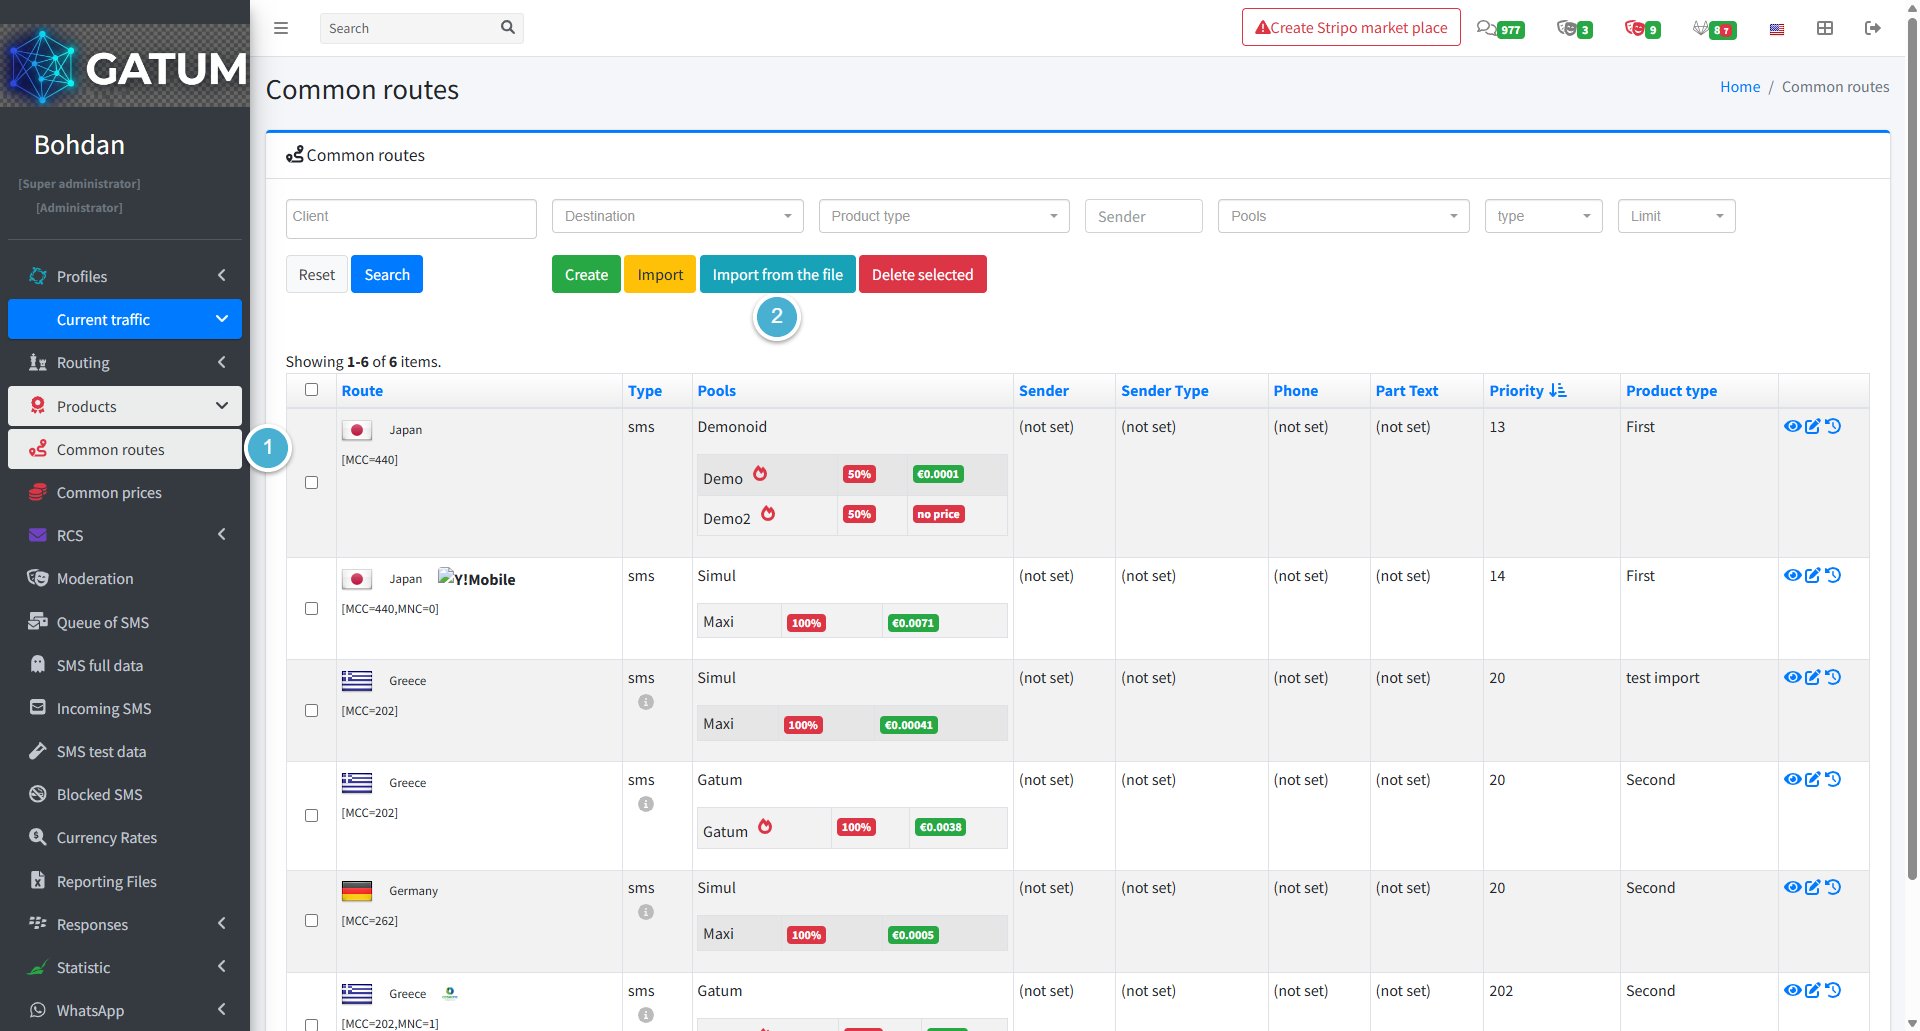
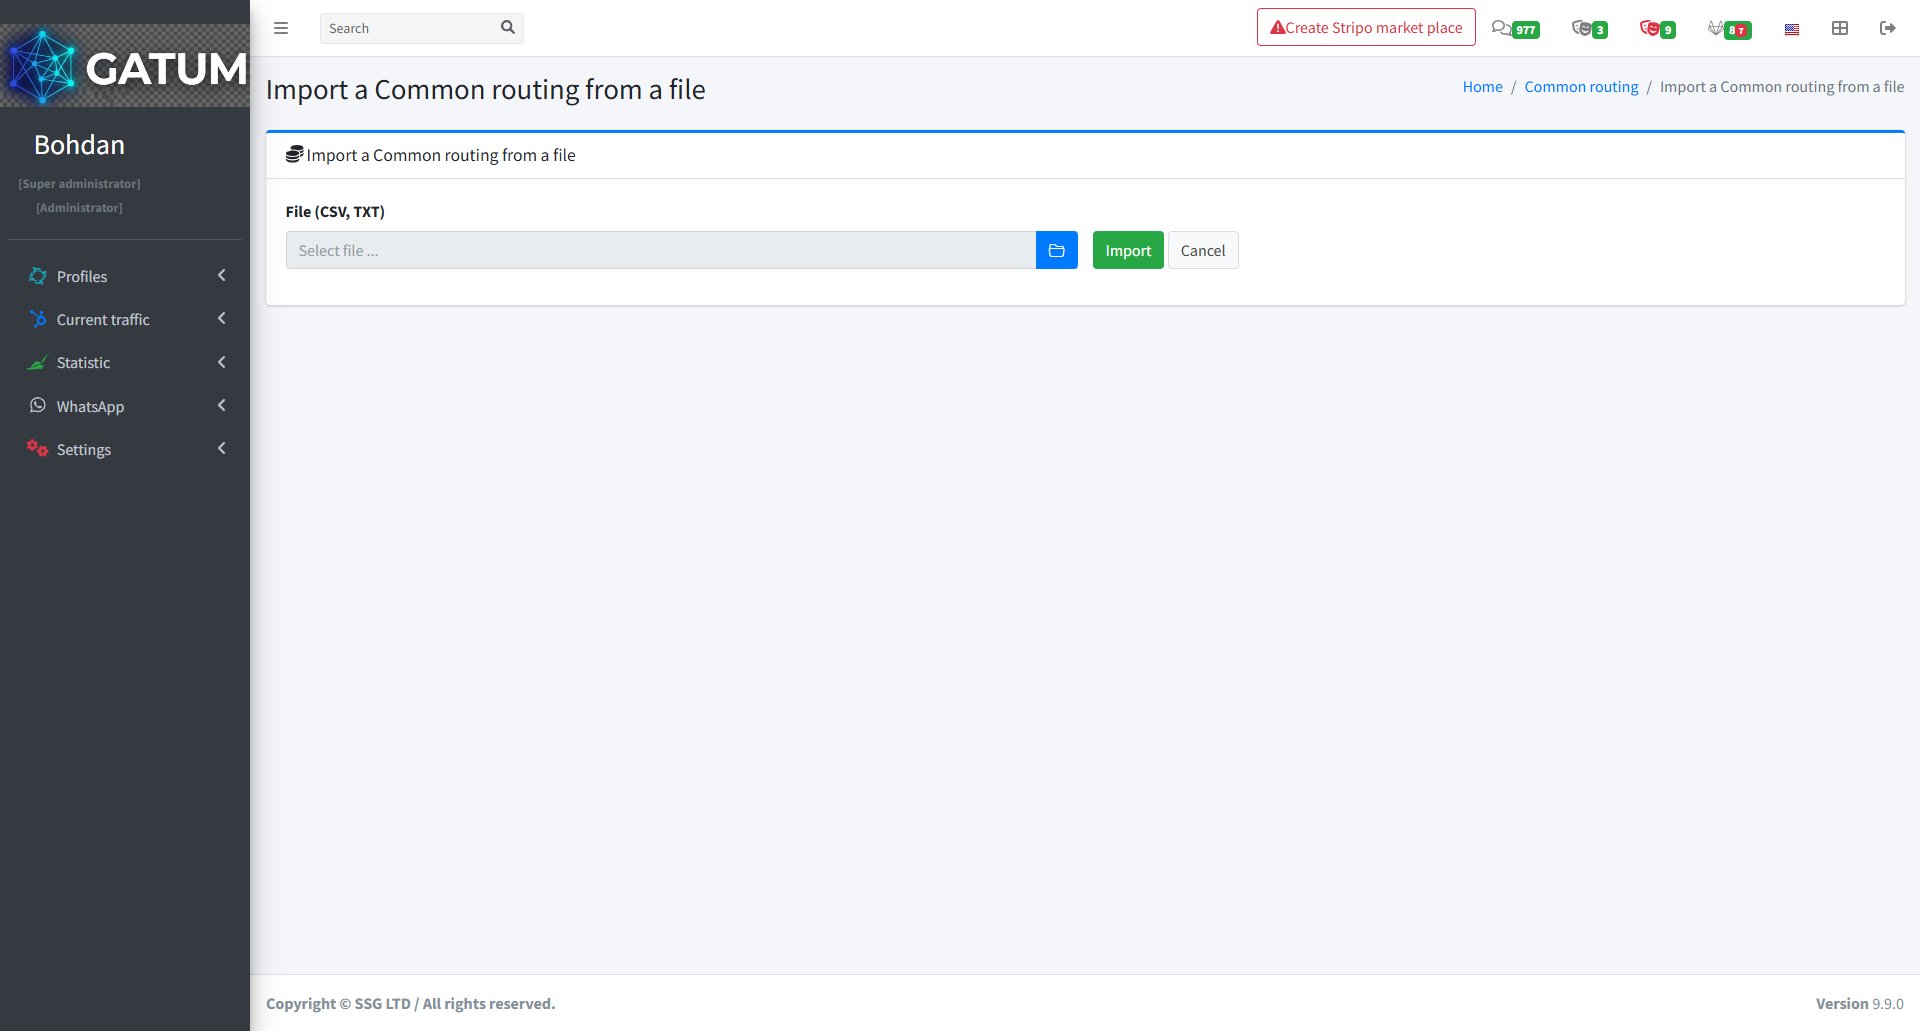
How to Import Routes from a File
If you have a large number of routes to add, you can upload them all at once using a CSV or TXT file.
Go to Current Traffic → Products → Common Routes.
Click Import from the file:
In the window that opens:
Click the folder icon to select your file, then click Import.
The route will appear in the Common Routes list and will apply to all clients assigned to the selected product.
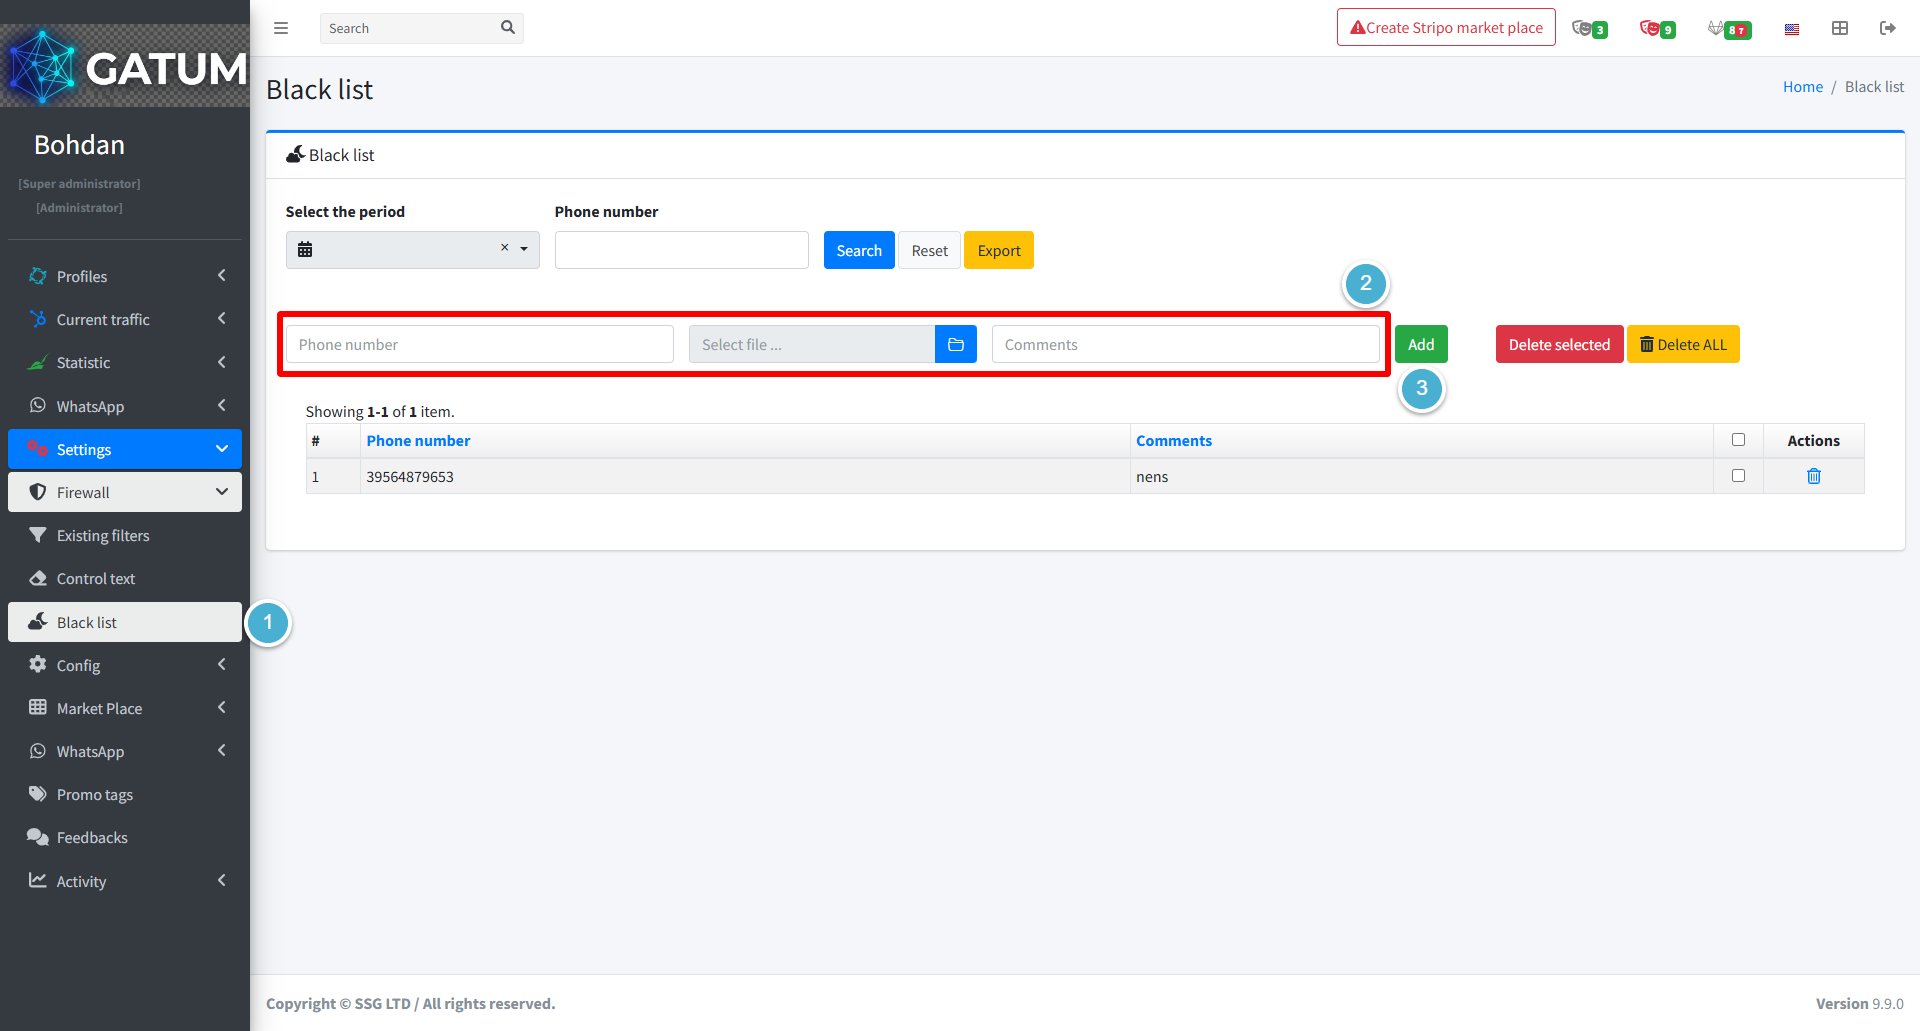
How to Add Numbers to the Blacklist?
The global blacklist blocks messages to specific phone numbers across all clients on the platform. Any message sent to a number on this list is blocked, regardless of which client submitted it.
Go to Settings → Firewall → Black list.
In the input bar, enter the phone number you want to block and optionally add a comment. To add multiple numbers at once, use the Select file button to upload a file containing the numbers.
ⓘ All phone numbers must be in international format (e.g. 4479111234567).
Click Add.
The number appears in the list immediately, and all future messages to it are blocked at the platform level.
Remove Numbers from the Blacklist
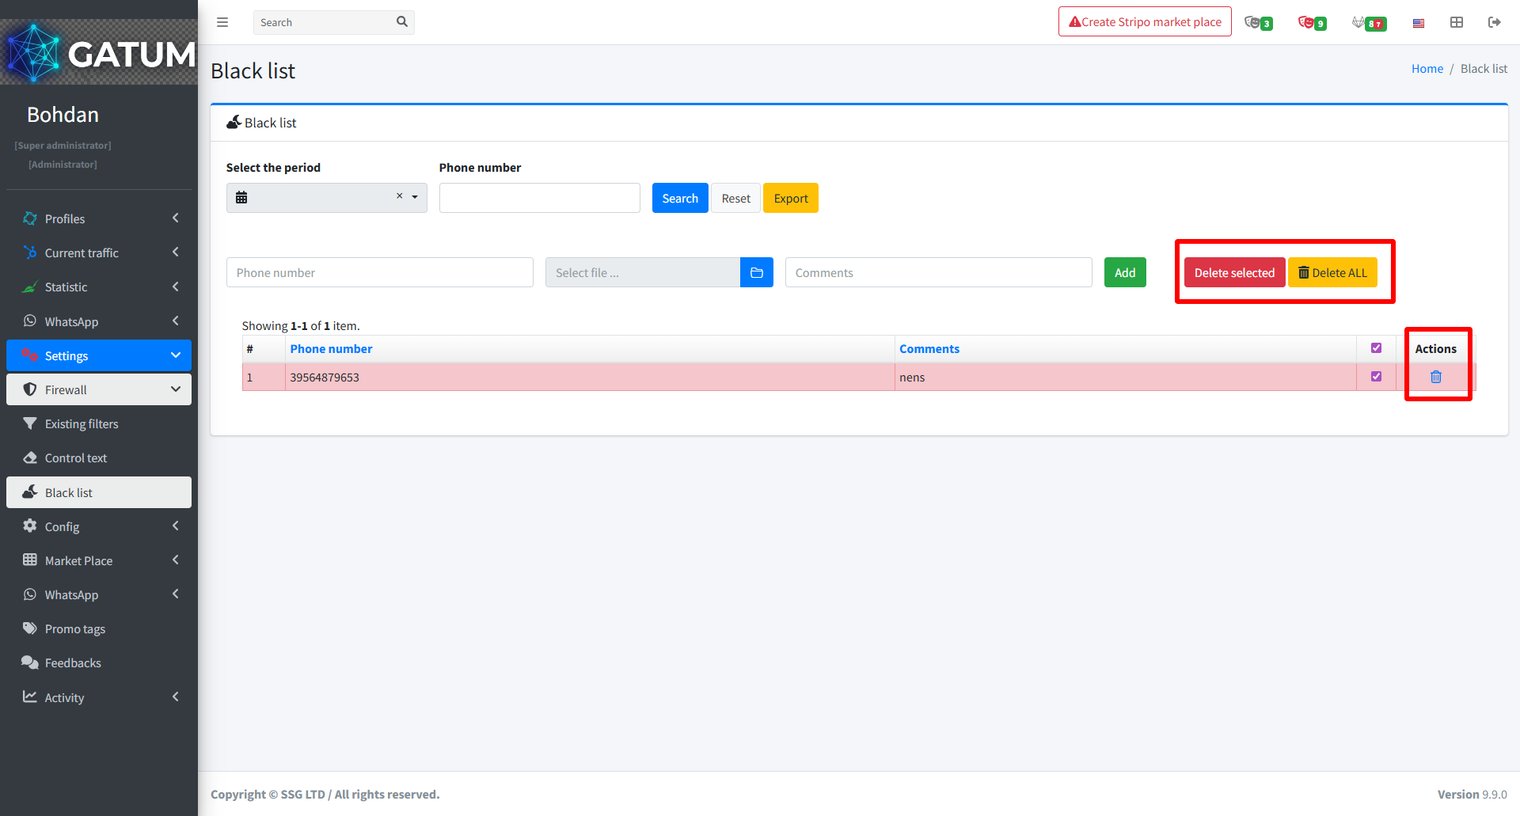
Go to Settings → Firewall → Black list.
Use the Phone number filter and Select the period at the top to find the entry you want to remove. Then either:
Check the box next to individual numbers and click Delete selected to remove only those entries.
Click Delete ALL to clear the entire blacklist at once.
How to Add Prices Manually?
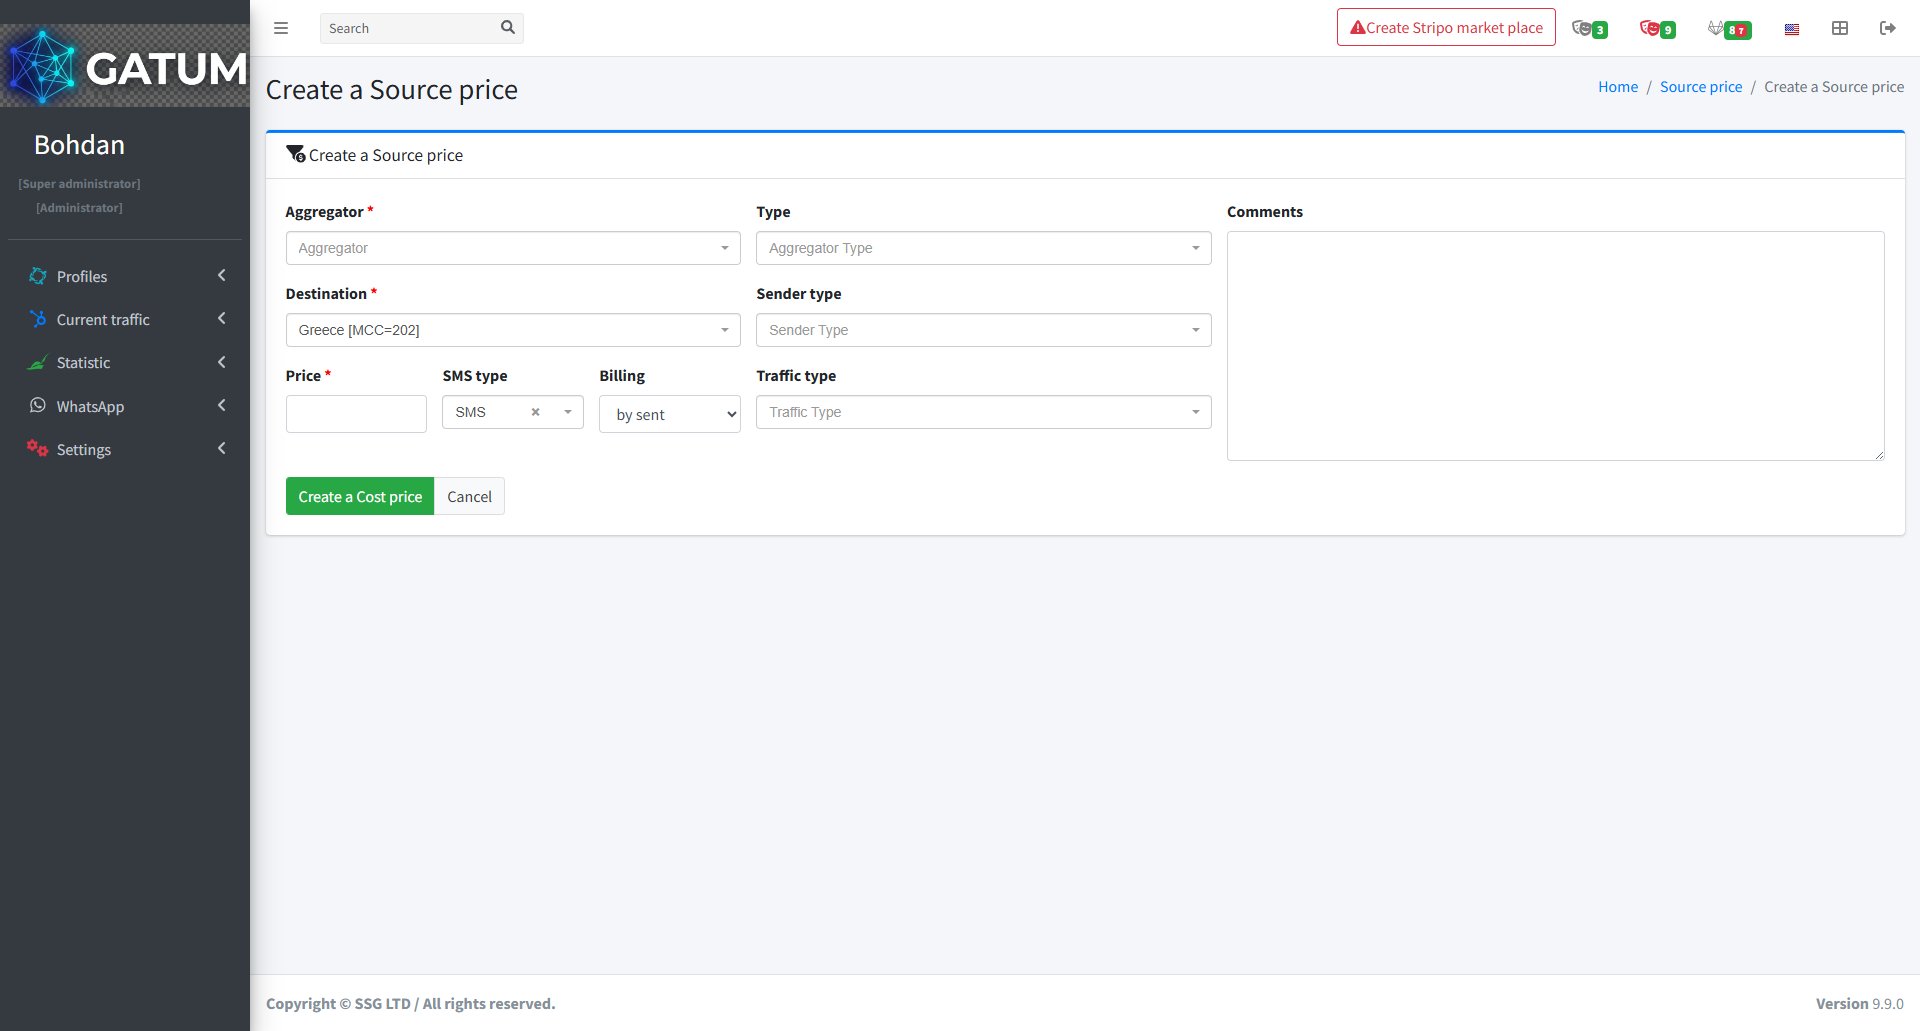
Source prices define what you pay an aggregator for delivering messages to a given destination. You can add them one at a time when you need to set or update a price for a specific country or network.
Create a Source Price
Go to Current traffic → Costs → Source prices.
Click Create a price.
In the window that opens:
Fill in the fields:
Field
Description
Aggregator
The aggregator this price applies to.
Type (optional)
The aggregator type to associate with this price.
Comments (optional)
Any notes about this price entry.
Destination
The country or network this price applies to.
Sender type (optional)
Restrict this price to a specific sender type.
Price
The cost per message in the aggregator's currency.
SMS type
The message type this price applies to. Defaults to SMS.
Billing
How costs are calculated: by sent charges per submitted message, by delivered charges only for delivered messages.
Traffic type (optional)
Restrict this price to a specific traffic type.
Click Create a Cost price.
The new price appears in the Source prices list and is immediately used for cost calculations on matching traffic. To update it later, use the edit icon in the price row, or schedule a future change using the clock icon.
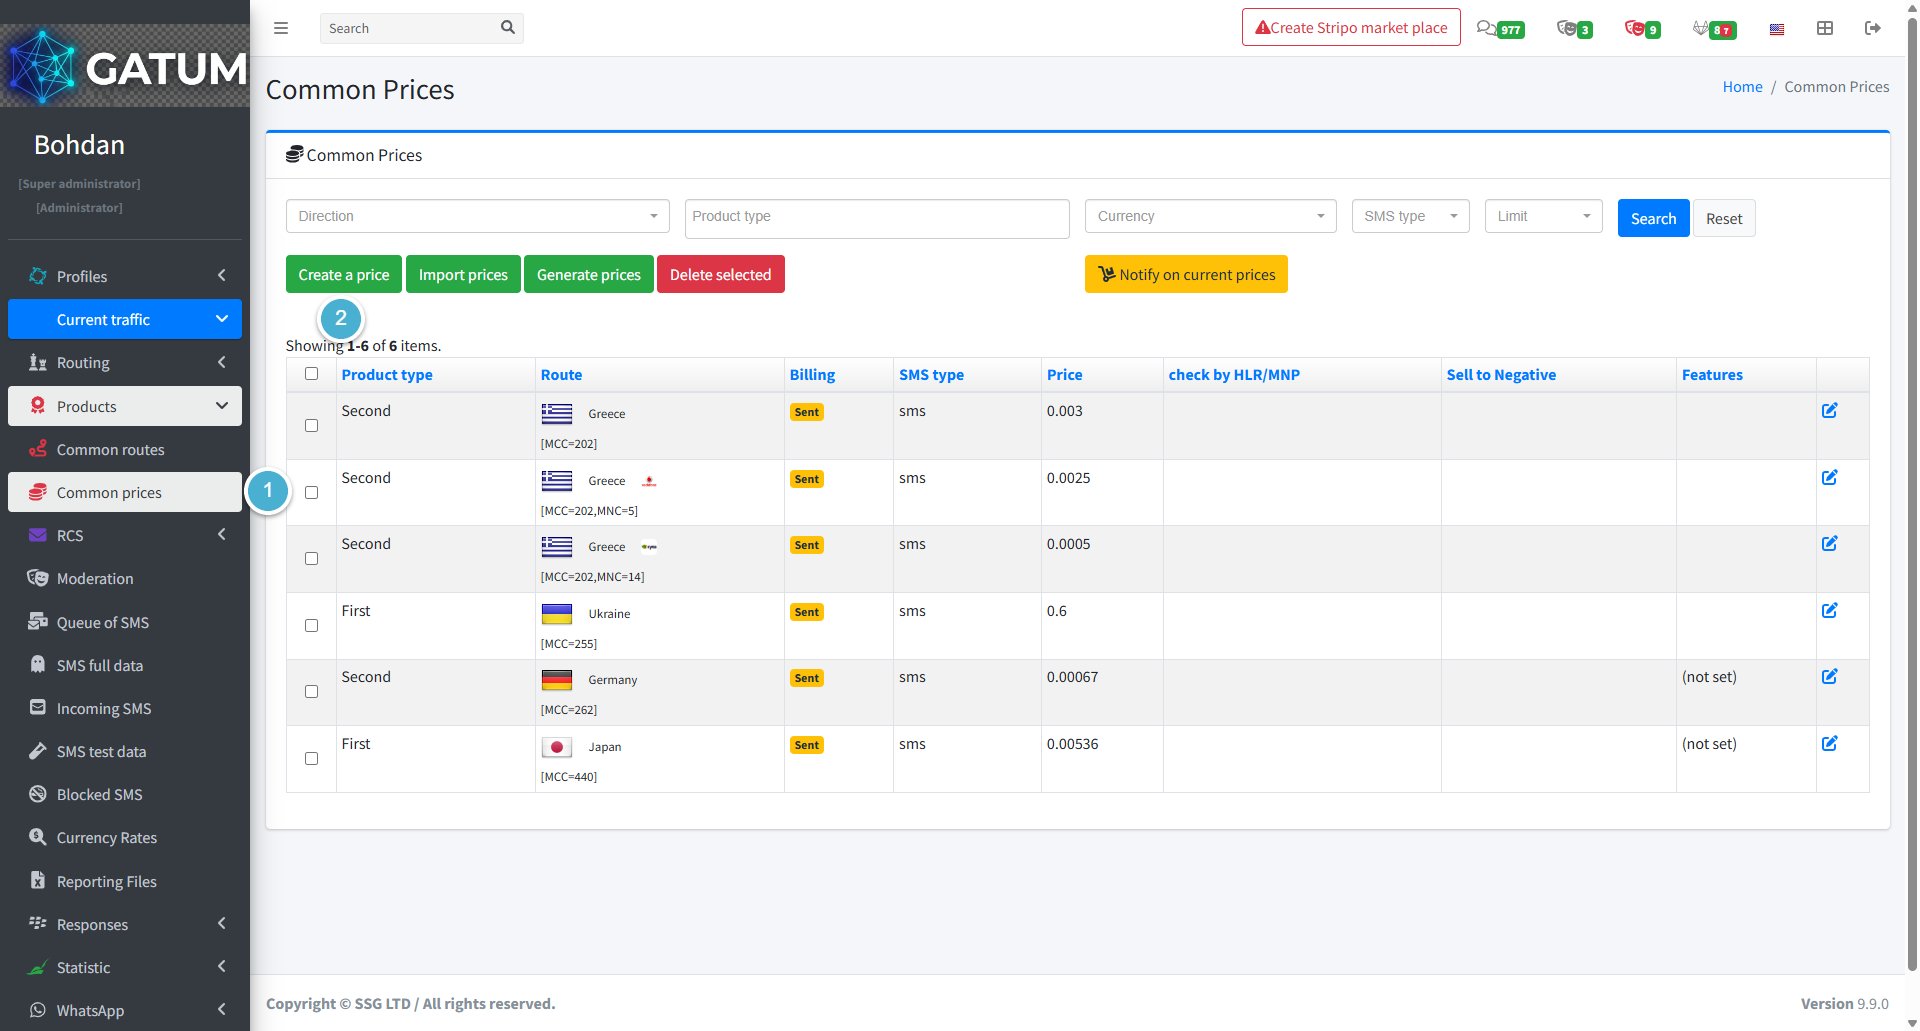
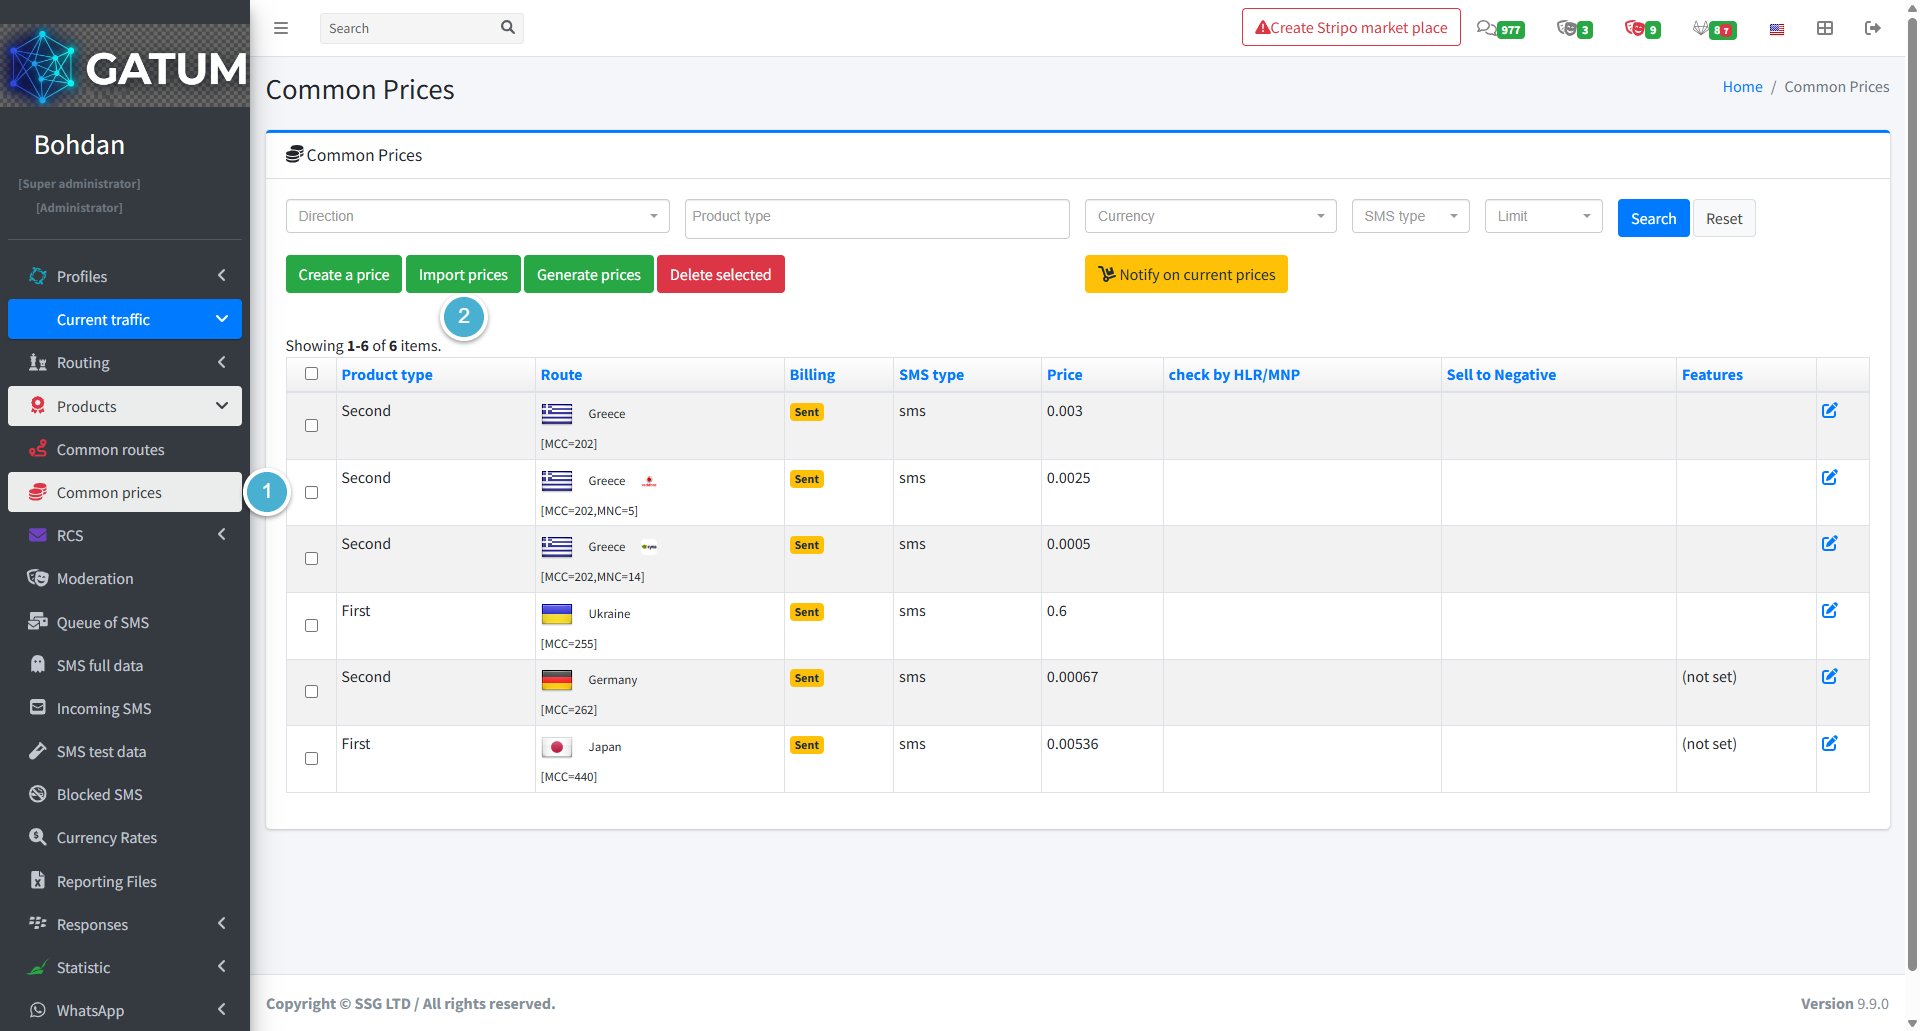
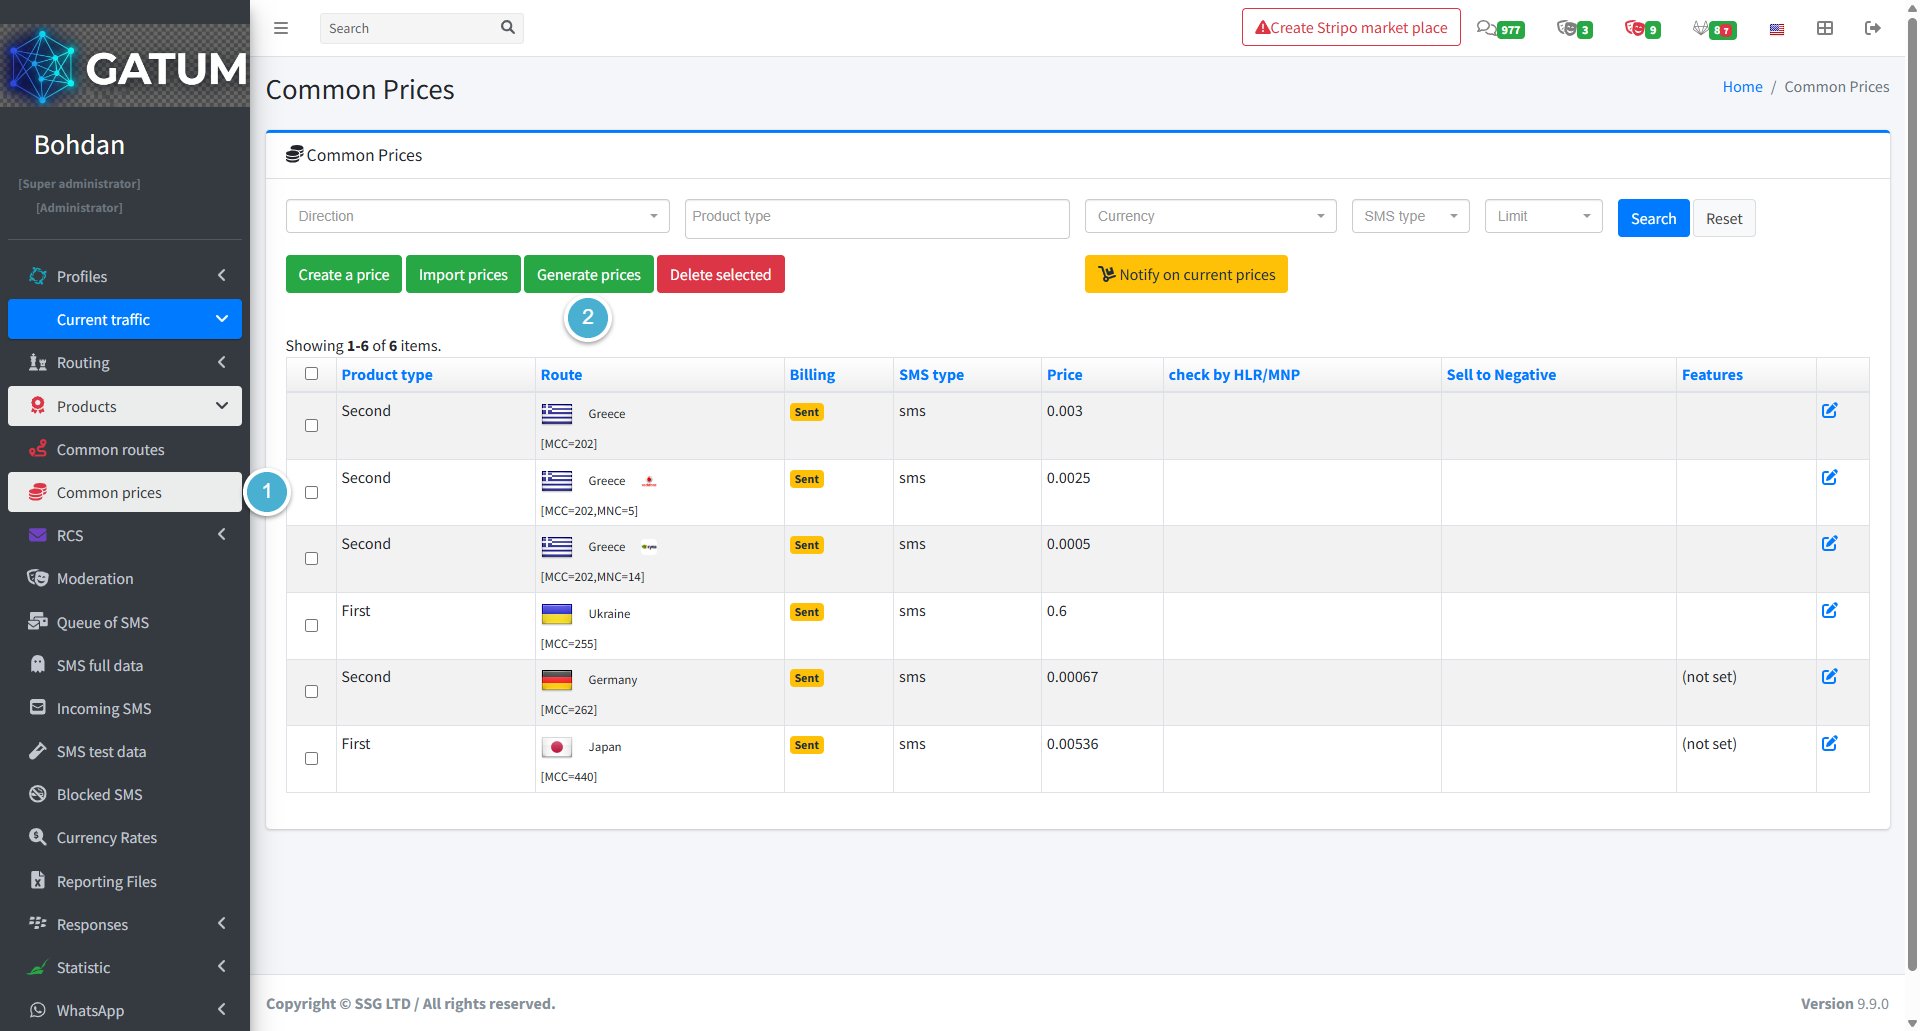
How to Add Prices to Products?
Common prices are prices set at the product level — they apply to all clients assigned to that product at once. There are three ways to add them: manually, by importing a file, or by generating prices based on your platform's existing costs with a markup.
How to Add a Price Manually
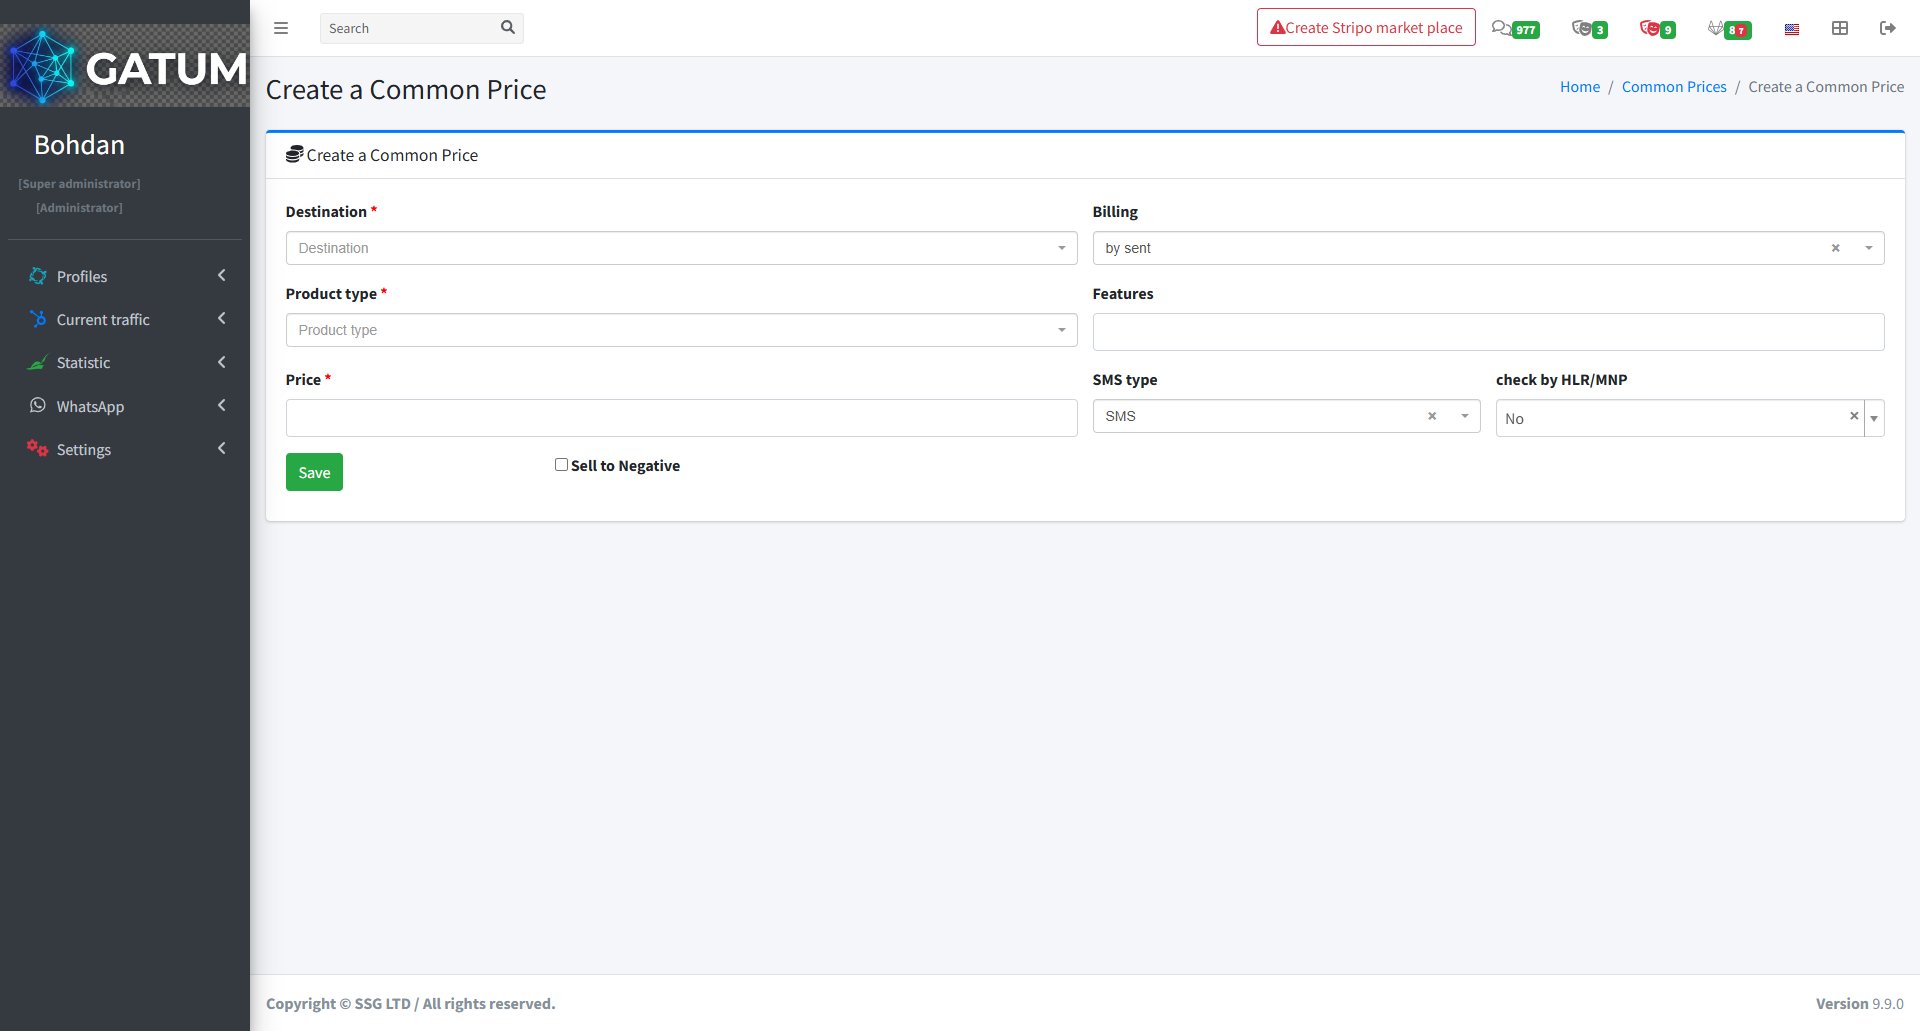
Go to Current Traffic → Products → Common Prices.
Click Create a price:
In the window that opens:
Fill in the fields:
Field
Description
Destination
The country or network this price applies to
Product type
The product this price will be assigned to
Price
Price per message
Billing (optional)
How messages are counted for billing (e.g. by sent)
Features (optional)
Additional routing features
SMS type (optional)
Message type (e.g. SMS)
Check by HLR/MNP (optional)
Whether to check the number before sending
Sell to Negative (optional)
Allow sending even if the client's balance is negative
Click Save.
The price will appear in the Common Prices list immediately.
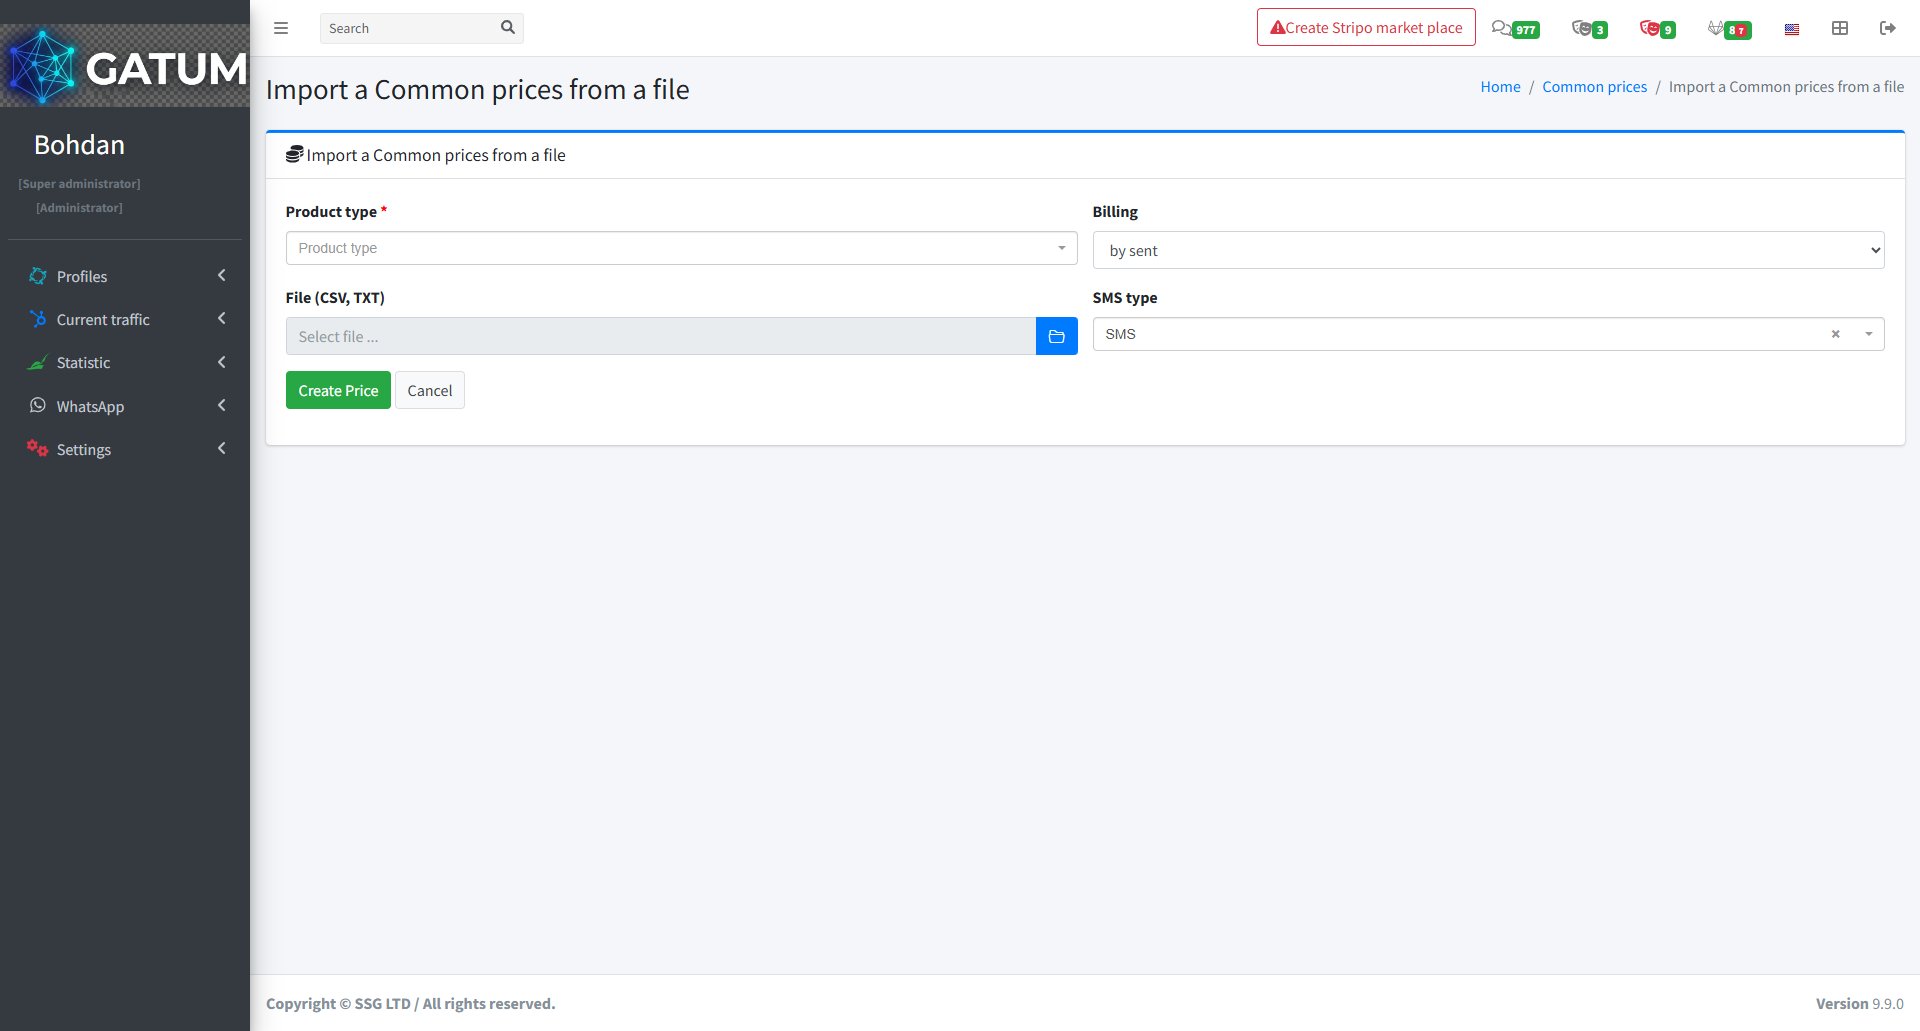
How to Import Prices from a File
Go to Current Traffic → Products → Common Prices.
Click Import prices:
In the window that opens:
Fill in the fields:
Field
Description
Product type
The product to assign the imported prices to
File (CSV, TXT)
Your file with prices
Billing (optional)
Billing type to apply to all imported prices
SMS type (optional)
Message type to apply to all imported prices
Click Create Price.
All prices from the file will appear in the list after the import is complete.
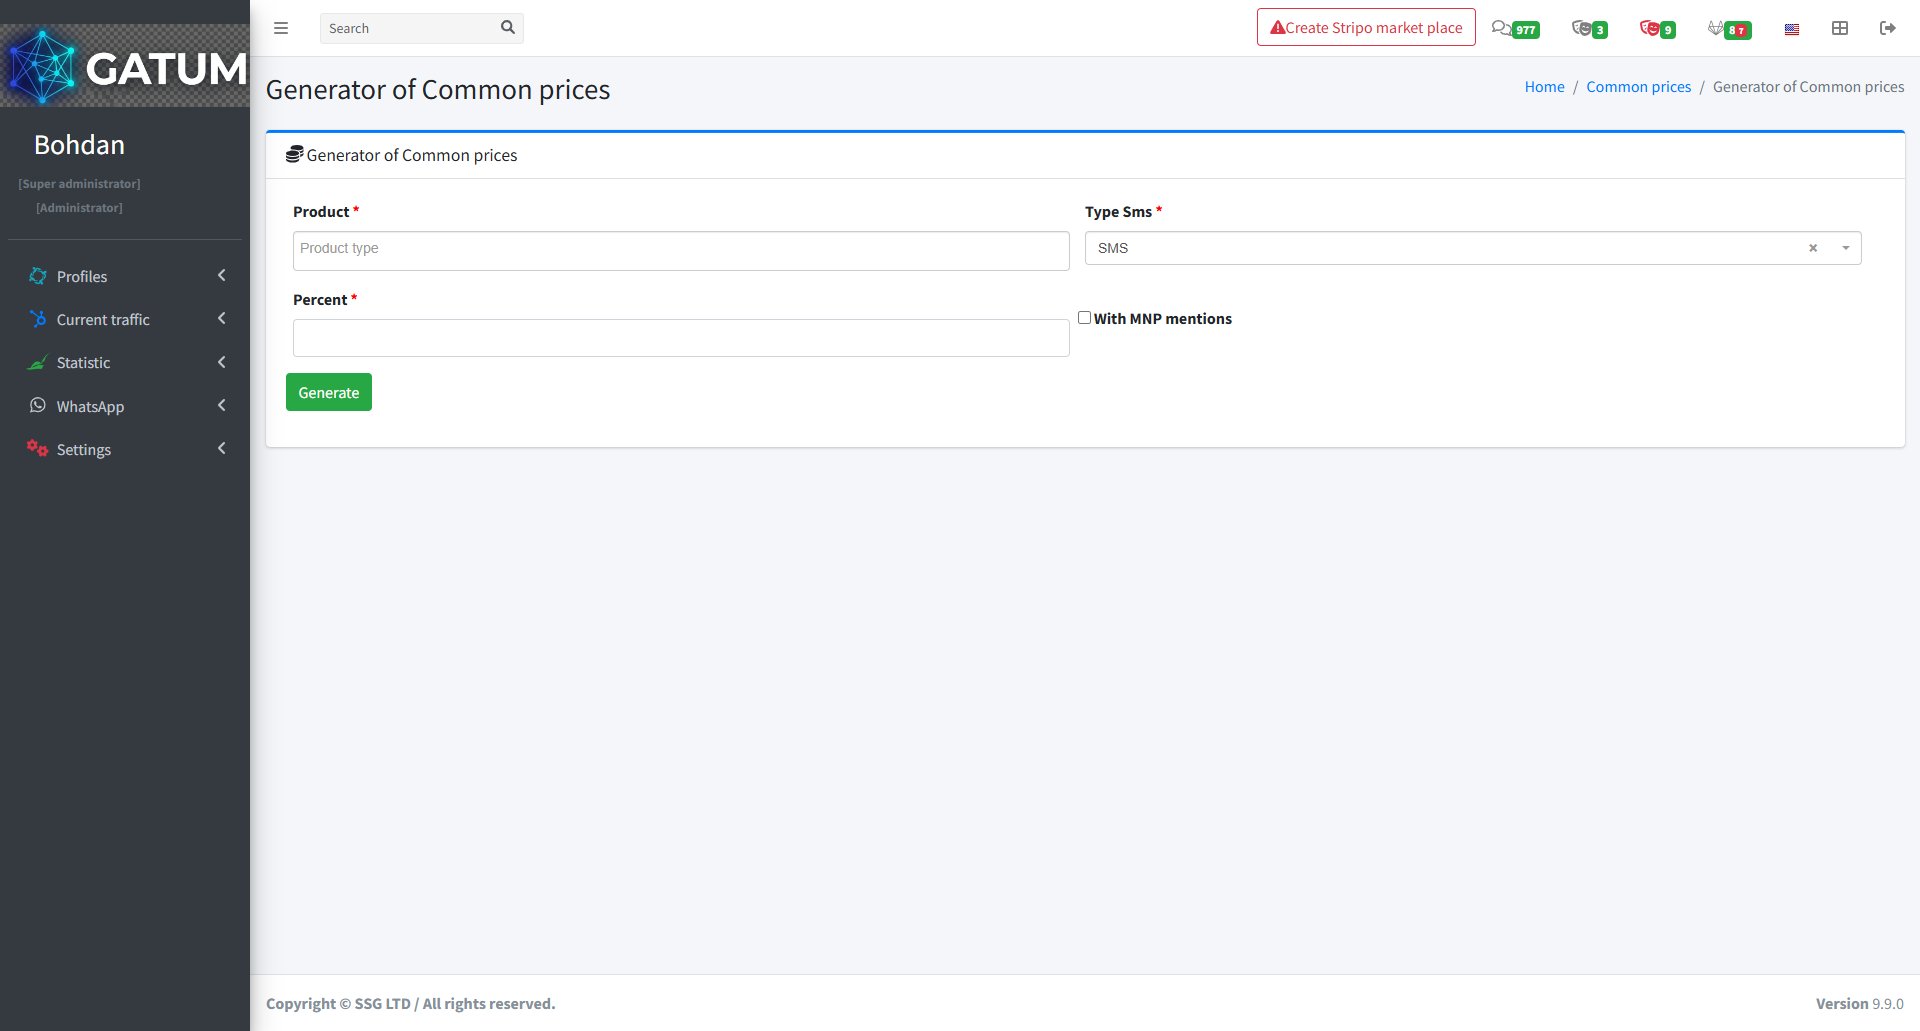
How to Generate Prices
Generate prices automatically based on the platform's existing costs, with a percentage markup added on top.
Go to Current Traffic → Products → Common Prices.
Click Generate prices:
In the window that opens:
Fill in the fields:
Field
Description
Product
The product to generate prices for
Type SMS
Message type to generate prices for
Percent
Markup percentage to add on top of the base cost
With MNP mentions (optional)
Include MNP-specific destinations in the generated prices
Click Generate.
The generated prices will appear in the Common Prices list and will apply to all clients on the selected product.
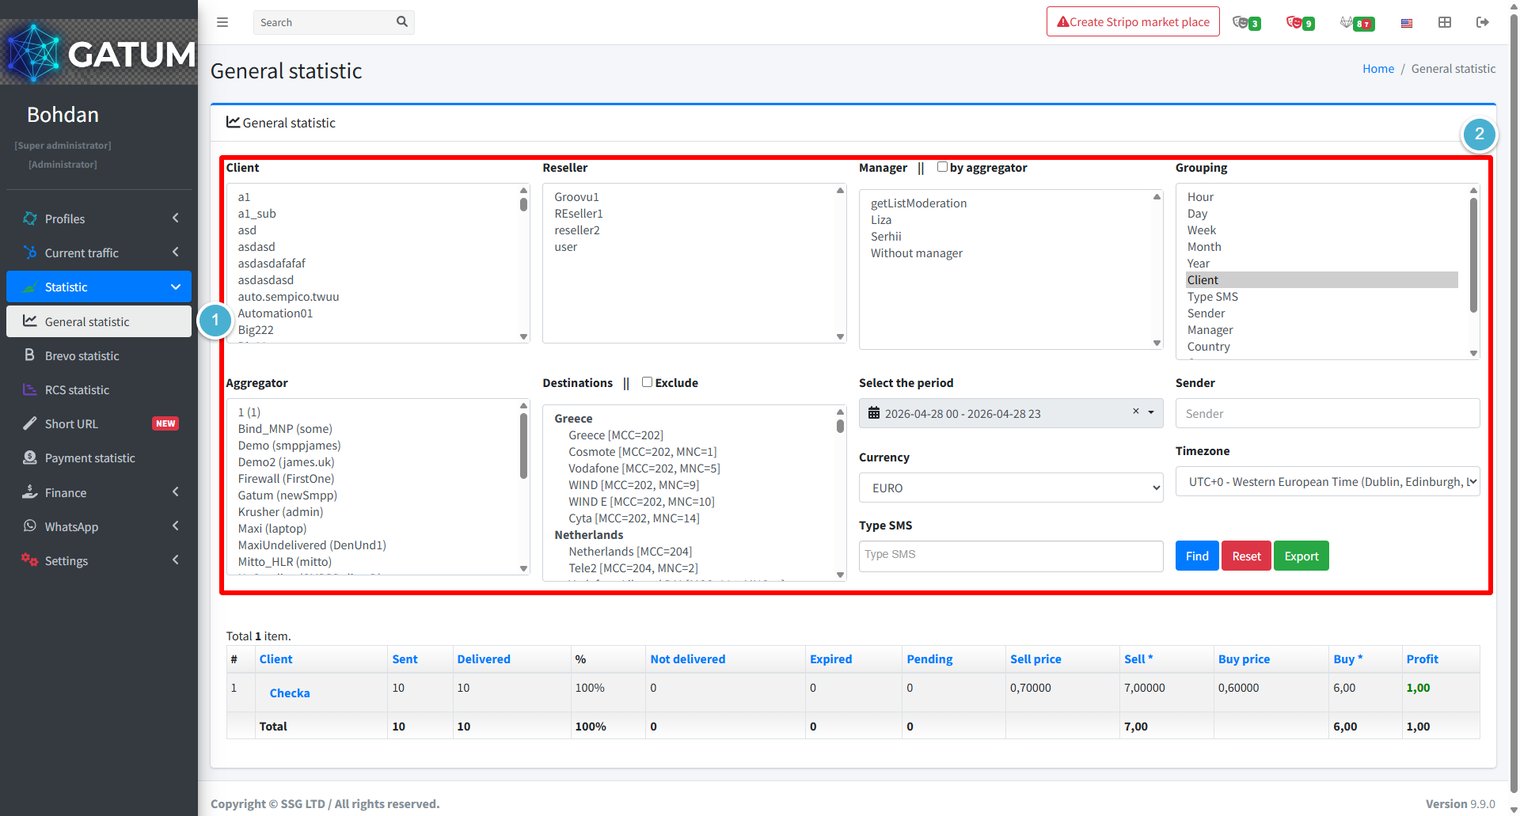
How to Analyze Platform Activity and View Statistics?
General statistic gives you a complete picture of traffic across the platform – sent and delivered volumes, delivery rates, revenue, costs, and profit – all filterable by client, aggregator, destination, time period, and more. All data is updated in real time, so messages sent seconds ago are already reflected in the results.
Go to Statistic → General statistic.
Use the filter panel to define exactly what data you want to see. You can combine any number of filters at once. Hold Ctrl (or Cmd on Mac) to select multiple values in list filters.
Filter
Description
Client
Filter by one or more clients.
Reseller
Filter by reseller.
Manager
Filter by manager. Check by aggregator to group by the aggregator's manager instead of the client's.
Grouping
How to aggregate the results: Hour, Day, Week, Month, Year, Client, Type SMS, Sender, Manager, or Country. You can select multiple groupings to combine them.
Aggregator
Filter by one or more aggregators.
Destinations
Filter by country or network. Check Exclude to show all traffic except the selected destinations.
Select the period
The date and time range to include.
Currency
The currency in which prices and profit are displayed.
Sender
Filter by sender name.
Timezone
The timezone used for time-based grouping.
Type SMS
Filter by message type.
Click Find to run the query. Results appear in the table below the filters with the following columns: Client, Sent, Delivered, %, Not delivered, Expired, Pending, Sell price, Sell (total revenue), Buy price, Buy (total cost), and Profit.
Click Reset to clear all filters and start over.
Click Export to download the current result set as a CSV file. The file reflects exactly the filters and grouping active at the time of export, so set up your filters first before exporting.
.
Image options
U
How to Apply for a New Sender ID?
A Sender ID is the name or number your recipients see when they receive your SMS. Before you can use a specific Sender ID, it needs to be approved by your Gatum manager.
Before You Start
The Sender ID feature is only available if your Gatum manager has enabled sender control for your account. If you don't see the Sender IDs section, contact your manager to activate it.
How to Submit a Request
Go to SMS → Sender IDs.
In the Sender ID field, enter the name you want to use:
ⓘ
Sub-accounts only control access to the web interface. They do not affect your API, REST API, or SMPP connections.
Click Create.
Your Sender ID will appear in the list below and await review from your manager.
Sender ID Statuses
Once submitted, your Sender ID will have one of the following statuses:
Status
What it means
Ordered
Your request has been submitted and is awaiting review
Approved
Your Sender ID has been approved and is ready to use
Declined
Your request was not approved
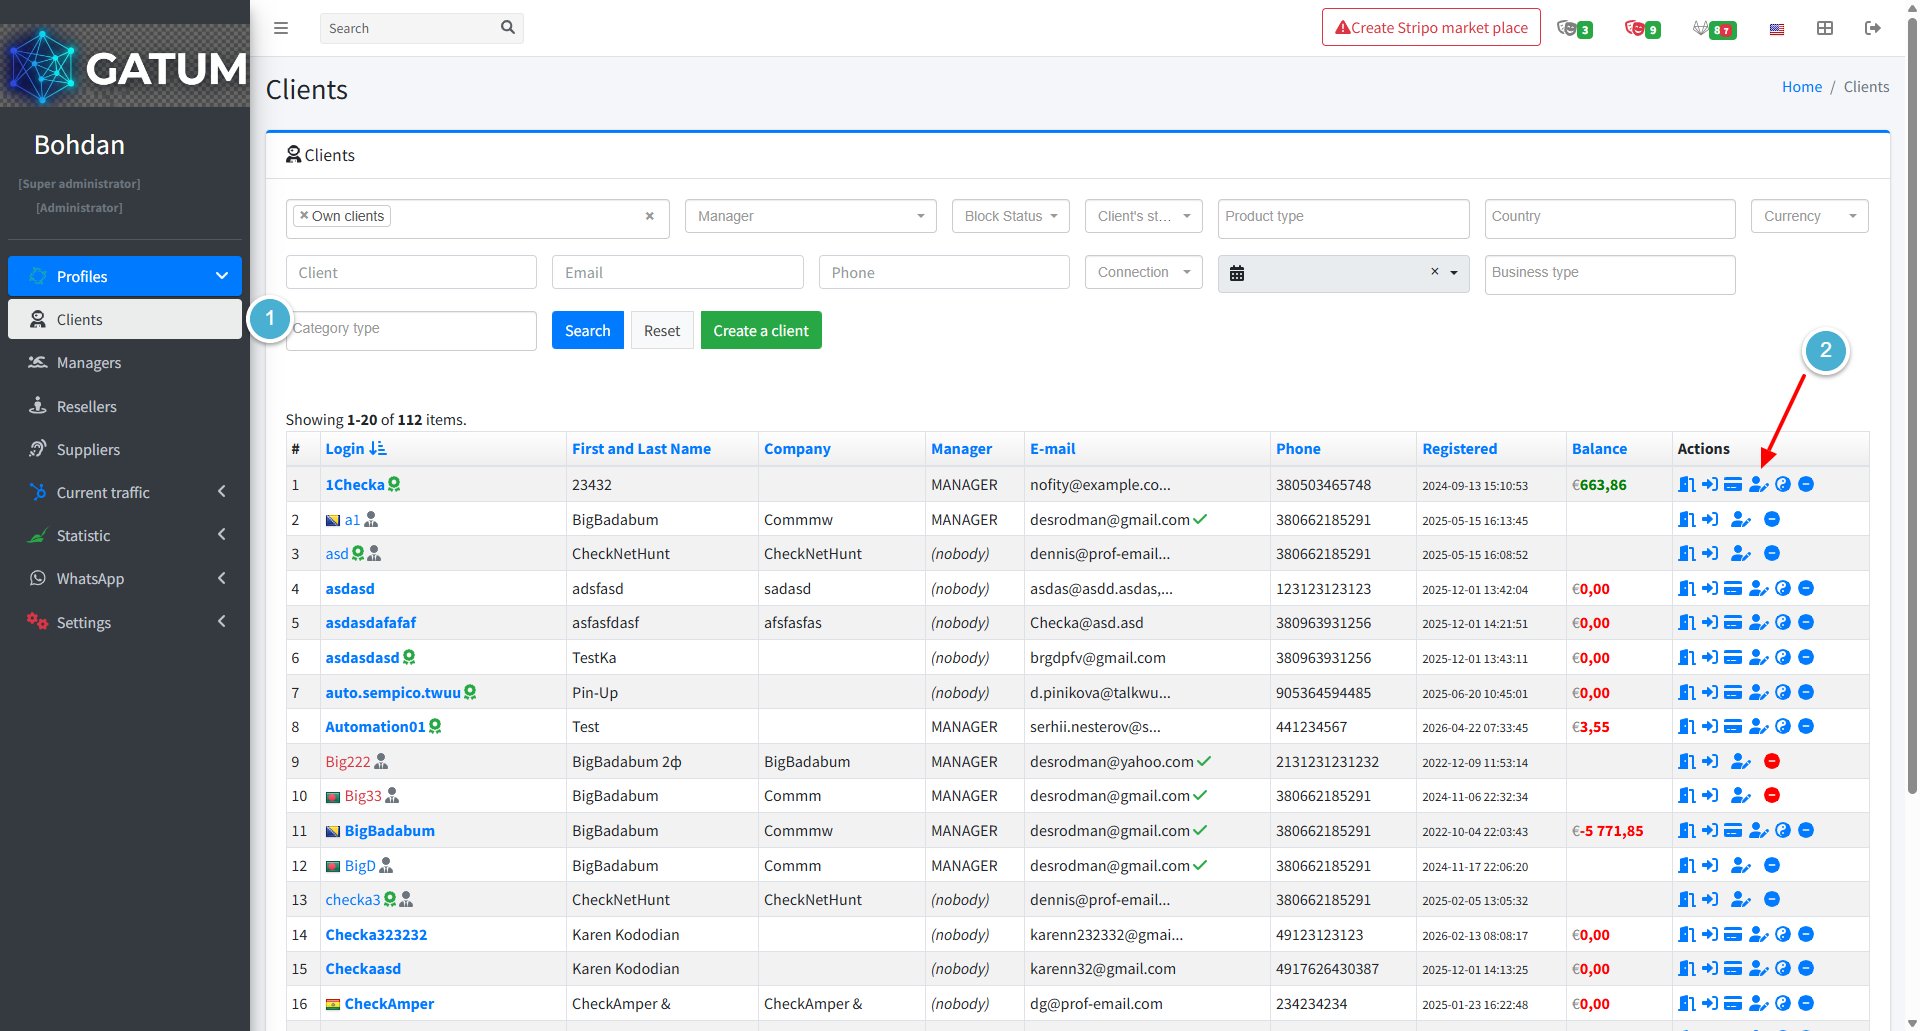
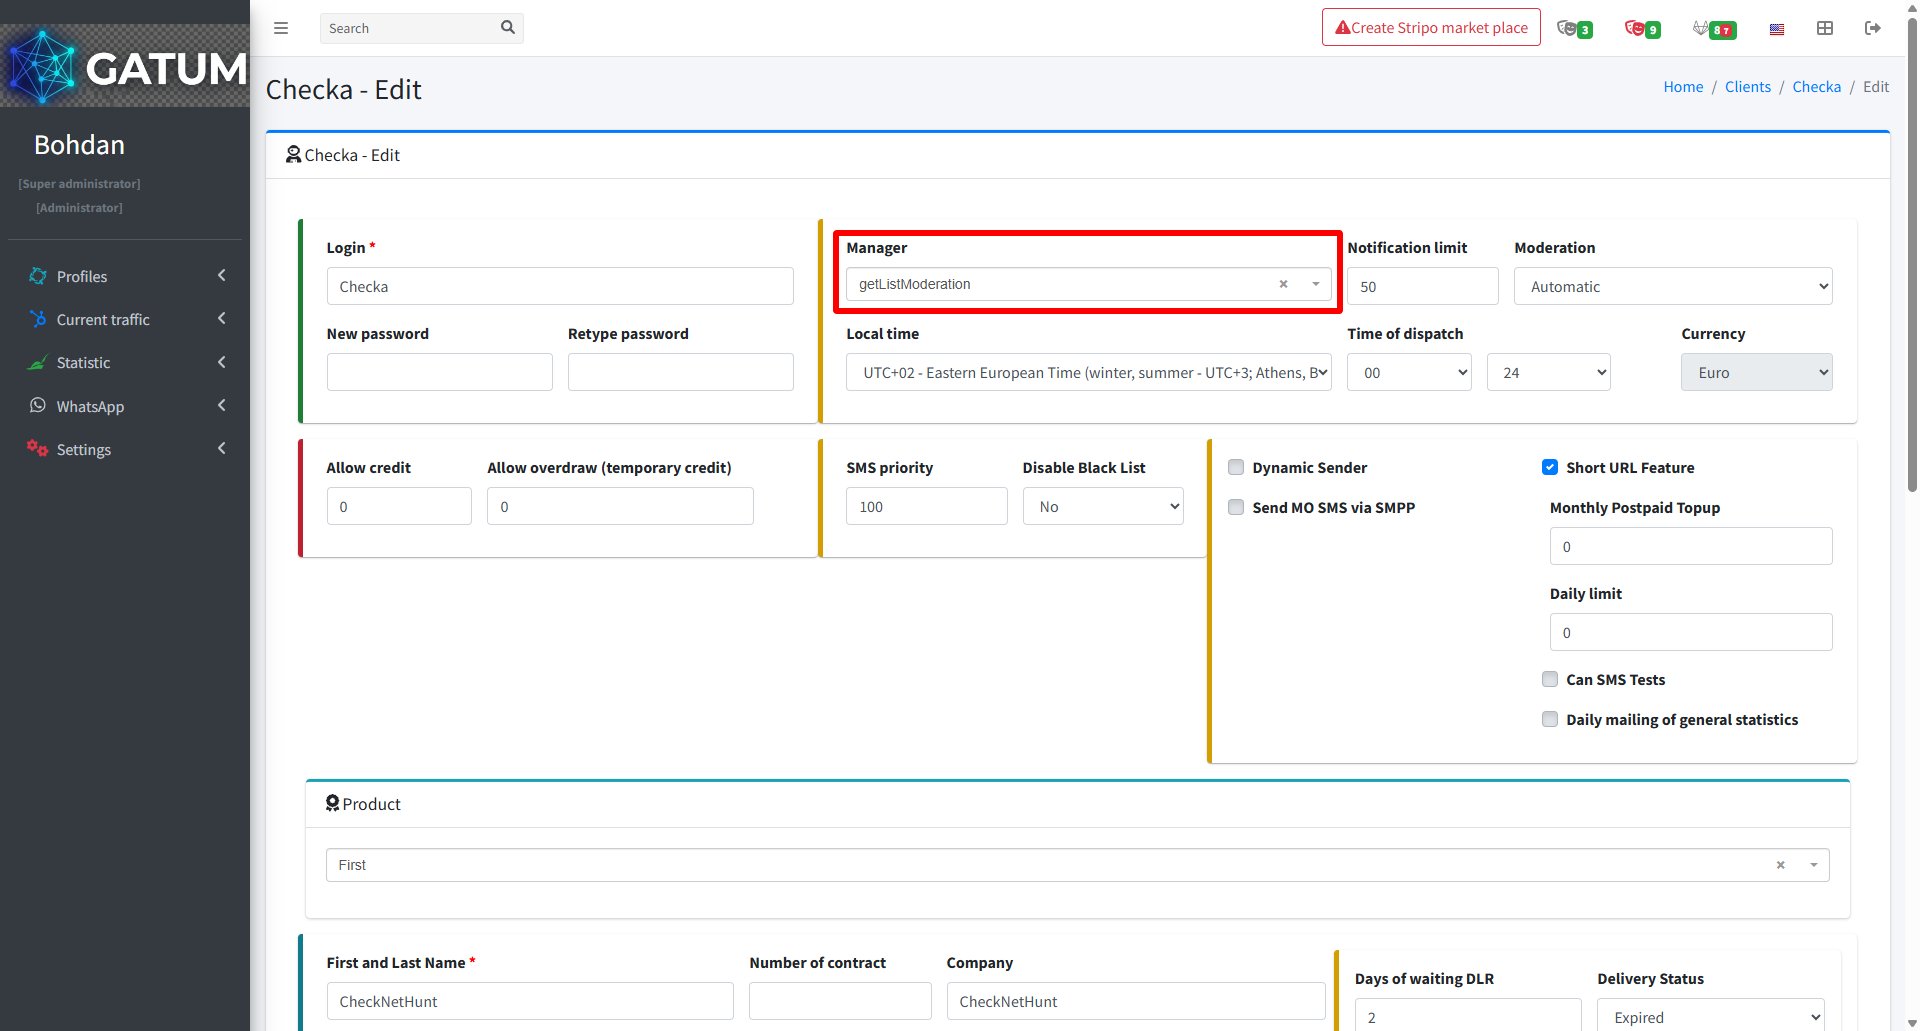
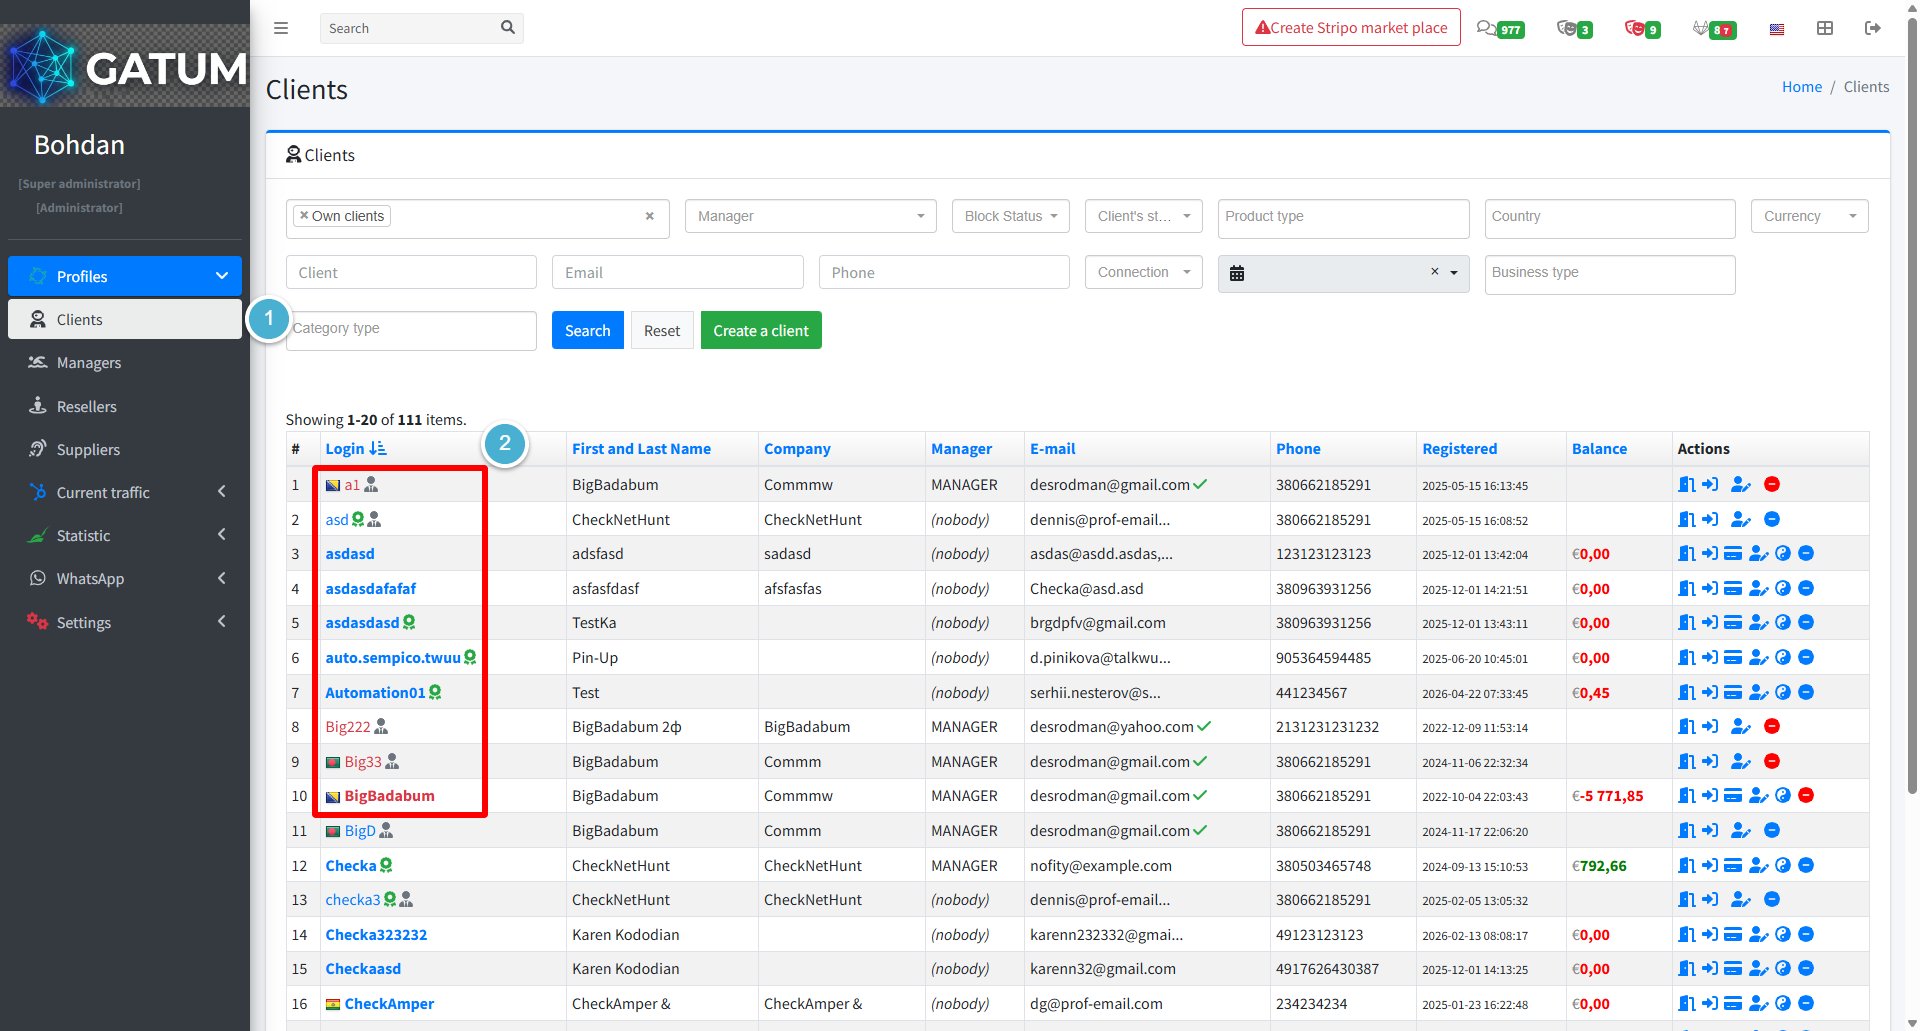
How to Assign a Manager to a Client?
Each client on the platform can have a manager assigned to them. The manager oversees the client's activity and is responsible for their account. A manager must be assigned before the client can send their own message text.
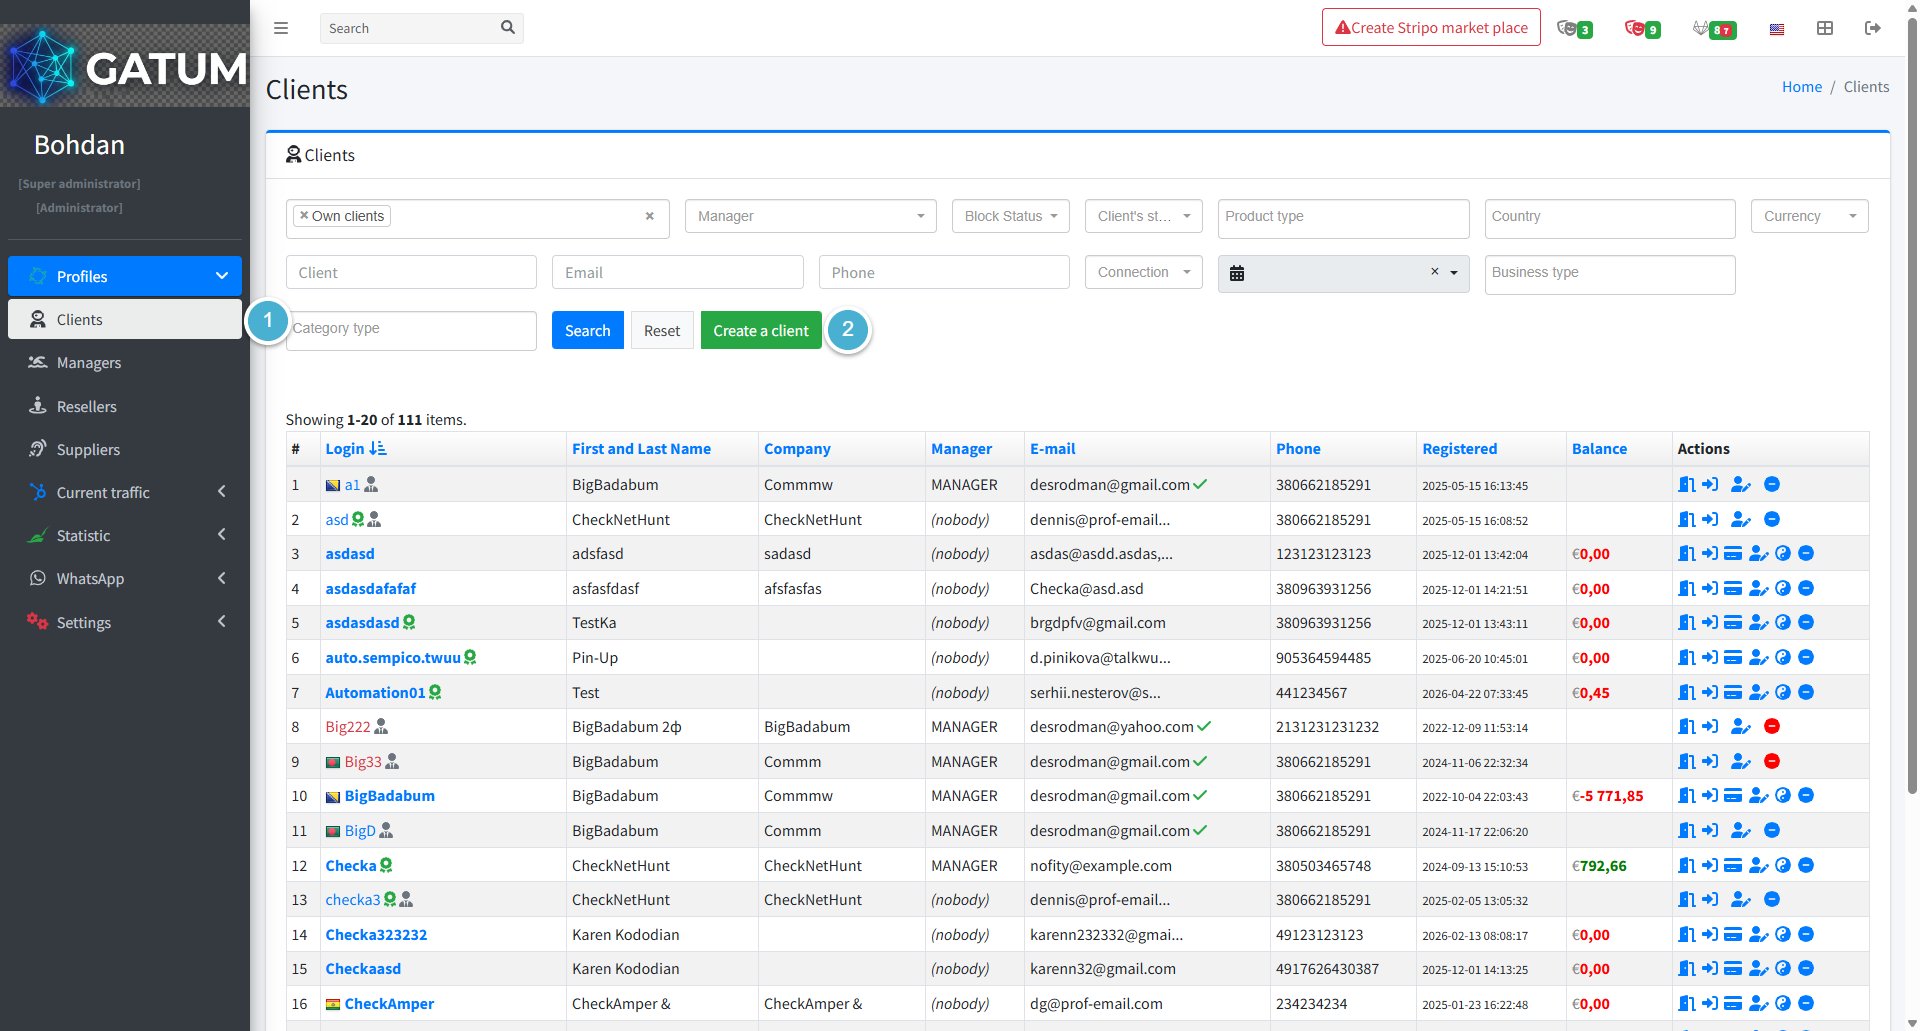
Go to Profiles → Clients.
In the Actions column, click the edit icon next to the client.
In the window that opens, find the Manager field and select the manager you want to assign from the dropdown.
Click Save.
Once a manager is assigned, the client will be able to send their own message text. Until then, this option is not available to them.
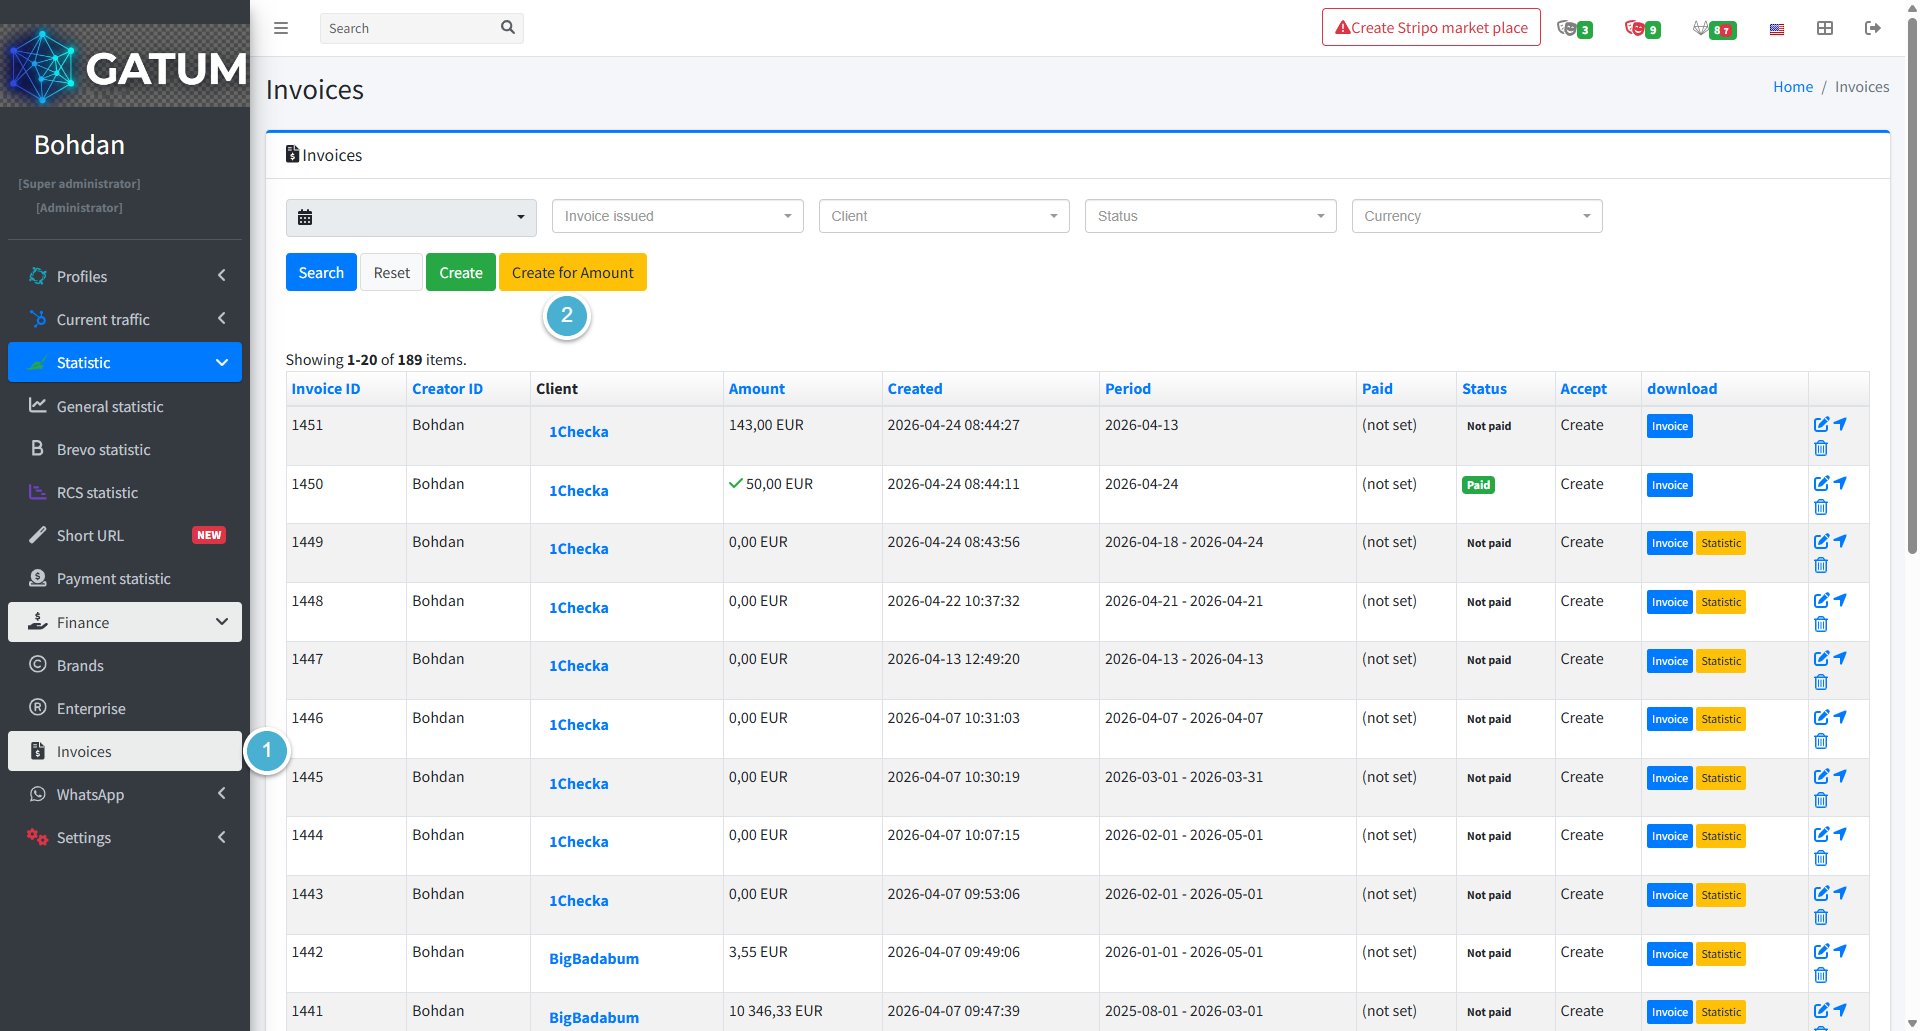
How to Bill Clients?
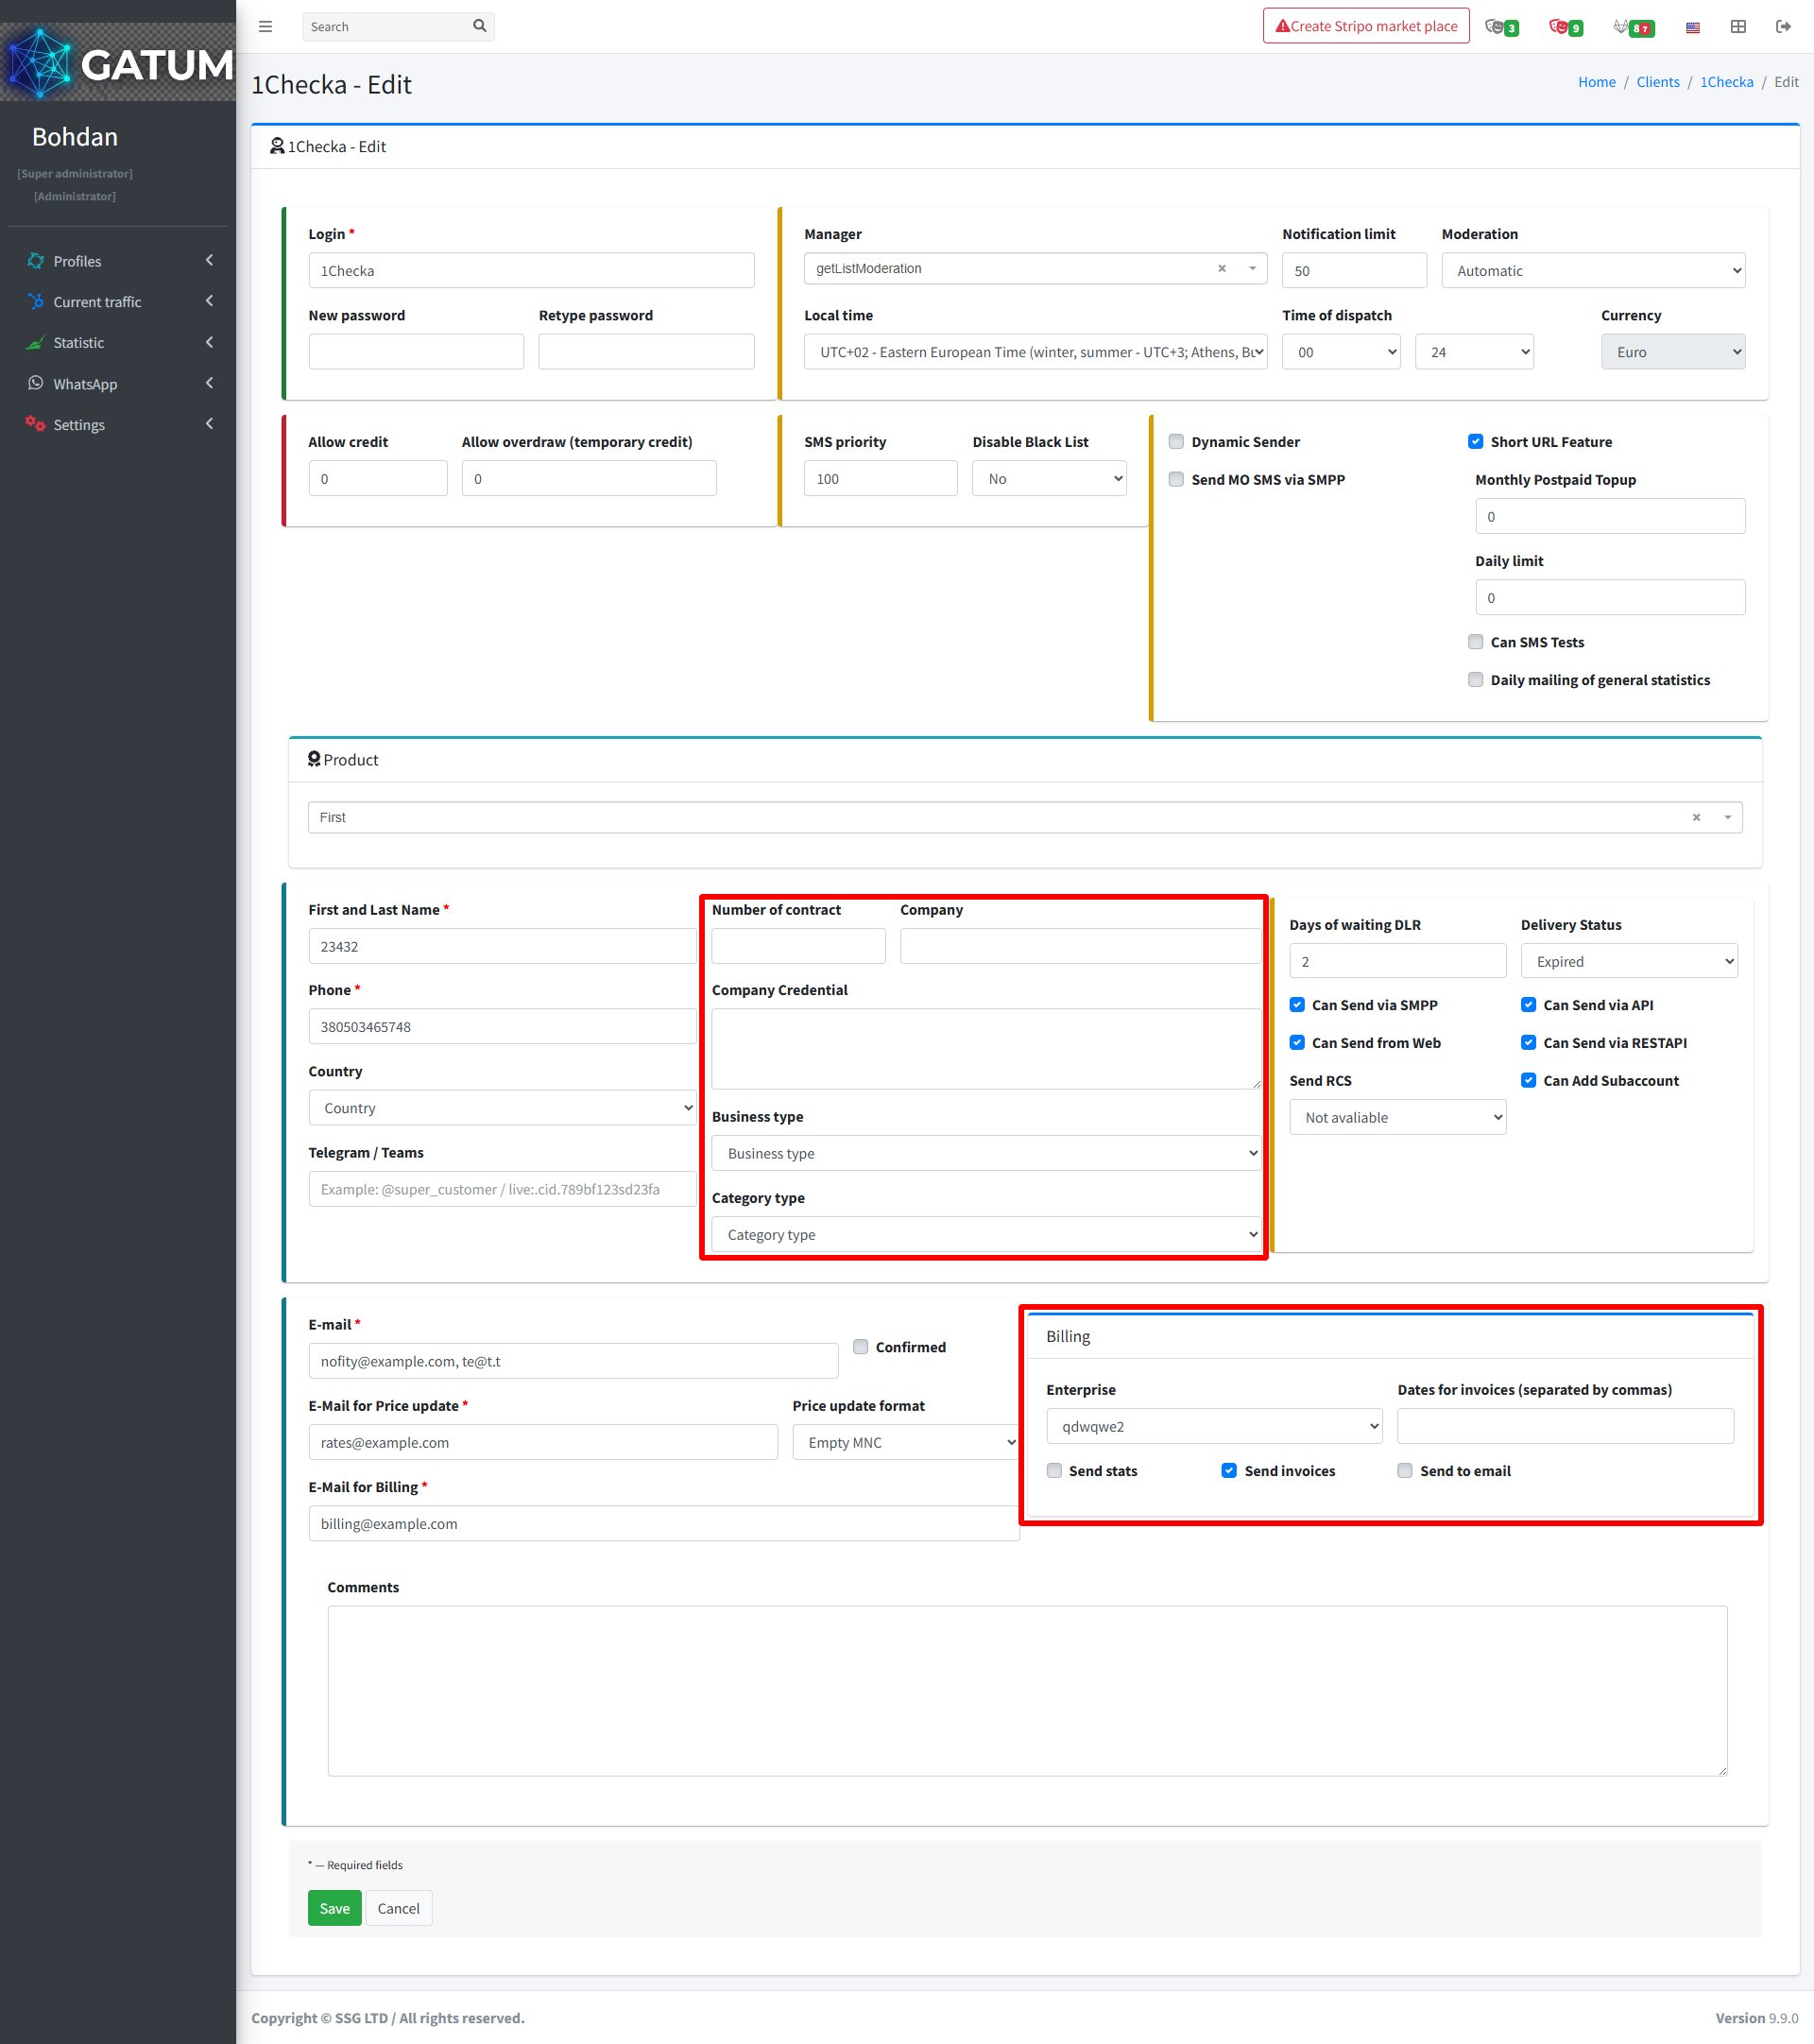
The platform can generate and send invoices to clients automatically or on demand. Before you start, make sure a brand and an enterprise are created – they determine the invoice template and the billing entity shown on the document. See How to Create a Brand and How to Create an Enterprise.
Before You Start
Each client that will receive invoices needs billing settings configured in their profile: their company details, the enterprise that will invoice them, and the dates on which invoices should be generated automatically.
Configure Client Billing Settings
Go to Profiles → Clients.
Click the edit icon in the client's row.
In the client edit form, fill in the company fields and billing settings.
Fill in the company fields and billing settings:
Field
Description
Number of contract (optional)
The contract number to include on invoices.
Company (optional)
The client's company name as it appears on invoices.
Company Credential (optional)
The client's company registration details or tax ID.
Business type (optional)
The client's business category.
Category type (optional)
An additional classification for the client.
Enterprise
The enterprise on whose behalf you will invoice this client.
Dates for invoices (optional)
Day numbers of the month on which invoices are generated automatically, separated by commas (e.g. 1,15). Leave empty to generate invoices manually only.
Send stats
When checked, a statistics file for the billing period is attached to the invoice automatically.
Send invoices
When checked, the invoice is visible in the client's own panel under Finance → Invoices.
Send to email
When checked, the invoice is sent to the client's billing email address.
Click Save.
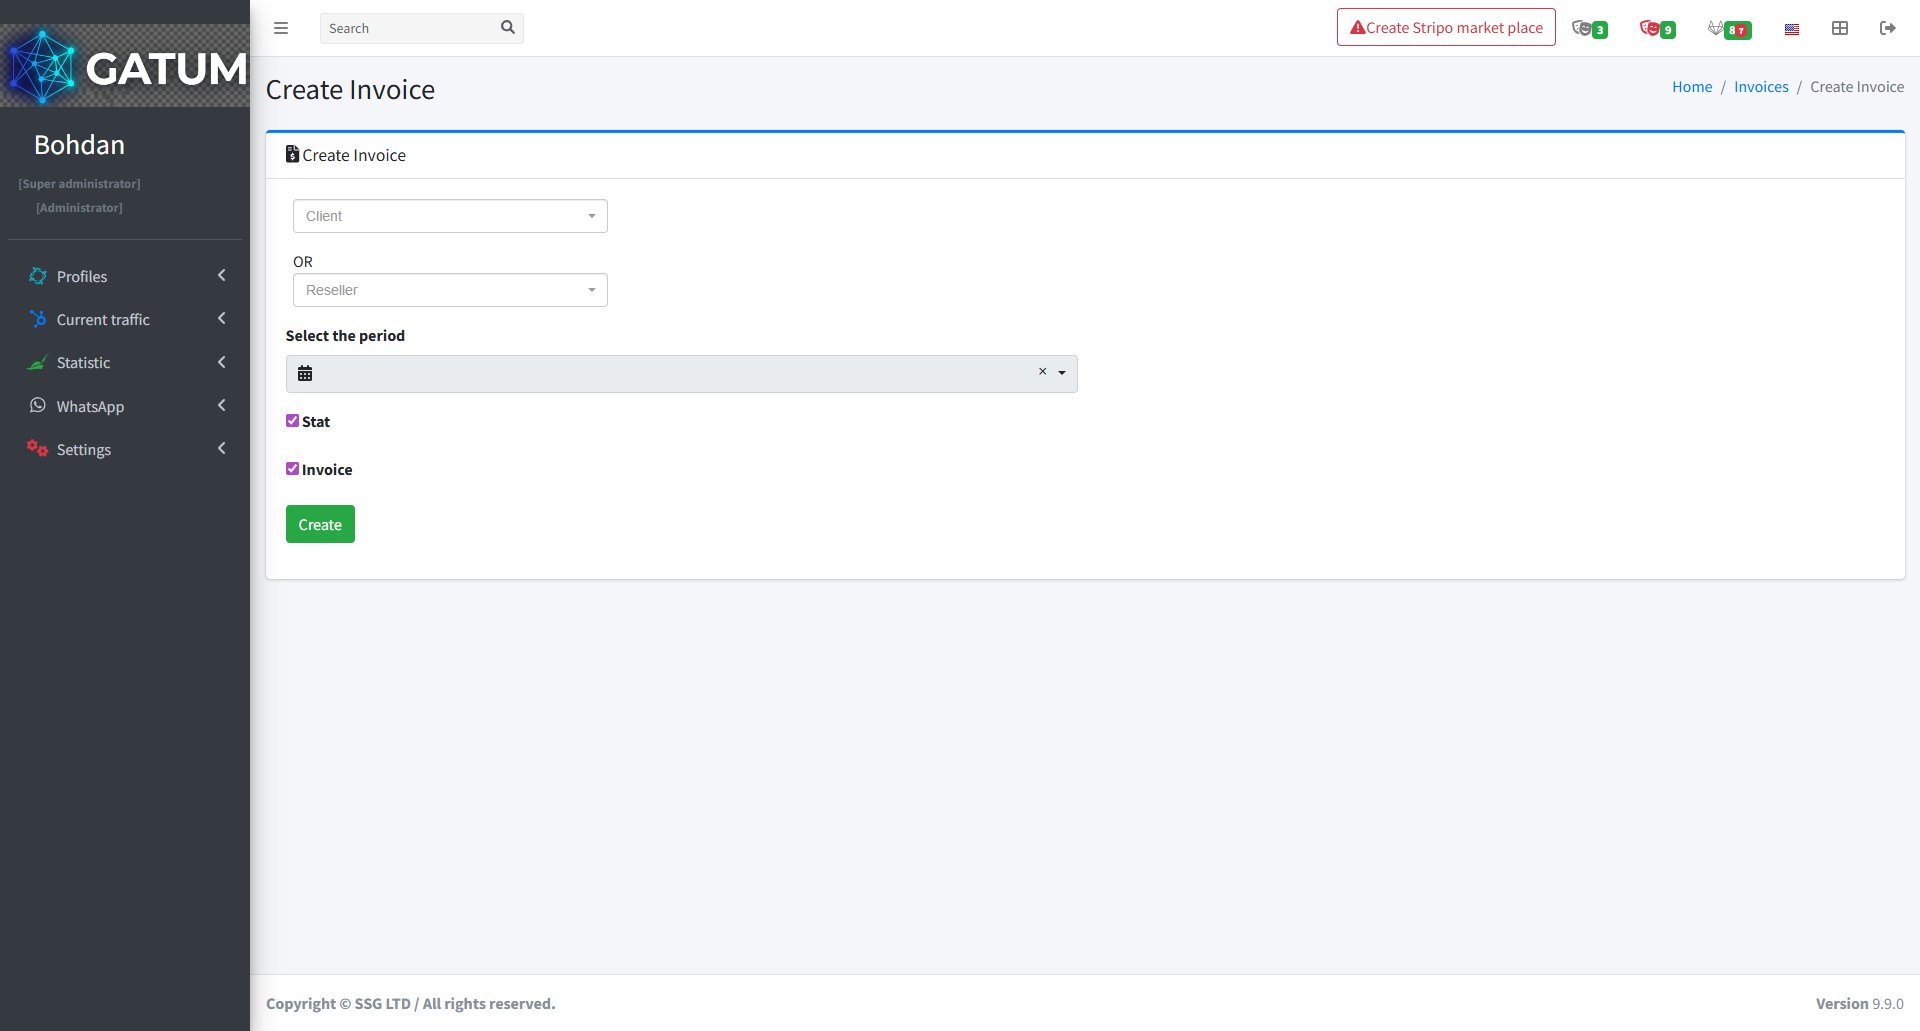
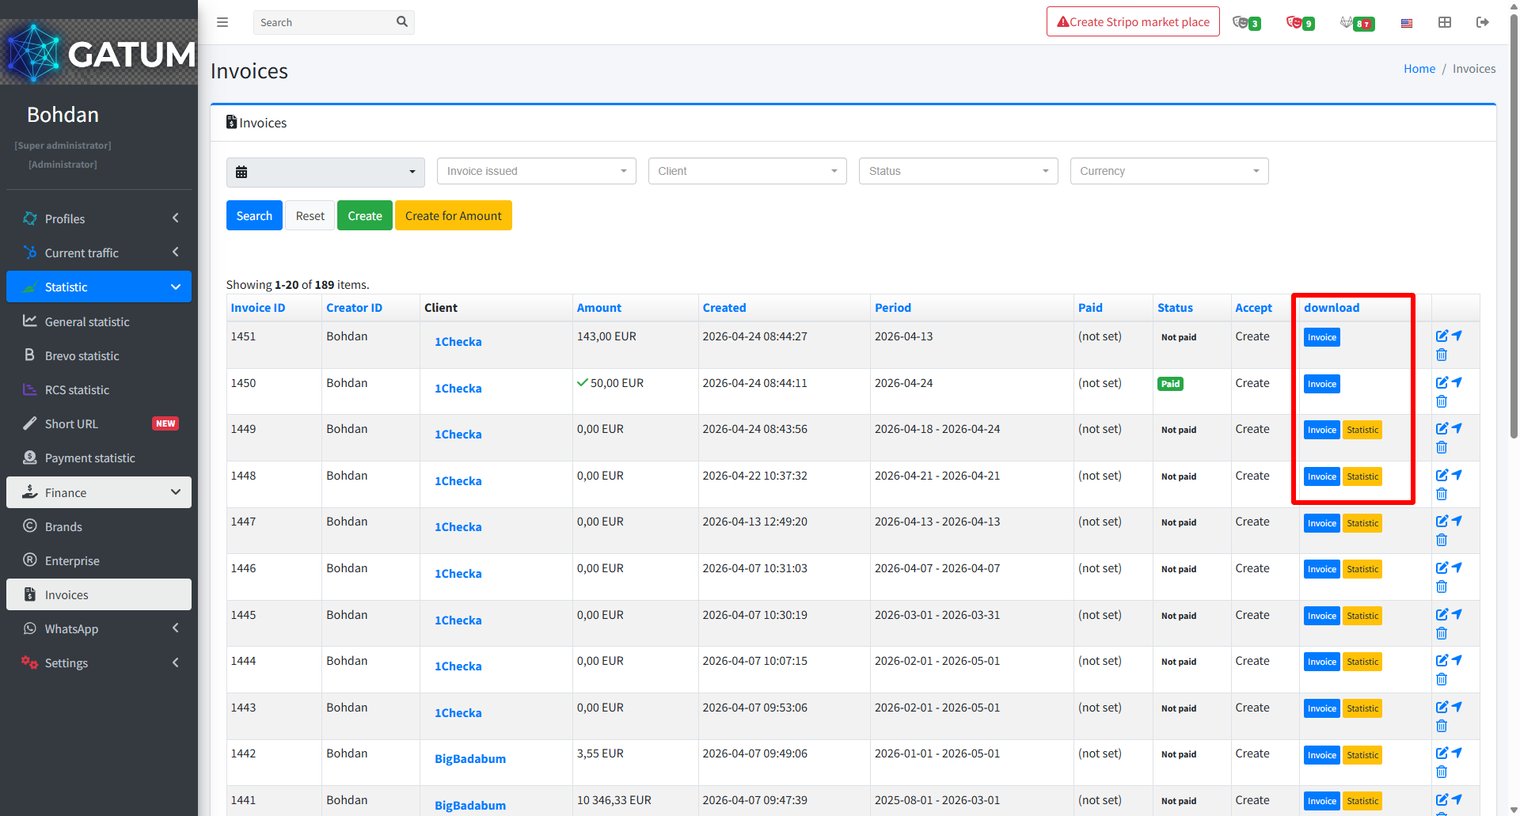
Create an Invoice for a Period
Use this method to generate an invoice that covers all traffic for a specific date range.
Go to Statistic → Finance → Invoices.
Click Create.
In the window that opens:
Fill in the fields:
Field
Description
Client
The client to invoice. Select either Client or Reseller, not both.
Reseller
The reseller to invoice, if invoicing a reseller instead of a client.
Select the period
The date range to cover in this invoice.
Stat
When checked, a statistics file for the period is attached to the invoice.
Invoice
When checked, the invoice document itself is generated.
Click Create.
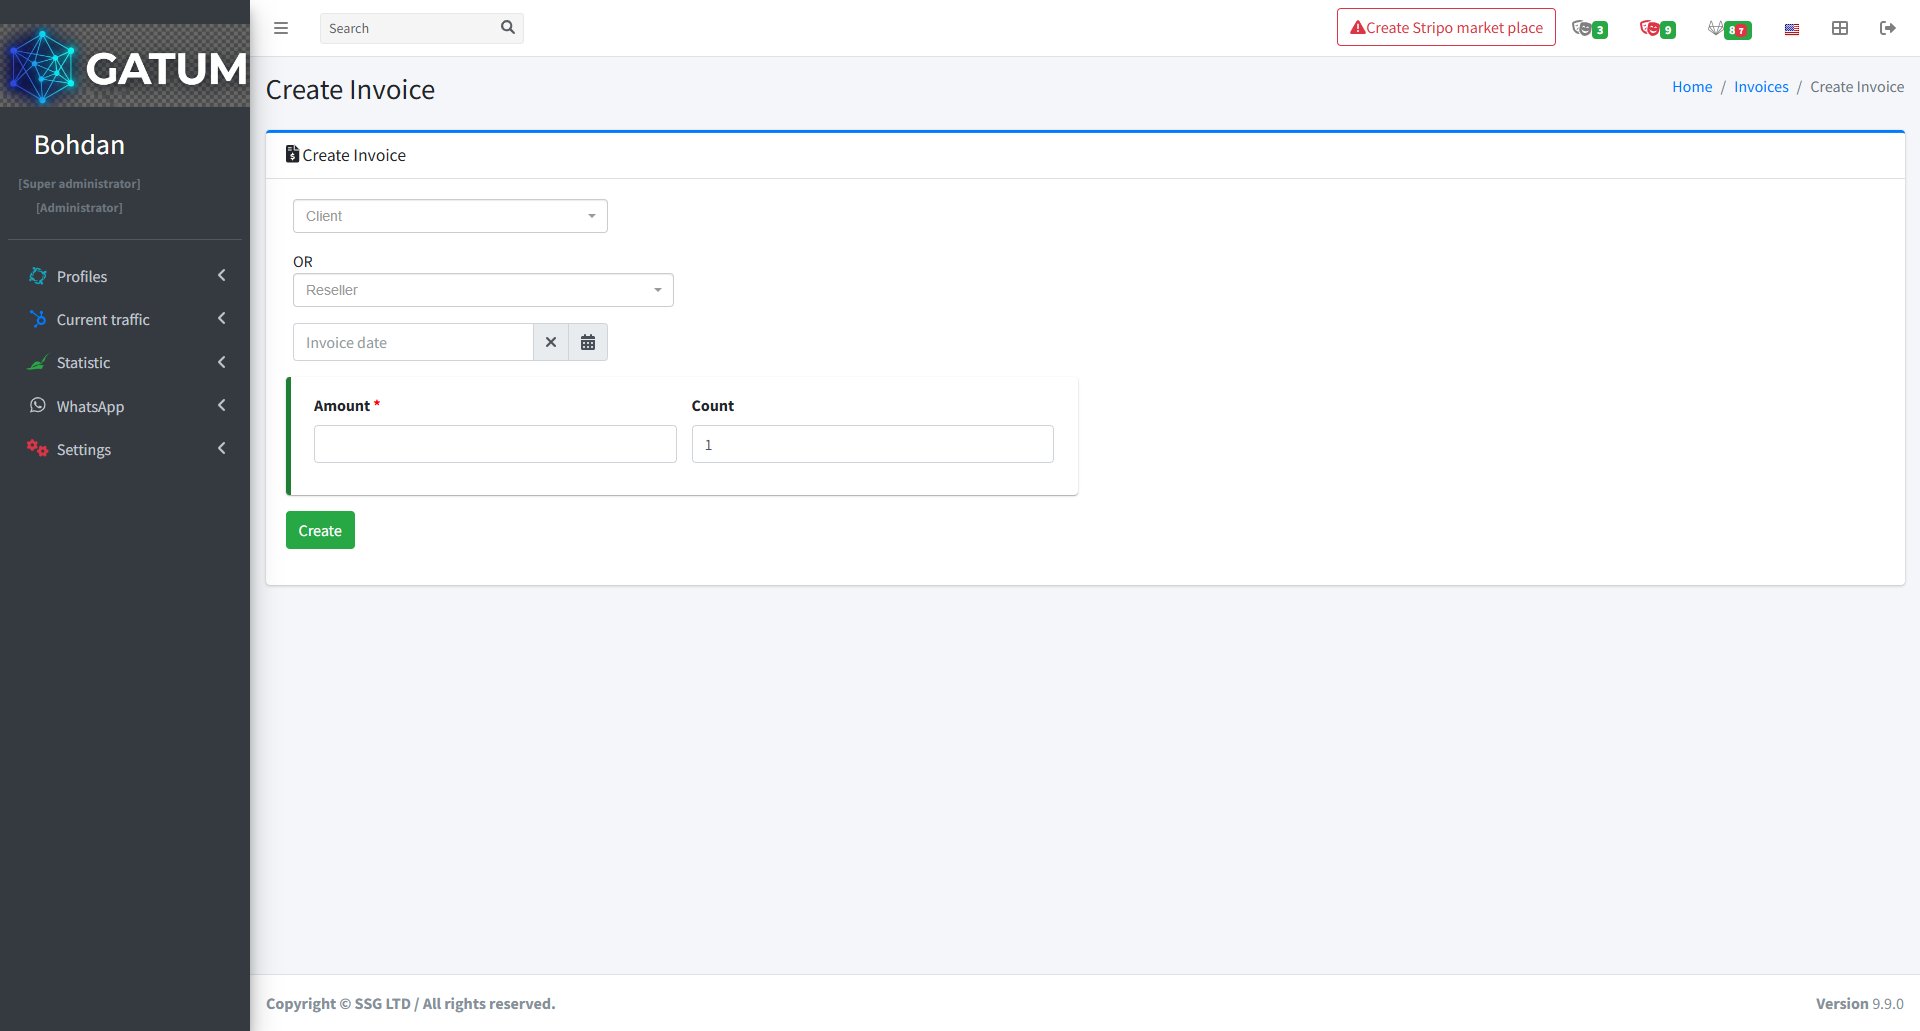
Create an Invoice for a Specific Amount
Use this method to generate an invoice for a fixed amount – for example, a prepayment or top-up invoice.
Go to Statistic → Finance → Invoices.
Click Create for Amount.
In the window that opens:
Fill in the fields:
Field
Description
Client
The client to invoice. Select either Client or Reseller, not both.
Reseller
The reseller to invoice, if invoicing a reseller instead of a client.
Invoice date
The date to print on the invoice.
Amount
The invoice amount in the client's currency.
Count
The number of copies of this invoice to generate. Defaults to 1.
Click Create.
Once an invoice is generated, it appears in the Invoices list. The download column shows Invoice and Statistic buttons for downloading the PDF invoice and the attached statistics file, respectively.
How to Block or Unblock a Client?
Blocking a client is a soft stop – they can still create messages, but nothing gets sent. Instead, their messages wait in the SMS queue until you unblock them. This is useful when you need to pause a client's traffic without losing any messages they've already submitted.
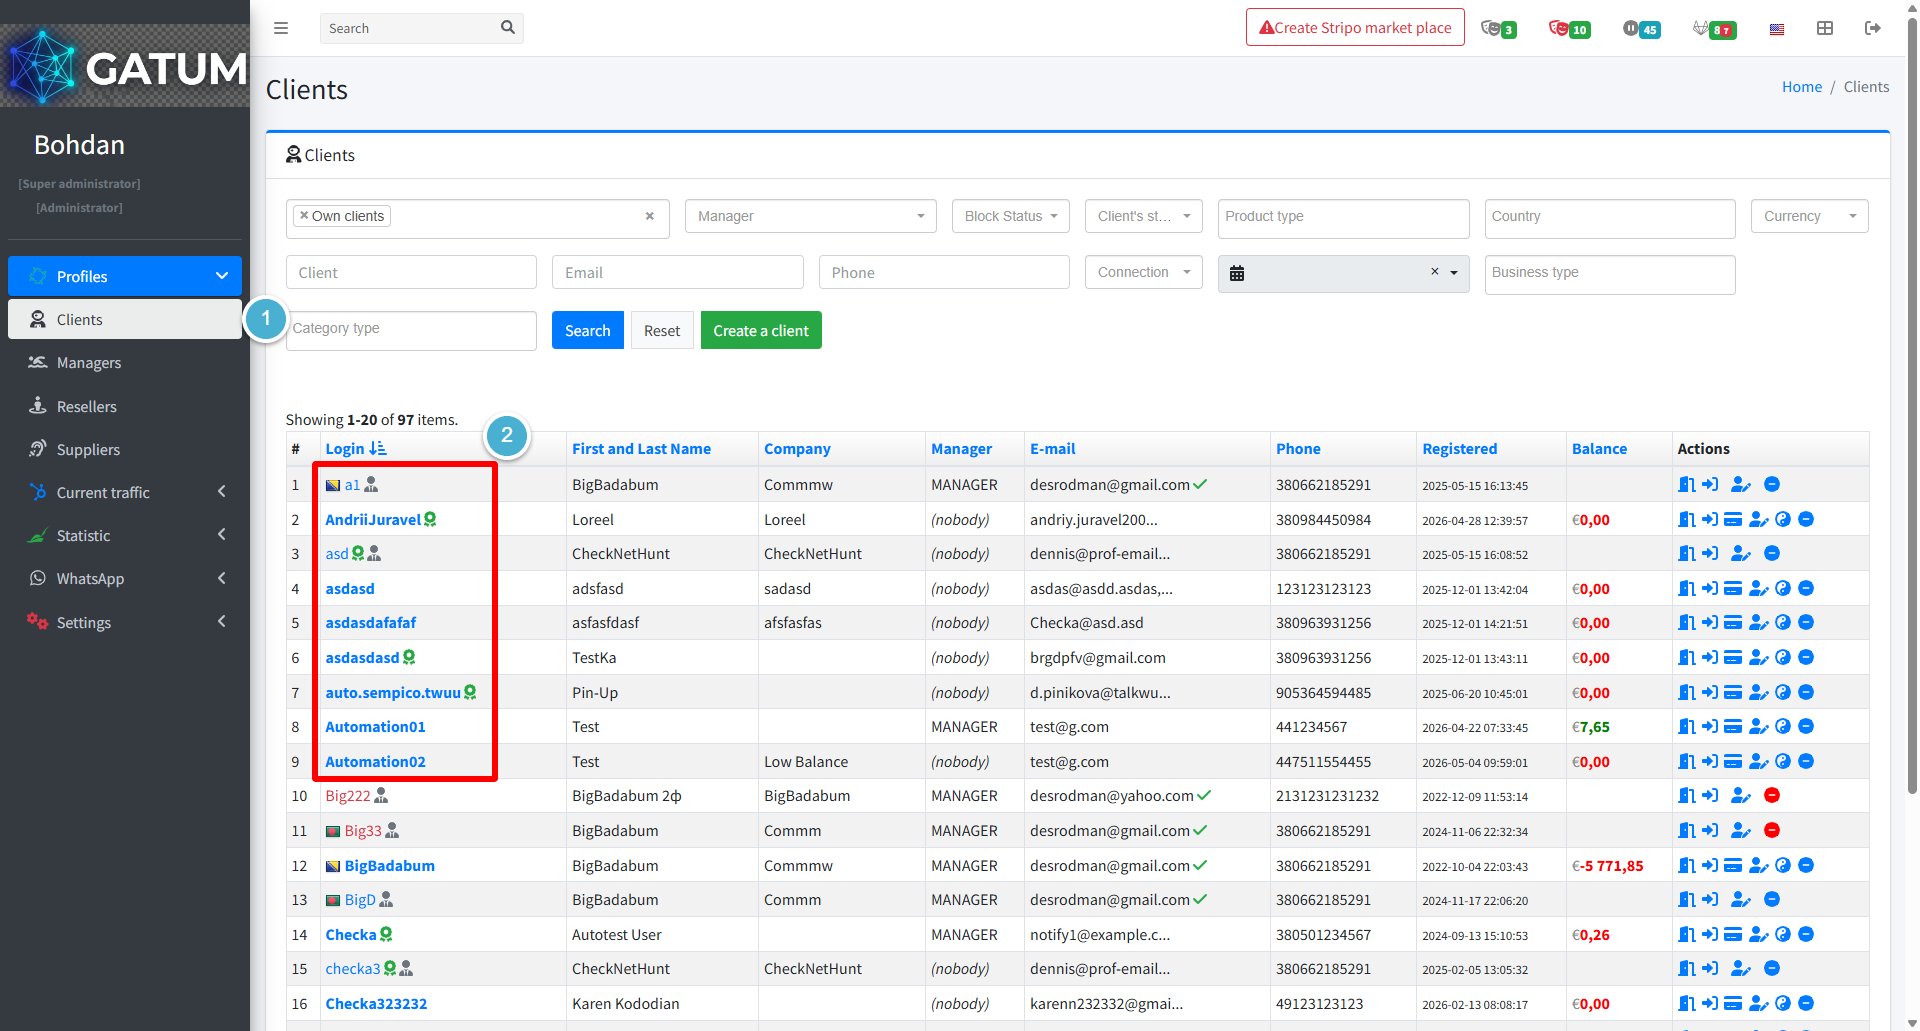
Go to Profiles → Clients.
In the Actions column, click the block icon next to the client.
Blue icon – the client is active. Click it to block.
Red icon – the client is blocked. Click it to unblock.
A confirmation message will appear at the top of the page with the client's name and their new status.
While a client is blocked, their messages queue up in Current Traffic → Queue of SMS and will be sent automatically once you unblock them.
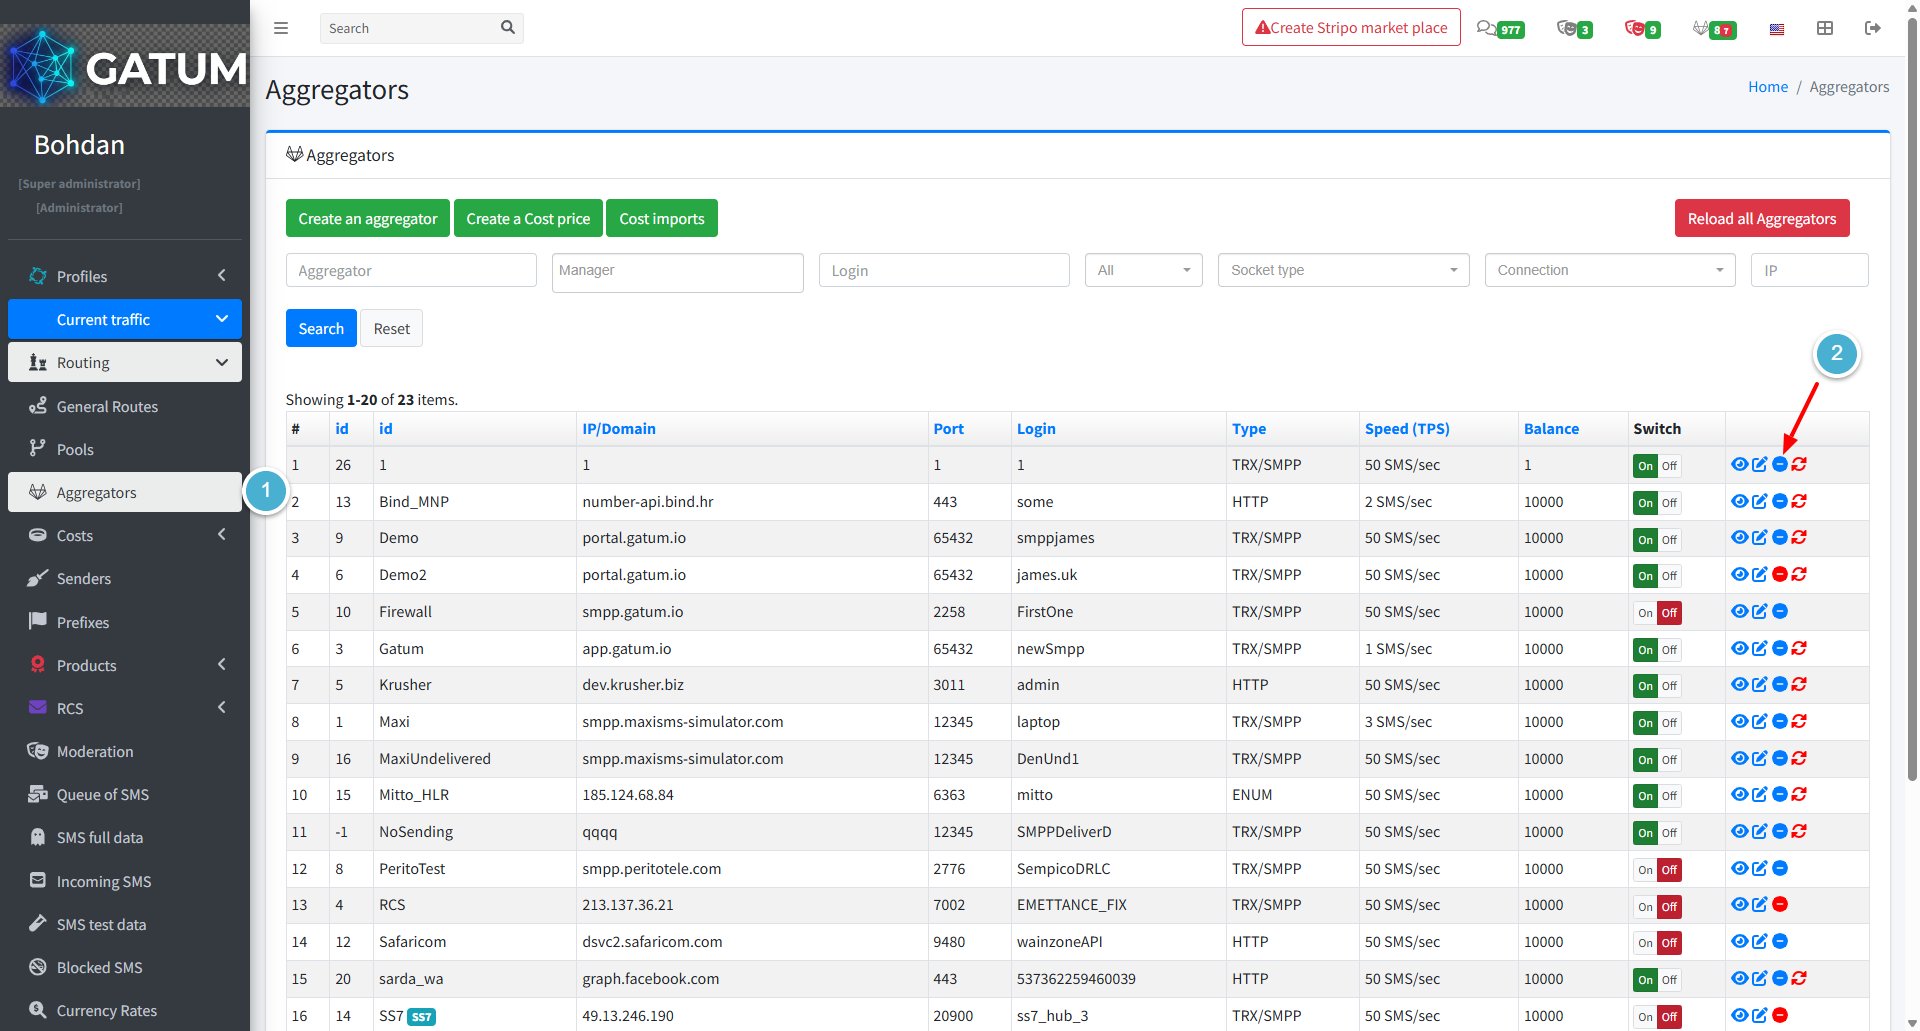
How to Block or Unblock an Aggregator?
Blocking an aggregator is a soft stop — your clients can still create messages, but they won't be sent out. Instead, they'll wait in the SMS queue until you unblock the aggregator. This is useful when you need to pause traffic to a specific aggregator without losing any messages.
How to Block or Unblock an Aggregator
Go to Current Traffic → Routing → Aggregators.
Find the aggregator you need and look at the Actions column, find the brick icon next to the aggregator:
Blue icon — the aggregator is active. Click it to block.
Red icon — the aggregator is blocked. Click it to unblock.
A confirmation message will appear at the top of the page letting you know whether the aggregator has been blocked or unblocked.
While an aggregator is blocked, any messages routed through it will queue up in Current Traffic → Queue of SMS and will be sent automatically once you unblock it:
ⓘ
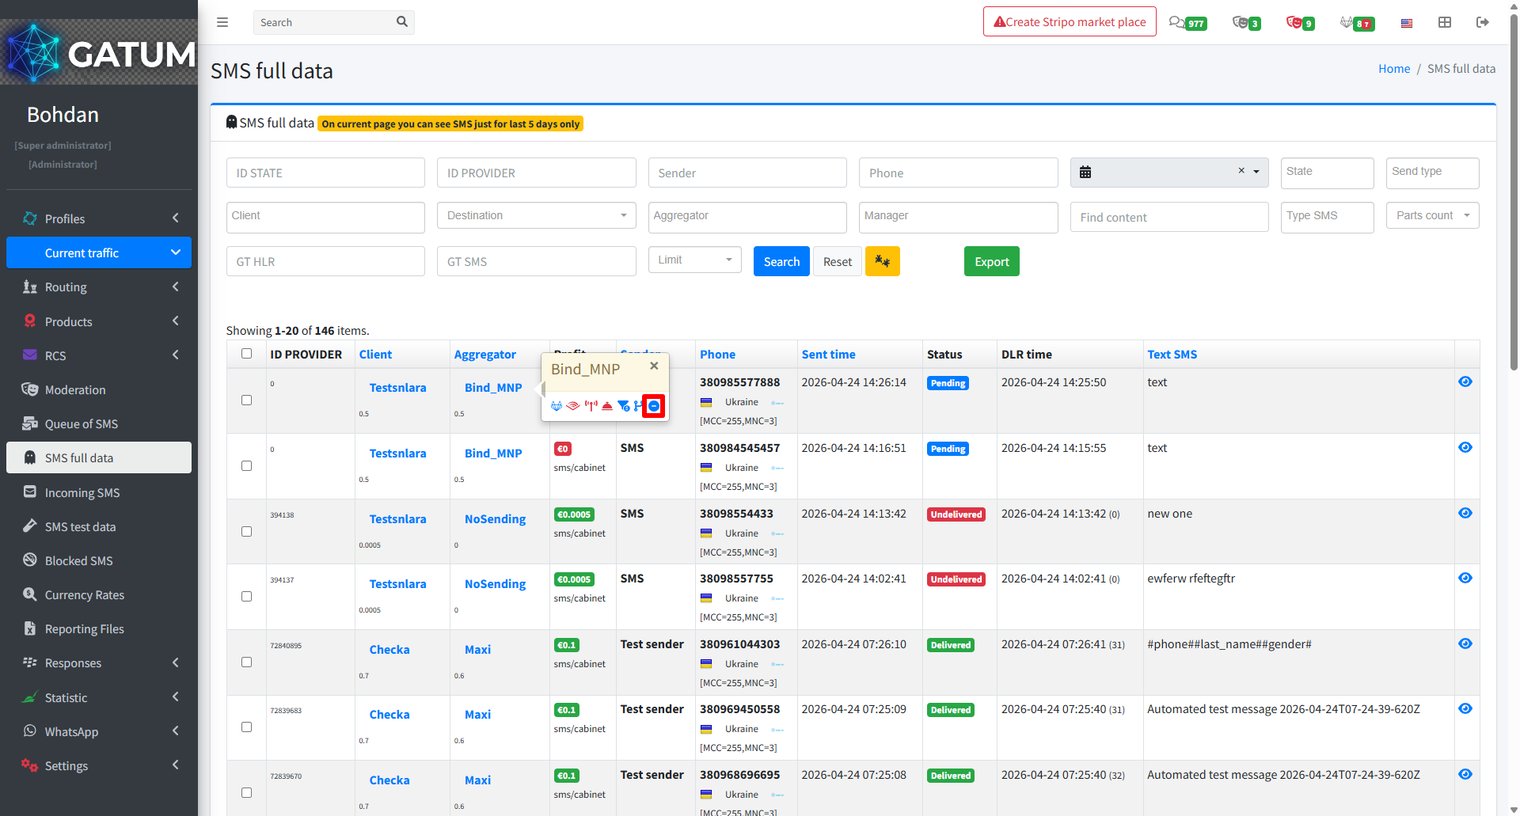
You can also block an aggregator directly from the Queue of SMS, SMS full data, and Incoming SMS pages. Click on the aggregator's name in the list — a pop-up menu will appear with a set of quick actions, including the block button.
You can use whichever page is most convenient — the result is the same regardless of where you trigger the block.
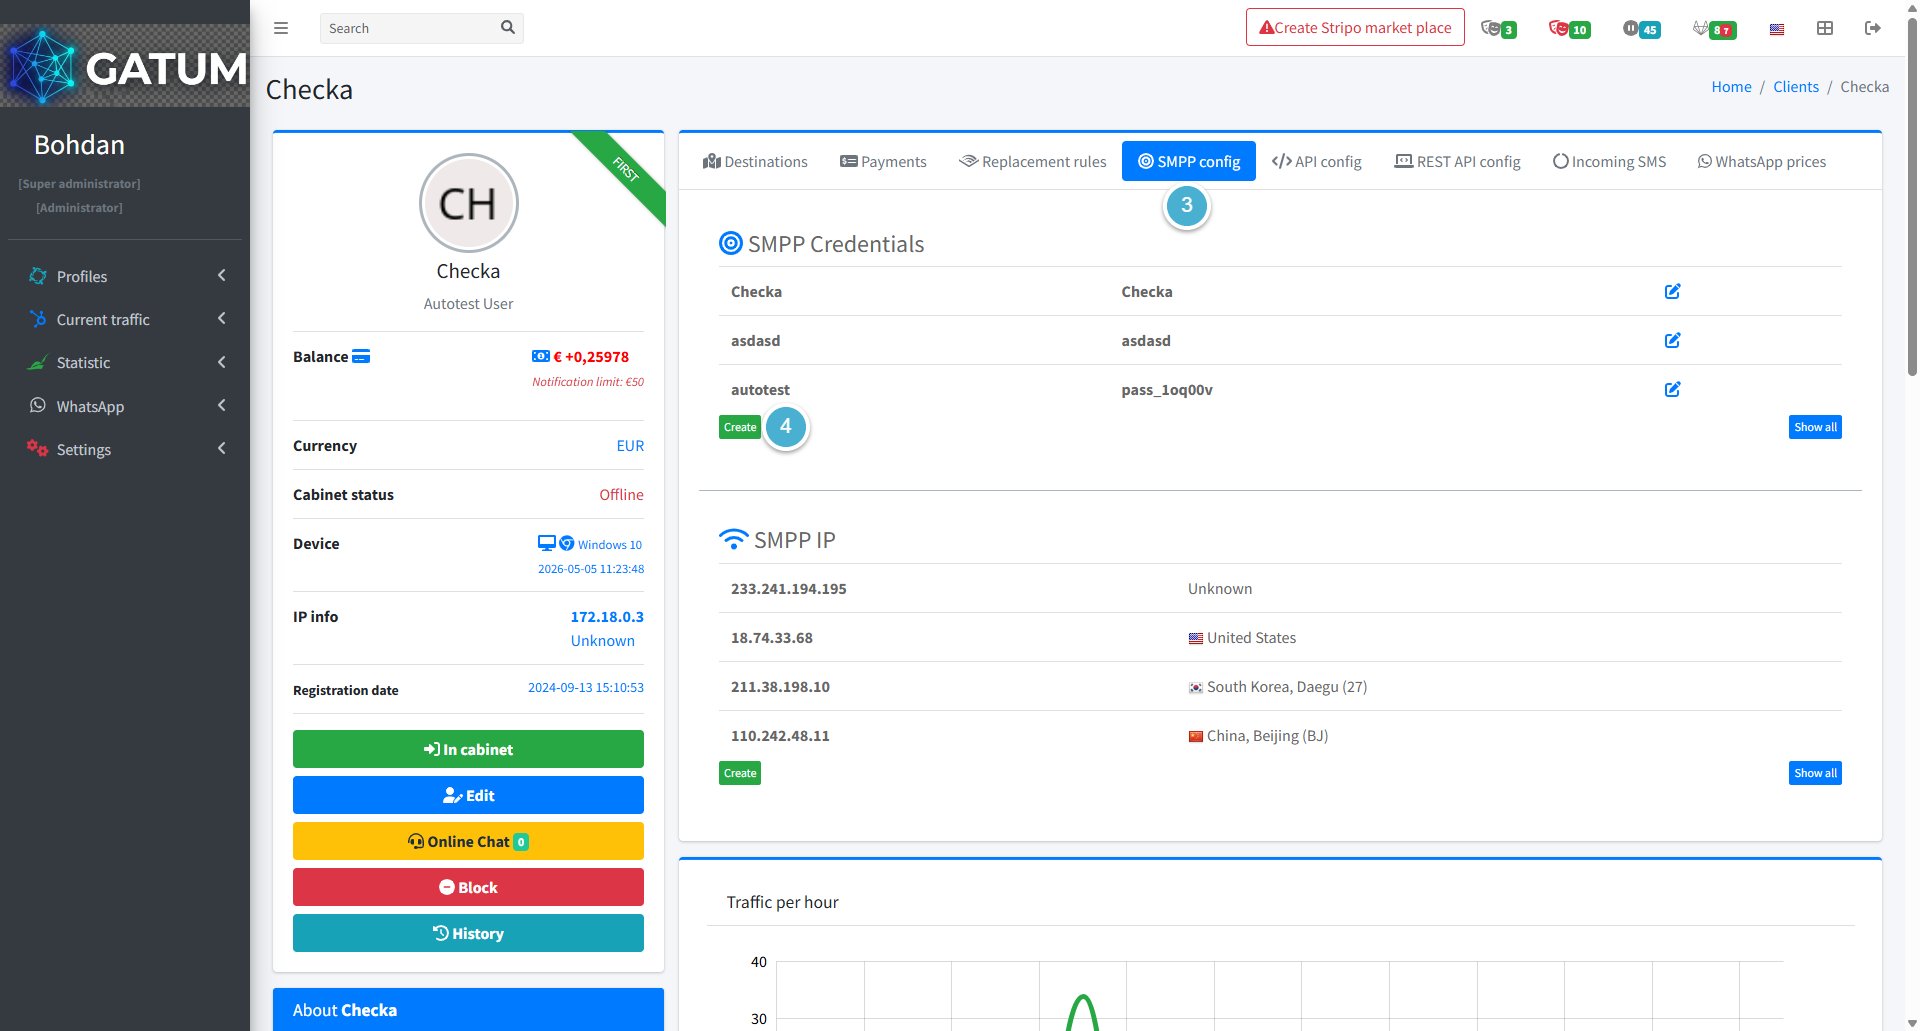
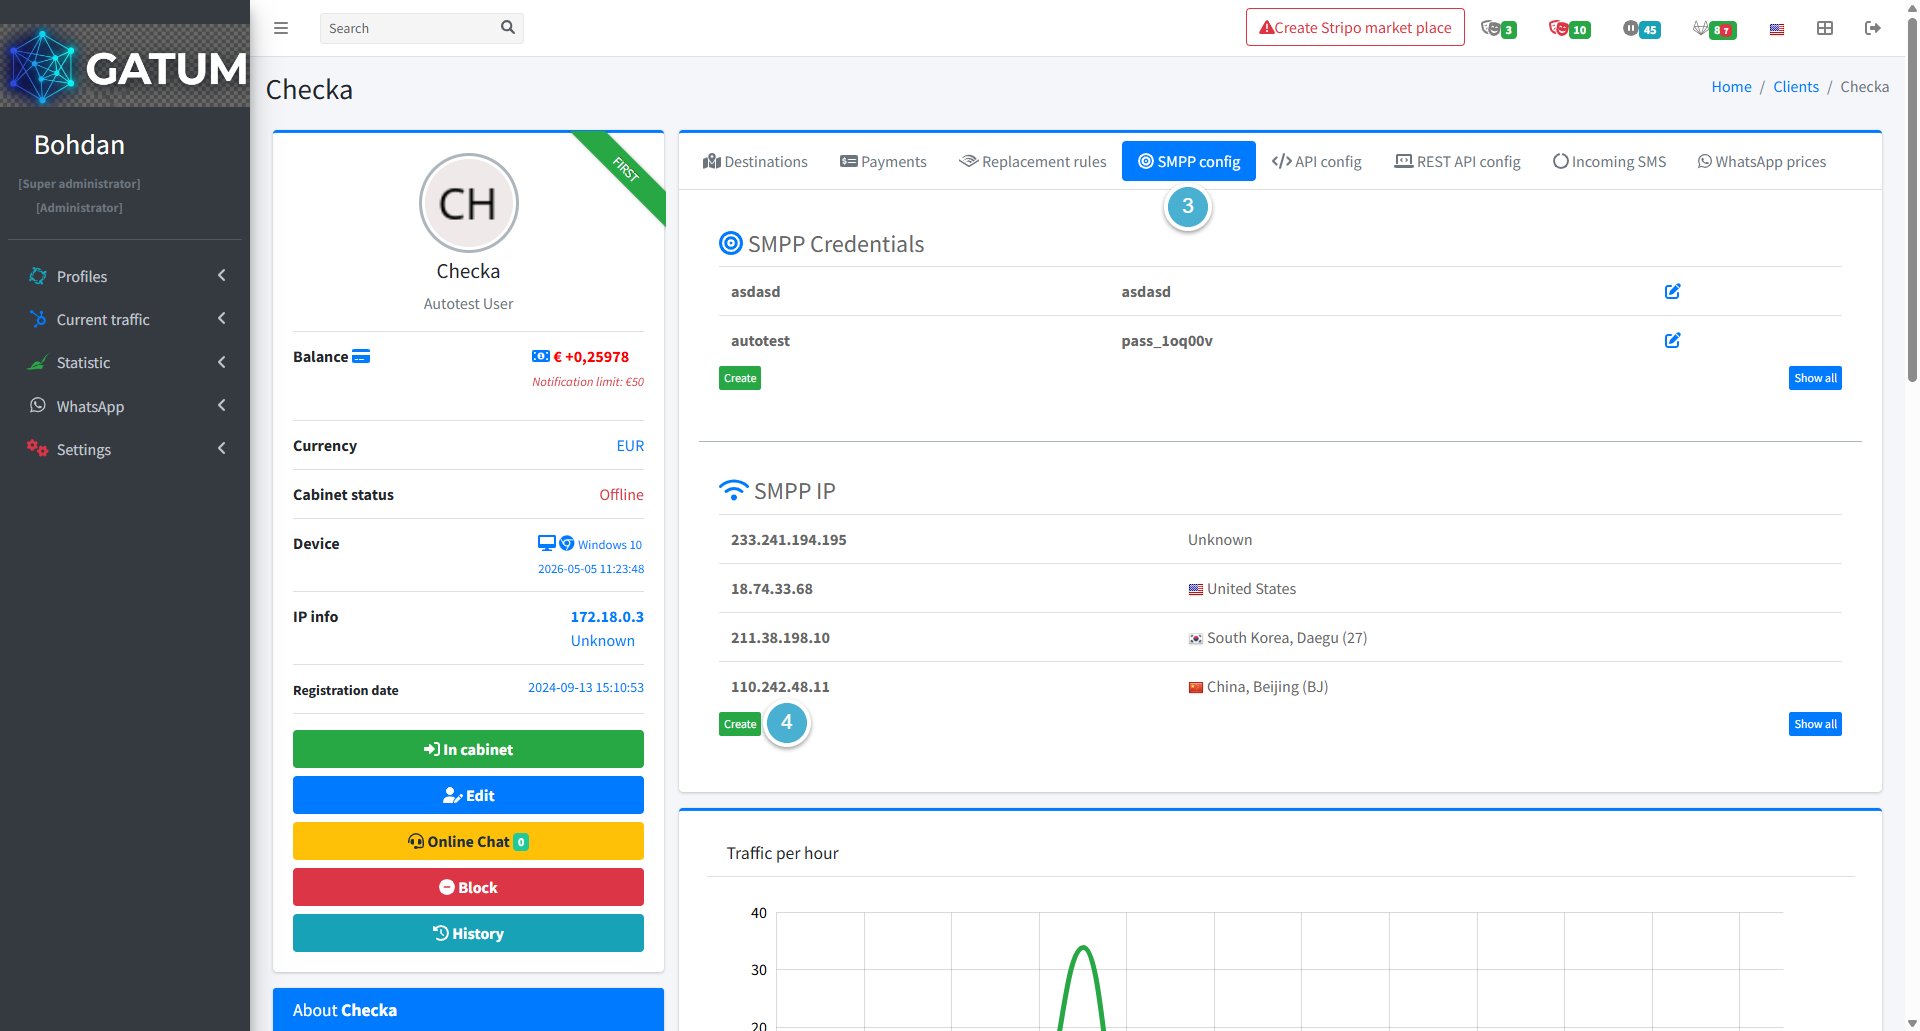
How to Configure a Client to Connect via SMPP Protocol?
The platform supports SMPP protocol version 3.4 and accepts connections from clients using the same protocol. To let a client send SMS via SMPP, you need to create an SMPP account for them and add the IP addresses they will connect from.
Create an SMPP Account
Go to Profiles → Clients.
Click on the client's name.
Open the SMPP config tab.
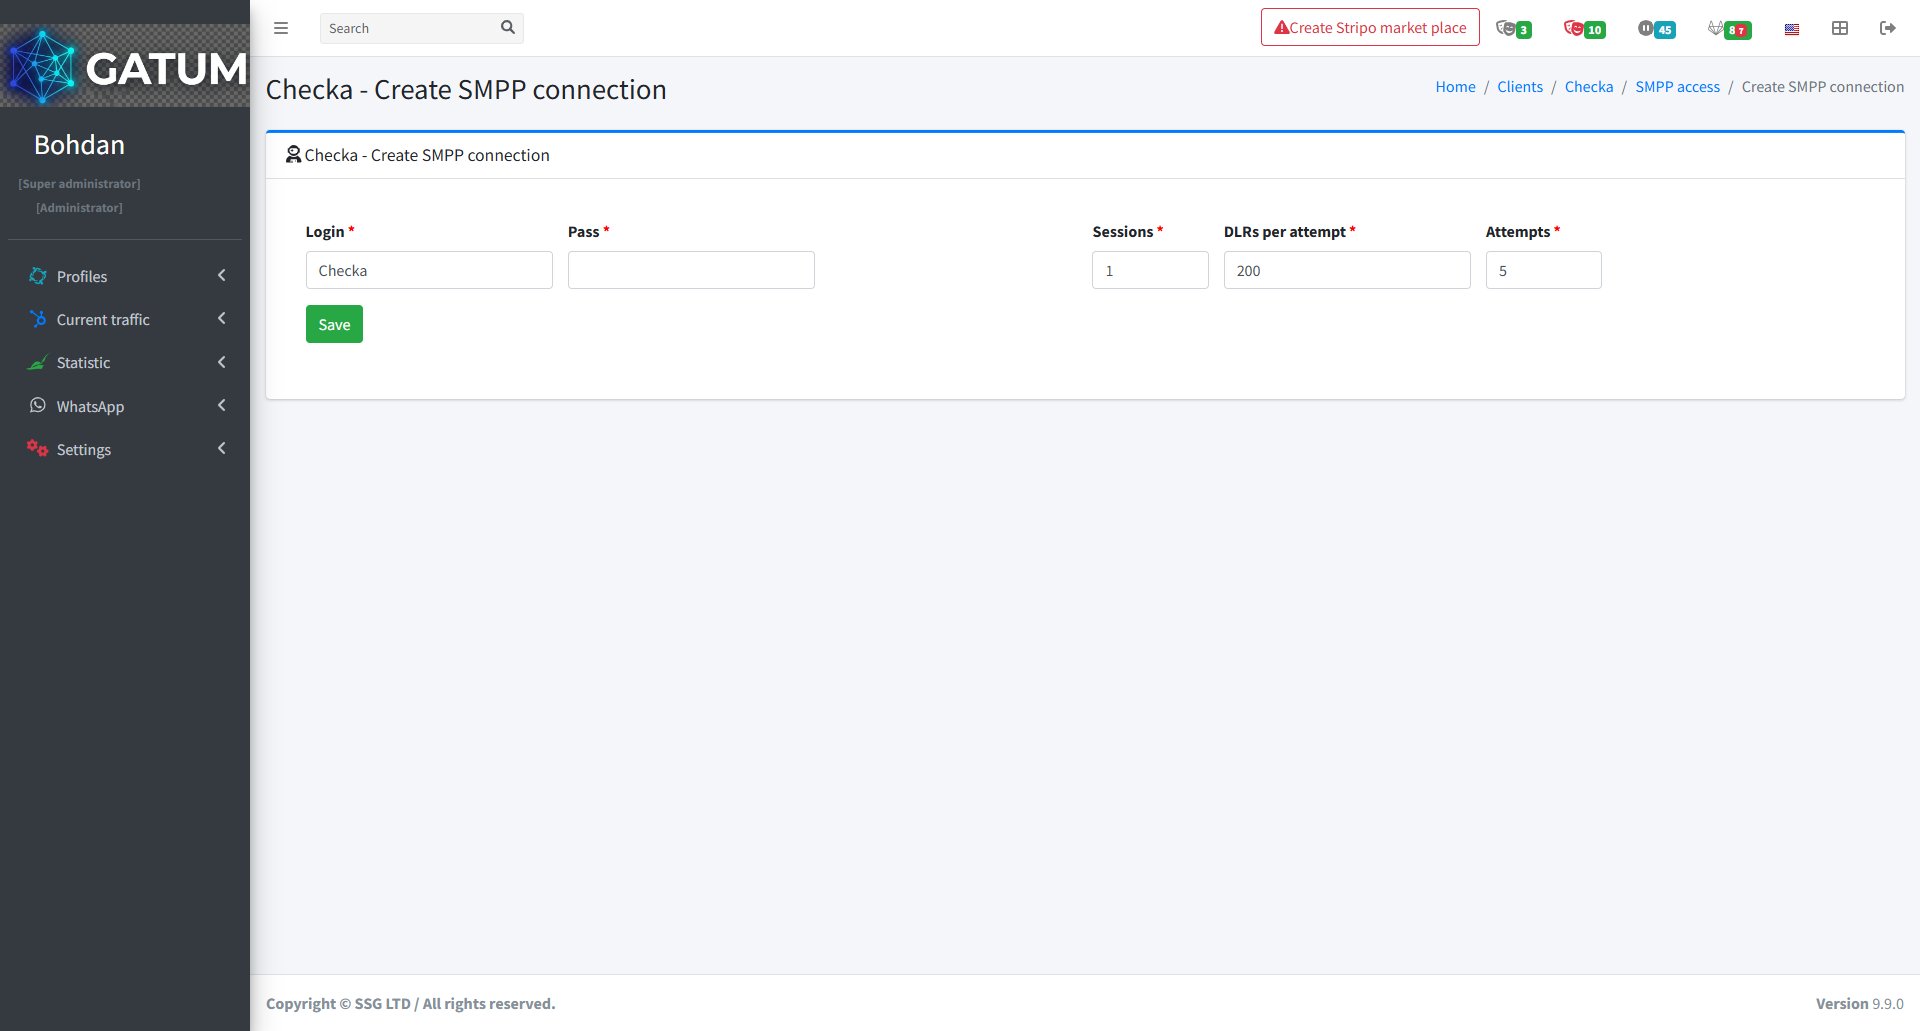
Click Create in the SMPP Credentials block.
In the window that opens:
Fill in the fields:
Field
Description
Login
The login the client will use to connect. Keep it no longer than 8 characters.
Pass
The password the client will use to connect. Use exactly 8 characters.
Sessions
The number of simultaneous sessions allowed for this connection.
DLRs per attempt
The number of delivery reports sent per attempt.
Attempts
The number of delivery report delivery attempts.
Click Save.
ⓘ
If the client connects from multiple servers, create a separate SMPP account for each server and add the corresponding IP addresses. This prevents delivery reports from being lost when SMS comes from one server but the DLR is sent to another.
The new account will appear in the SMPP Credentials list. The client can now use the login and password to connect to the platform via SMPP.
Add an SMPP IP Address
Go to Profiles → Clients.
Click on the client's name.
Open the SMPP config tab.
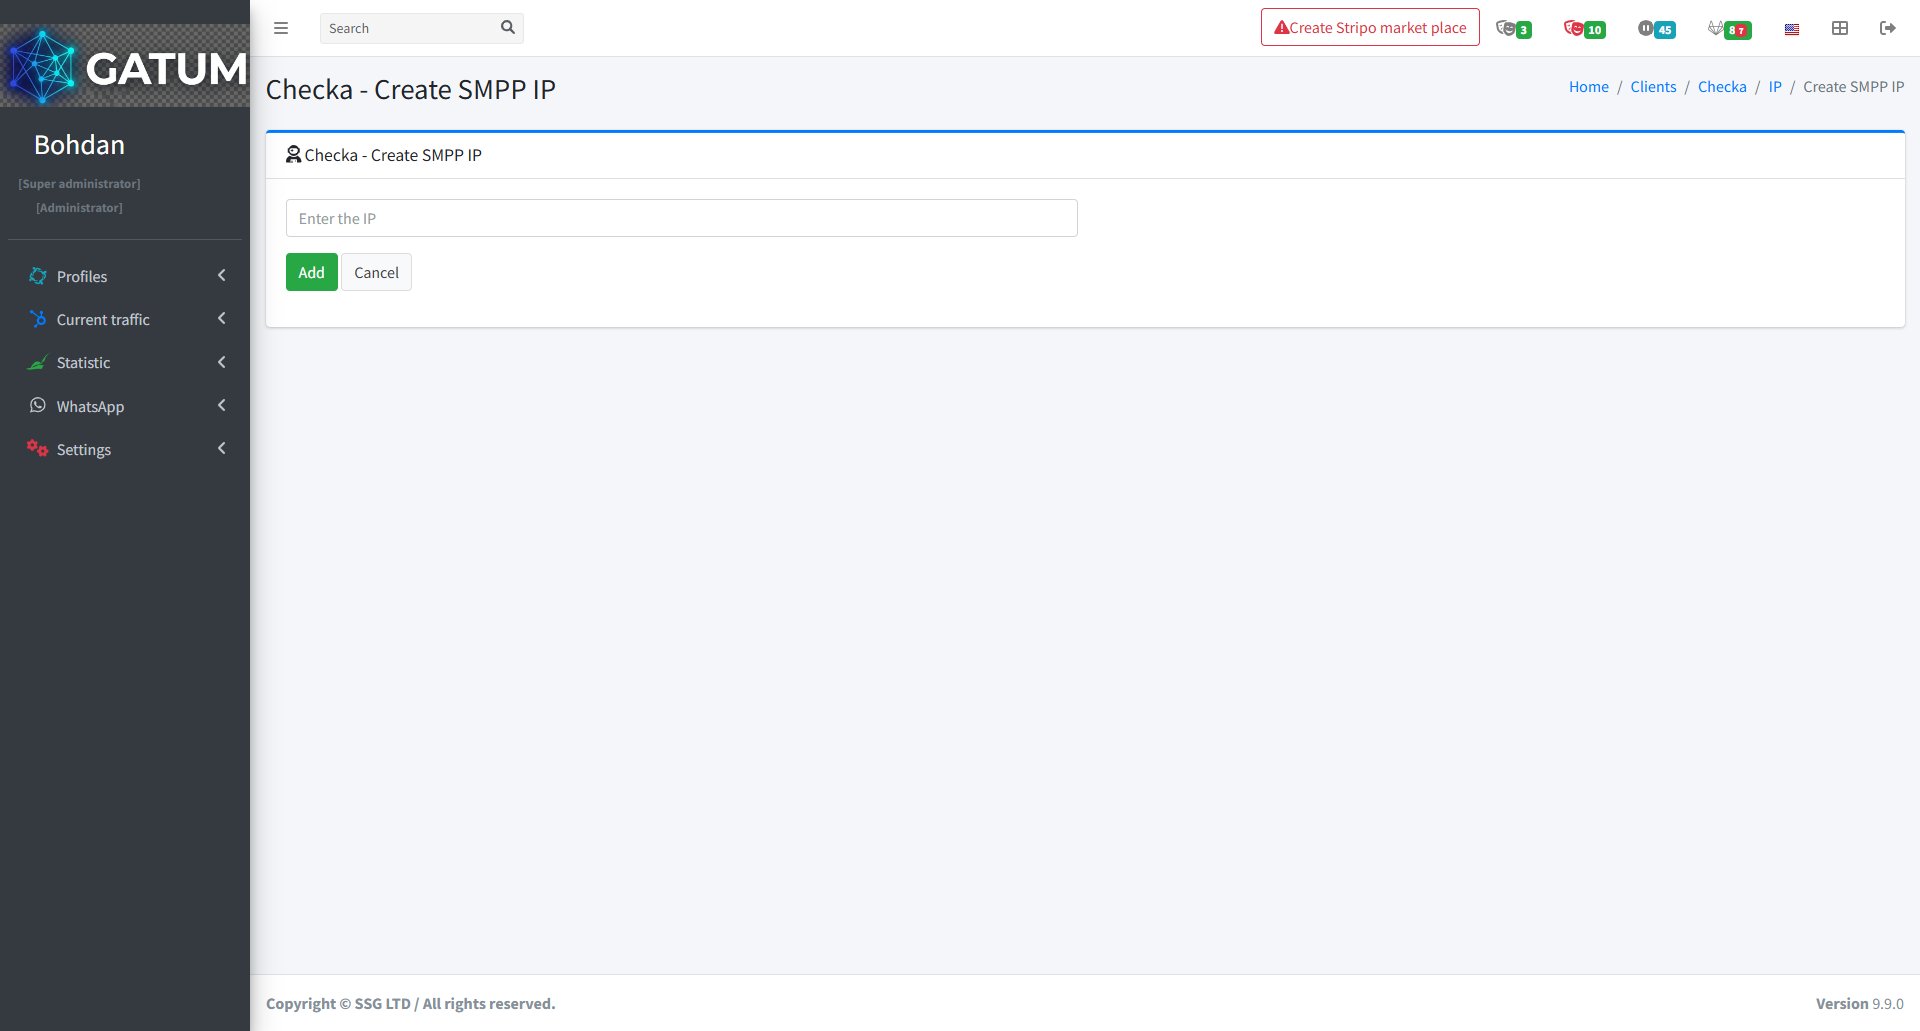
Click Create in the SMPP IP block.
In the window that opens:
Enter the IP address of the server the client will connect from and click Save.
Once the IP is added, the client's server will be allowed to establish an SMPP connection. If the client sends traffic from multiple servers, repeat this process for each IP address.
How to Configure Sending Reports to the Client via SMS Sent via the API Protocol?
When a client sends SMS via the API, the platform can automatically send a delivery report (DLR) to a webhook URL of their choice. This lets the client's system receive real-time status updates for every message sent.
Before You Start
The API access must be enabled for the client in the admin panel. Go to Profiles → Clients, open the client's edit page, and make sure the Can Send via API feature is enabled.
Set Up DLR Sending to Webhook
Go to API → GET.
In the DLR sending to webhook block, enter the webhook URL in the Send SMS State via API field.
This is the address where delivery reports will be sent for each SMS. The URL should be provided by the client's development team.
If you want the platform to wait for a confirmation response from the webhook before marking the delivery report as sent, enable the With confirmation checkbox.
Click Save, then click Check Response to verify that the webhook is reachable and responding correctly.
Once saved, the platform will start sending DLR reports to the specified URL for every SMS sent via API.
How to Configure Sending Reports to the Client via SMS Sent via the REST API Protocol?
When a client sends SMS via the REST API, the platform can automatically send a delivery report (DLR) to a webhook URL of their choice. This lets the client's system receive real-time status updates for every message sent.
Before You Start
The REST API access must be enabled for the client in the admin panel. Go to Profiles → Clients, open the client's edit page, and make sure the Can Send via REST API feature is enabled.
Set Up DLR Sending to Webhook
Go to API → GET.
In the DLR sending to webhook block, enter the webhook URL in the Send SMS State via API field.
This is the address where delivery reports will be sent for each SMS. The URL should be provided by the client's development team.
If you want the platform to wait for a confirmation response from the webhook before marking the delivery report as sent, enable the With confirmation checkbox.
Click Save, then click Check Response to verify that the webhook is reachable and responding correctly.
Once saved, the platform will start sending DLR reports to the specified URL for every SMS sent via REST API.
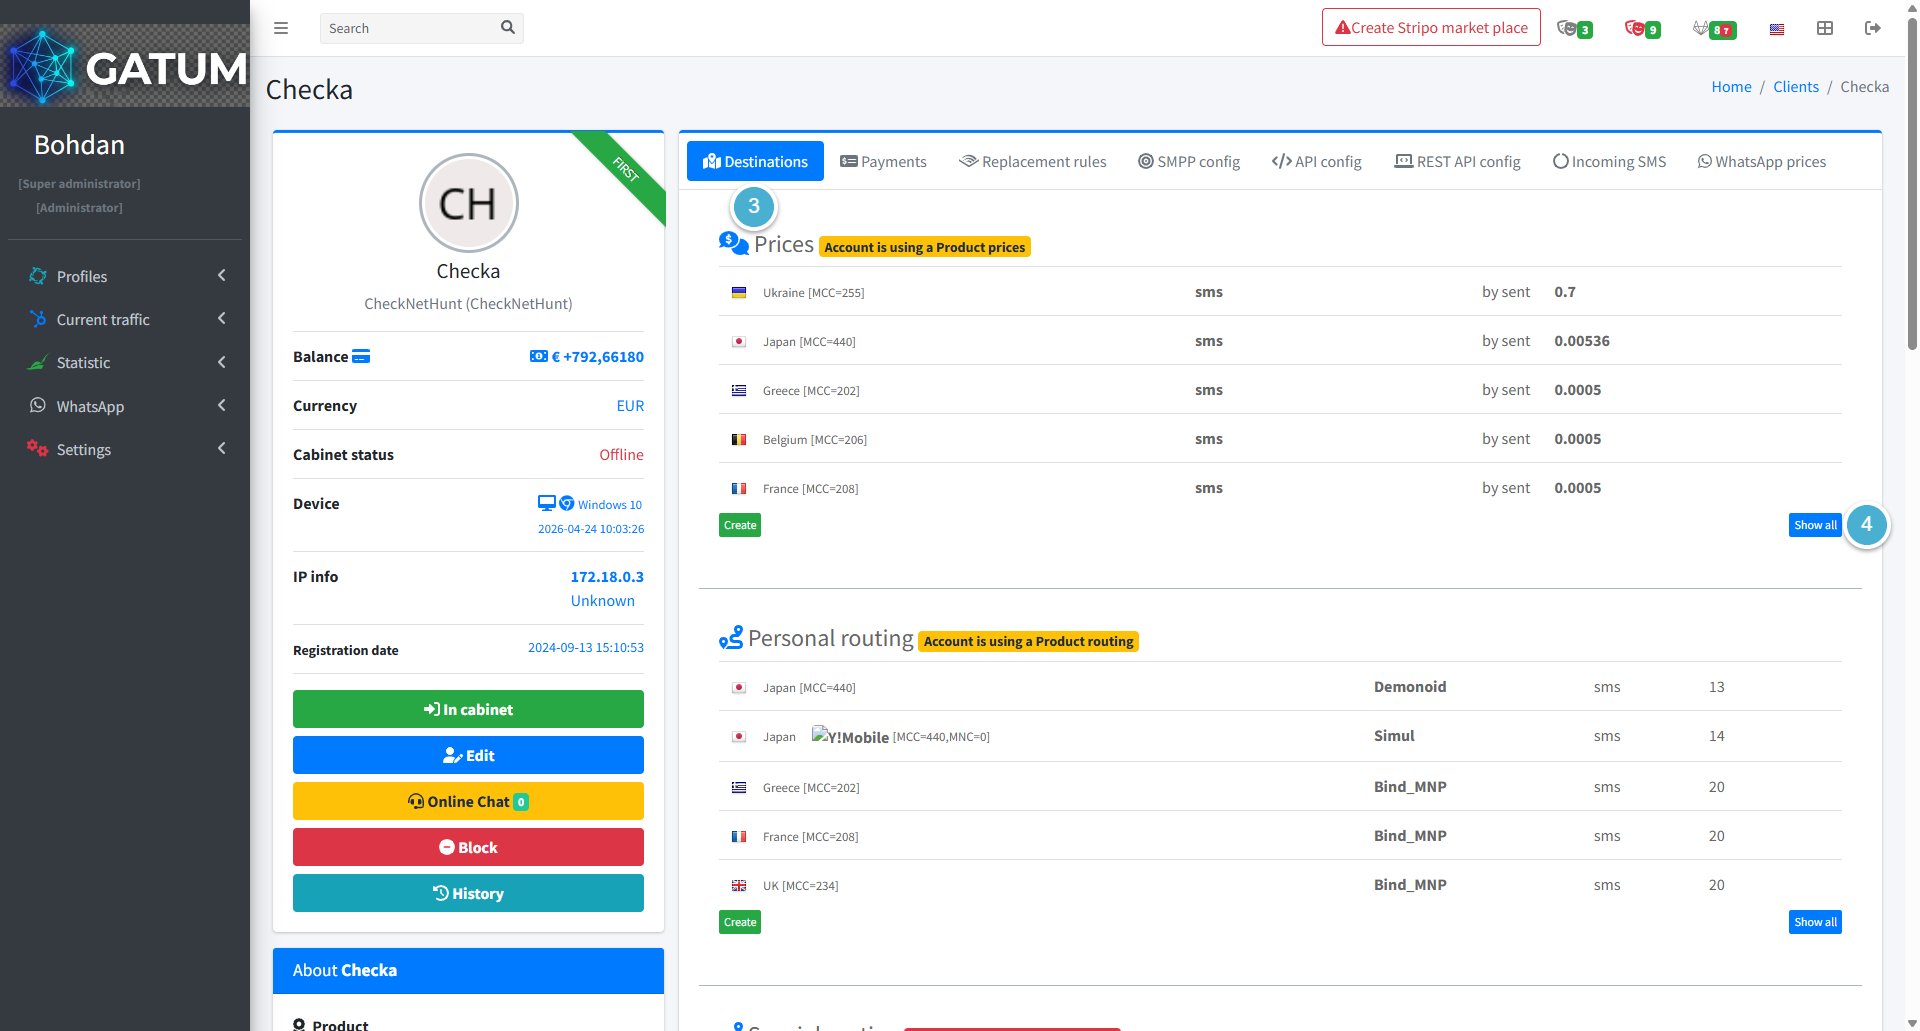
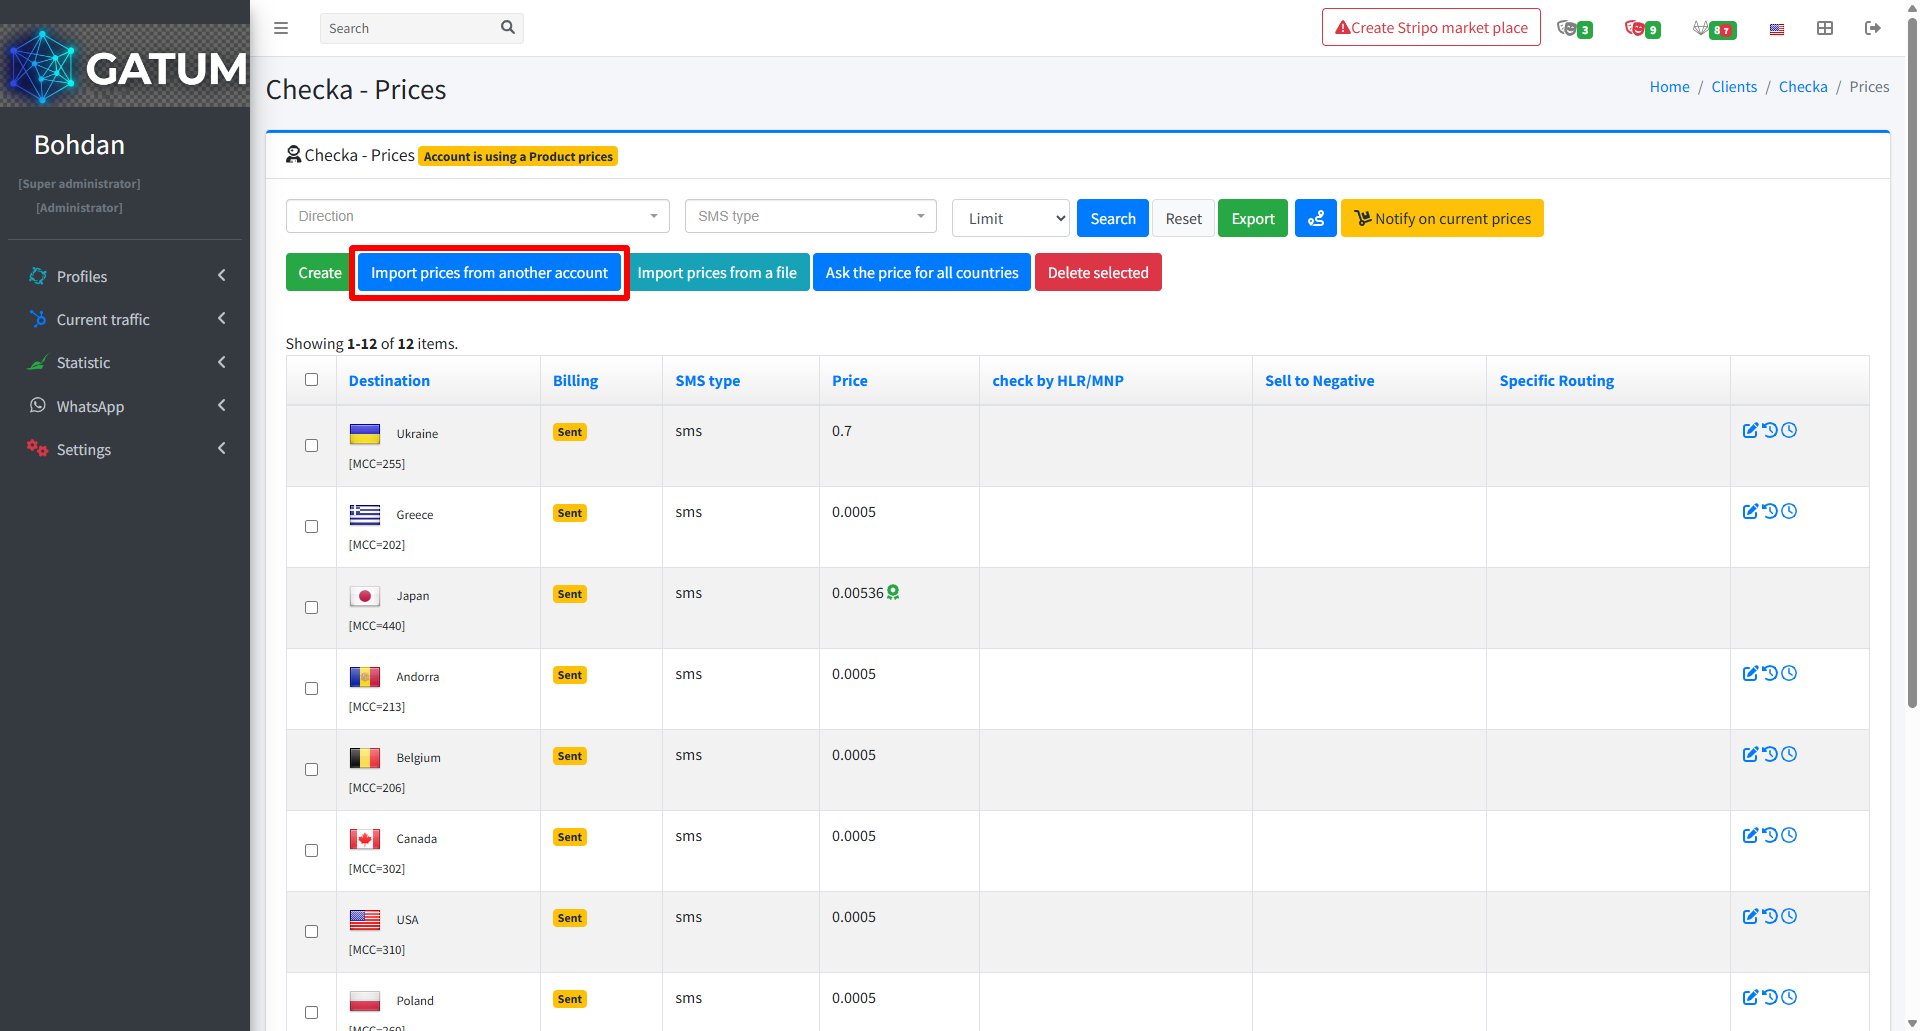
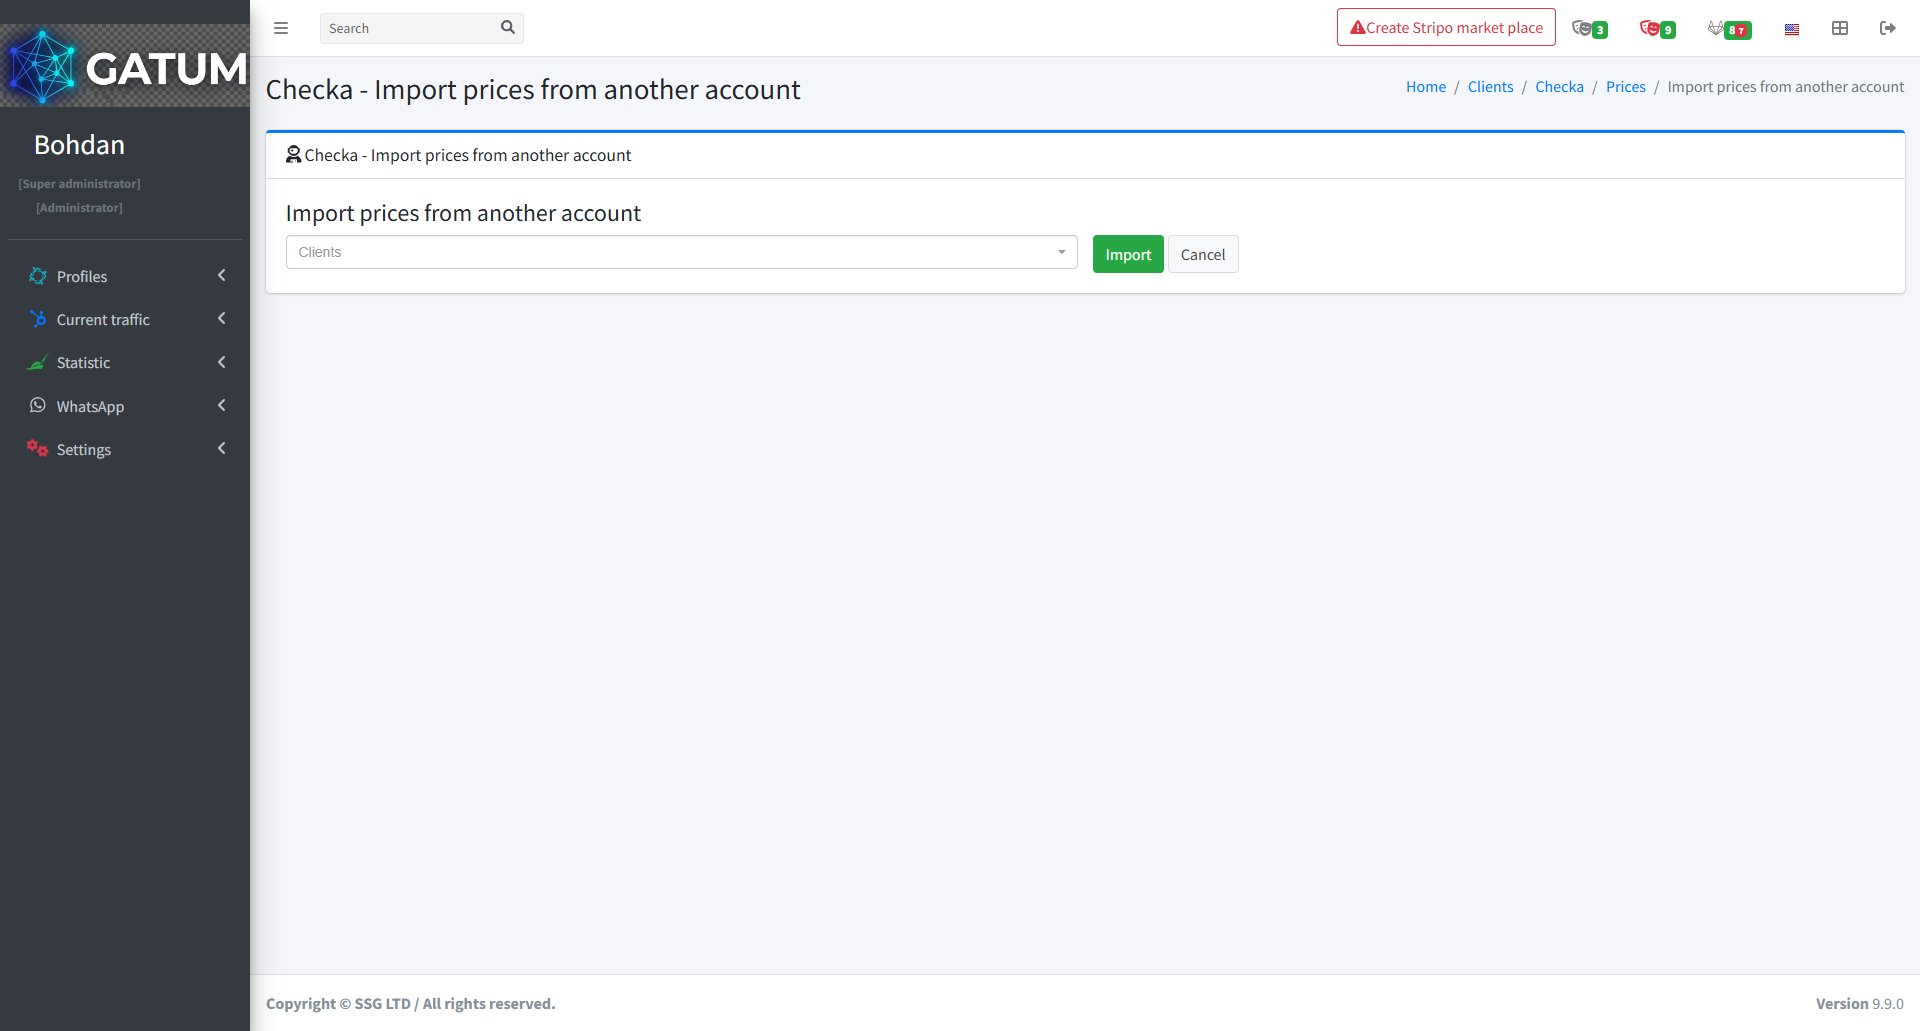
How to Copy Prices from Another Client?
If you've already set up prices for one client and need to apply the same pricing to another, you can copy them in a few clicks instead of adding each price manually.
Go to Profiles → Clients.
Click on the client's name.
Open the Destinations tab.
Click Show all in the Prices block.
In the window that opens, click Import prices from another account:
In the window that opens:
Select the client whose prices you want to copy from the dropdown and click Import.
All prices from the selected account will be copied to this client immediately.
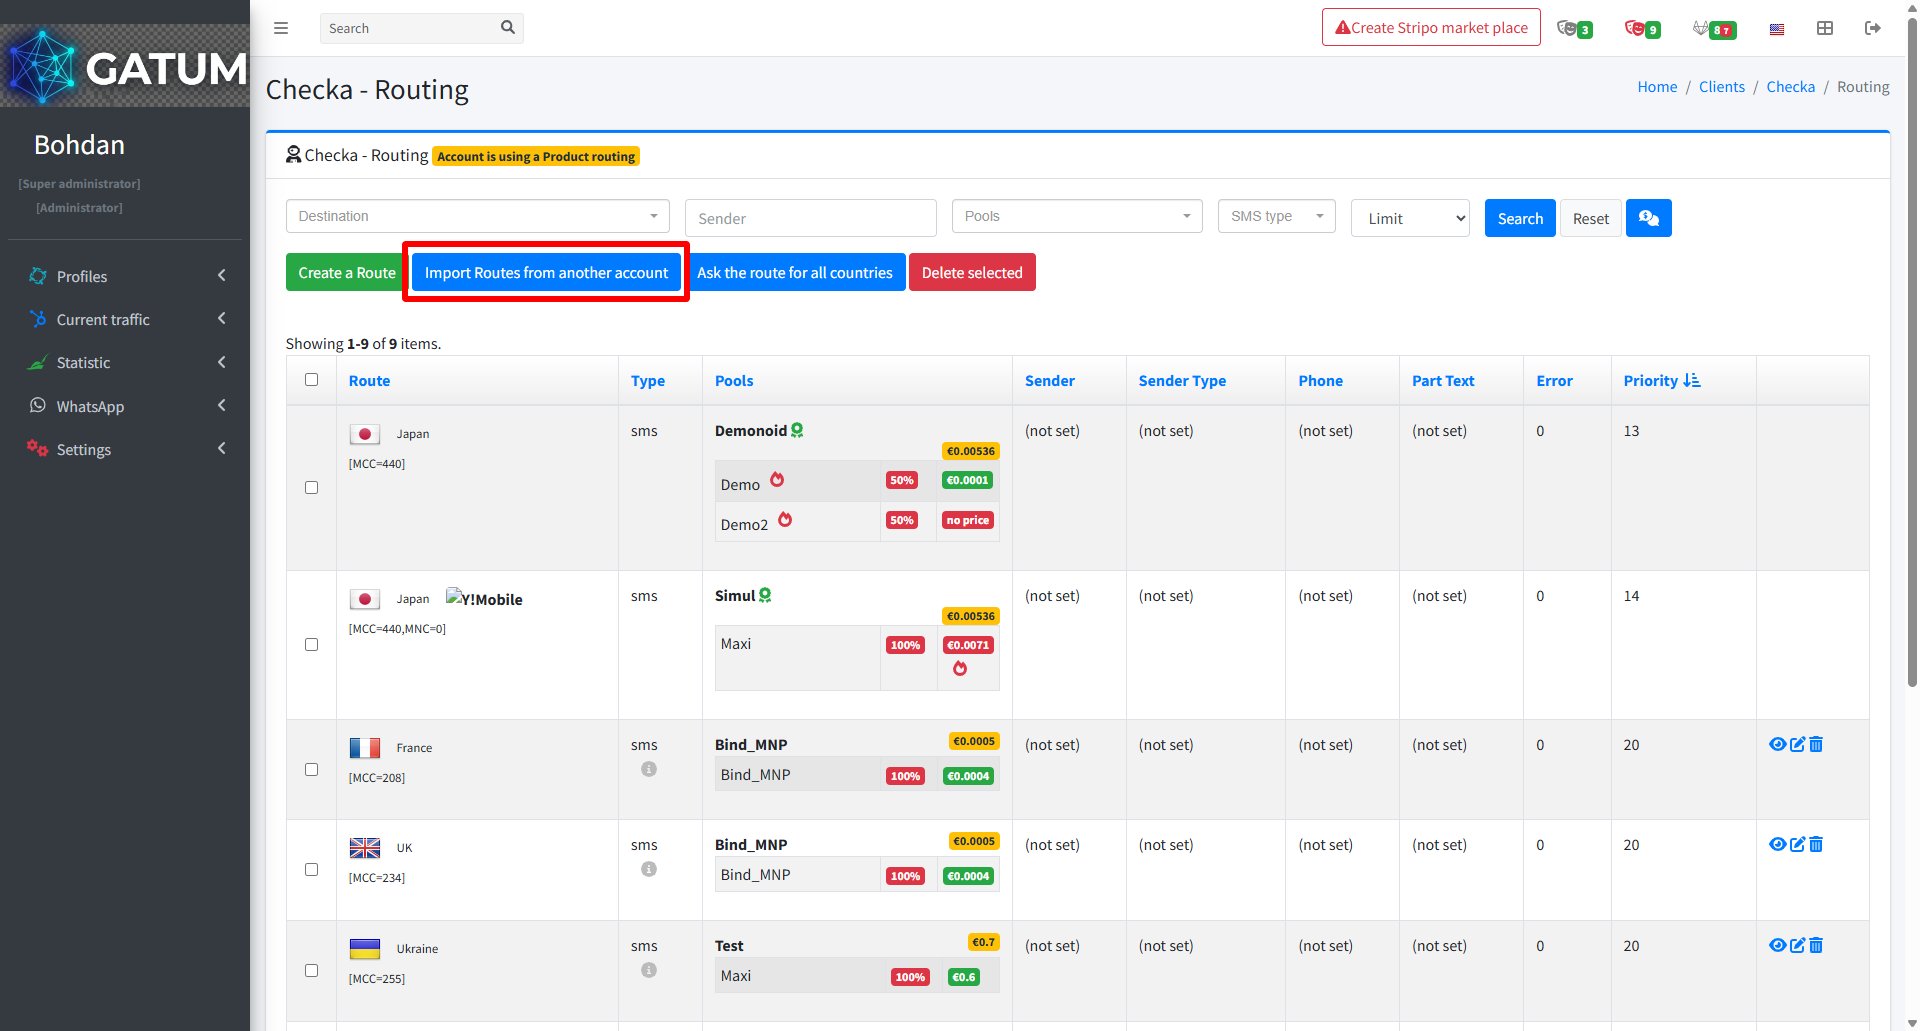
How to Copy Routing from Another Client?
If you've already set up routing for one client and need to apply the same configuration to another, you can copy it in a few clicks instead of creating routes from scratch.
Go to Profiles → Clients.
Click on the name of the client you want to copy the routing to.
Open the Destinations tab.
Click Show all in the Personal routing block.
In the window that opens, click Import Routes from another account.
In the window that opens:
Select the client whose routing you want to copy from the dropdown and click Import.
All routes from the selected account will be copied to this client's routing immediately.
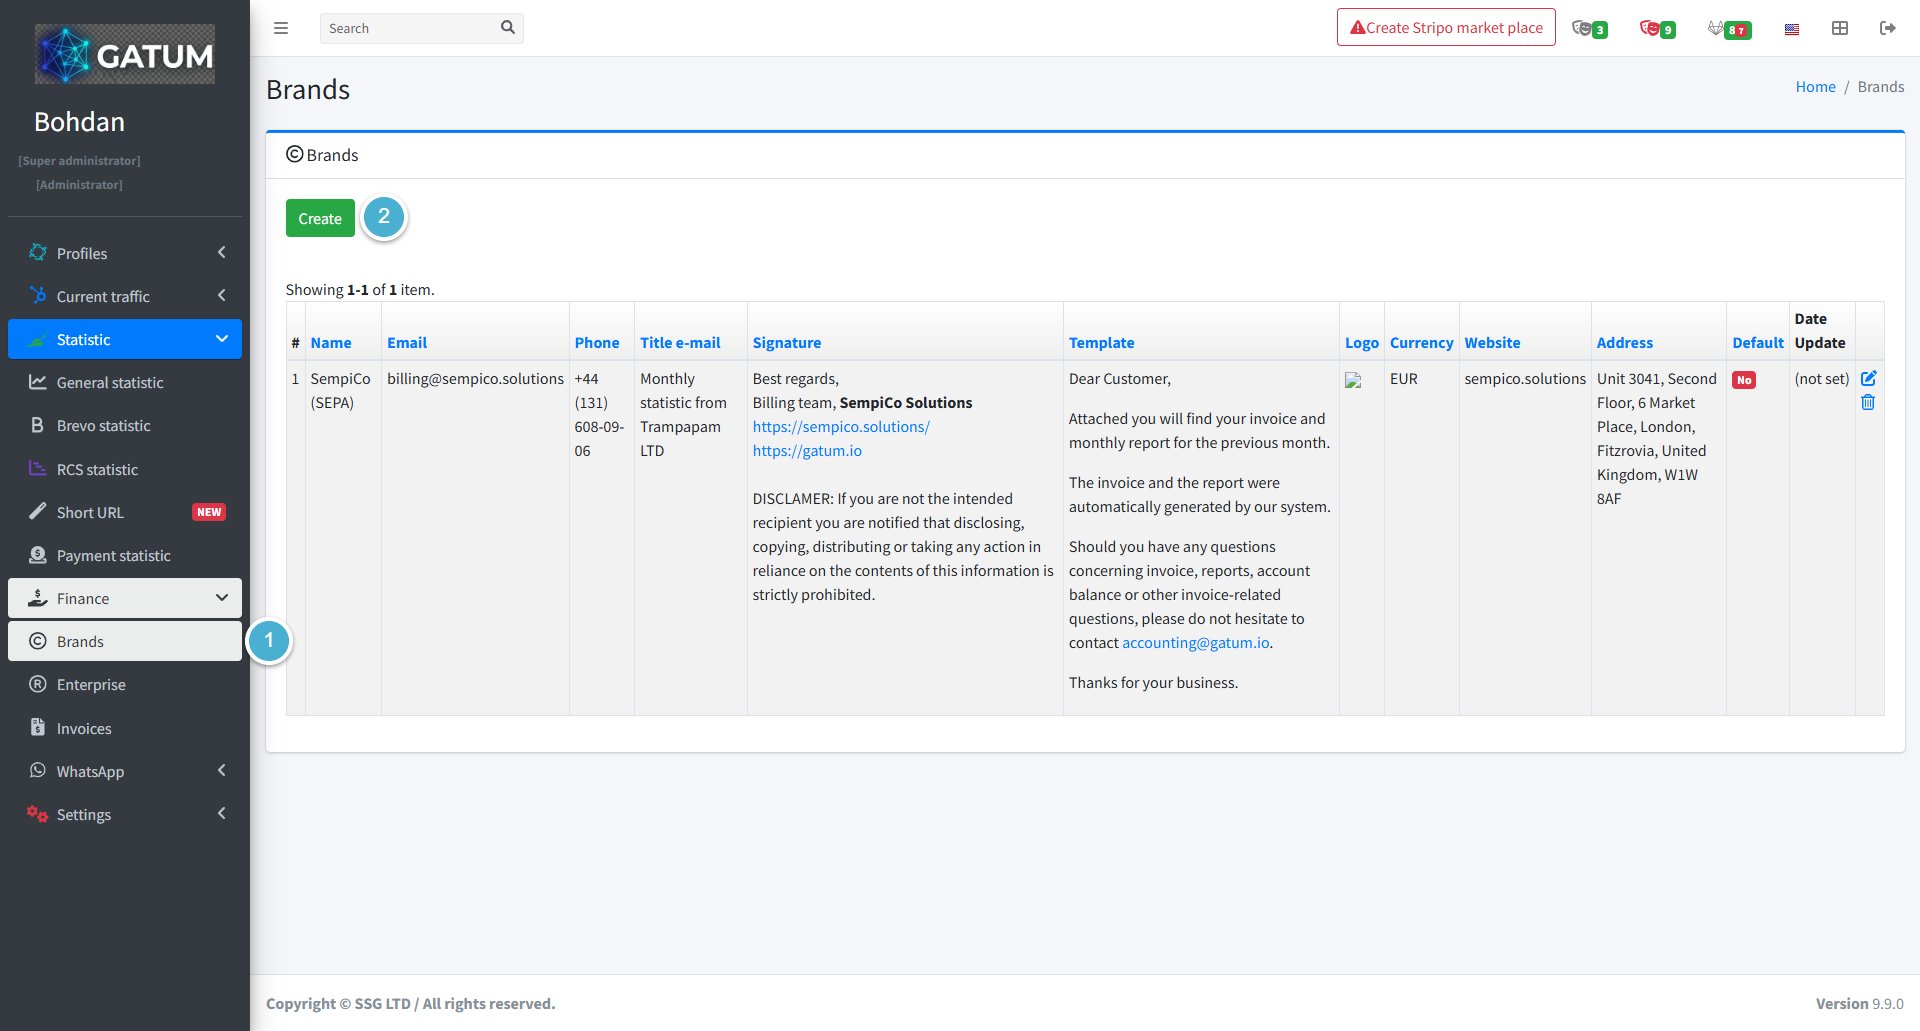
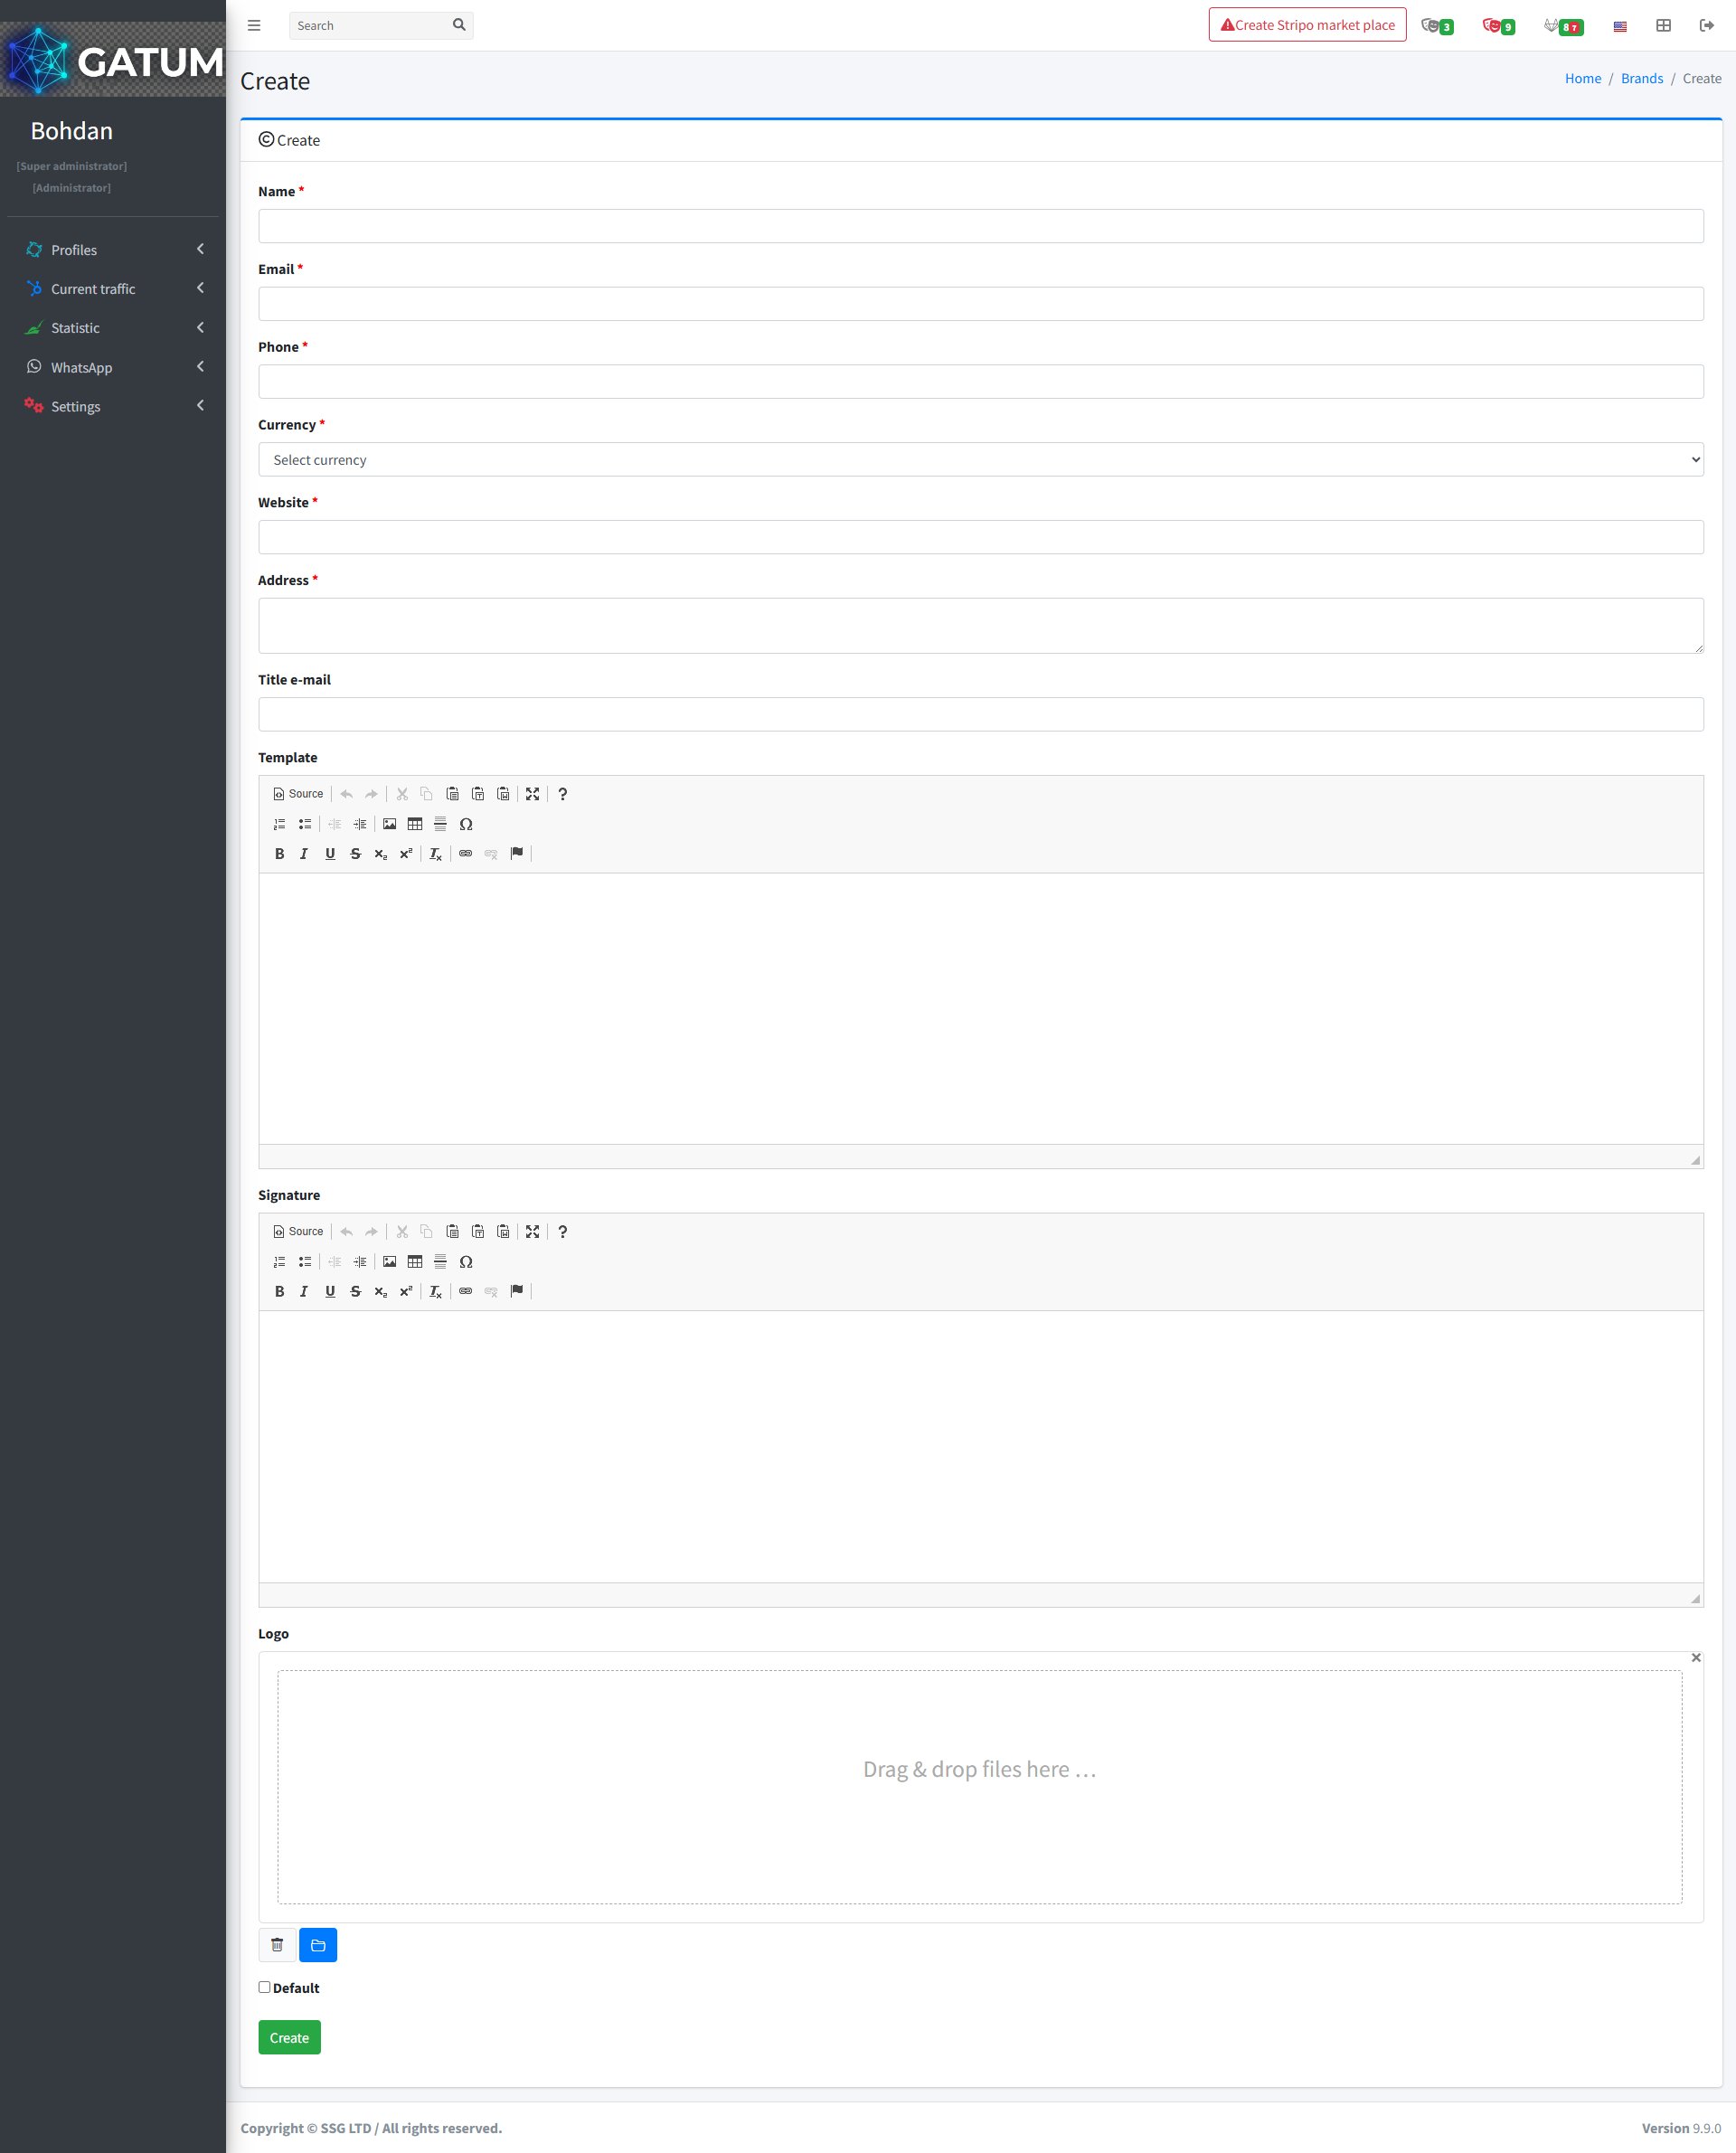
How to Create a Brand on the Platform?
Brands represent the company identity used on invoices you issue to clients. Each brand holds your contact details, invoice template, email signature, and logo. You can create multiple brands if you operate under different company names or billing entities.
Go to Statistic → Finance → Brands.
Click Create.
In the window that opens:
Fill in the fields:
Field
Description
Name
The brand name as it will appear on invoices.
Email
The billing email address shown on invoices.
Phone
The contact phone number shown on invoices.
Currency
The currency this brand invoices in.
Website
Your company website address.
Address
Your company's physical address.
Title e-mail (optional)
The subject line used for invoice emails sent under this brand.
Template (optional)
The body text of the invoice email. Use the rich text editor to format it.
Signature (optional)
The email signature appended to invoice emails.
Logo (optional)
Your company logo displayed on the invoice. Drag and drop a file or use the upload button.
Default (optional)
Mark this brand as the default to use it automatically when issuing invoices without selecting a brand manually.
Click Create.
Once created, the brand appears in the Brands list and becomes available when generating invoices for clients. To update any details later, use the edit icon in the brand's row.
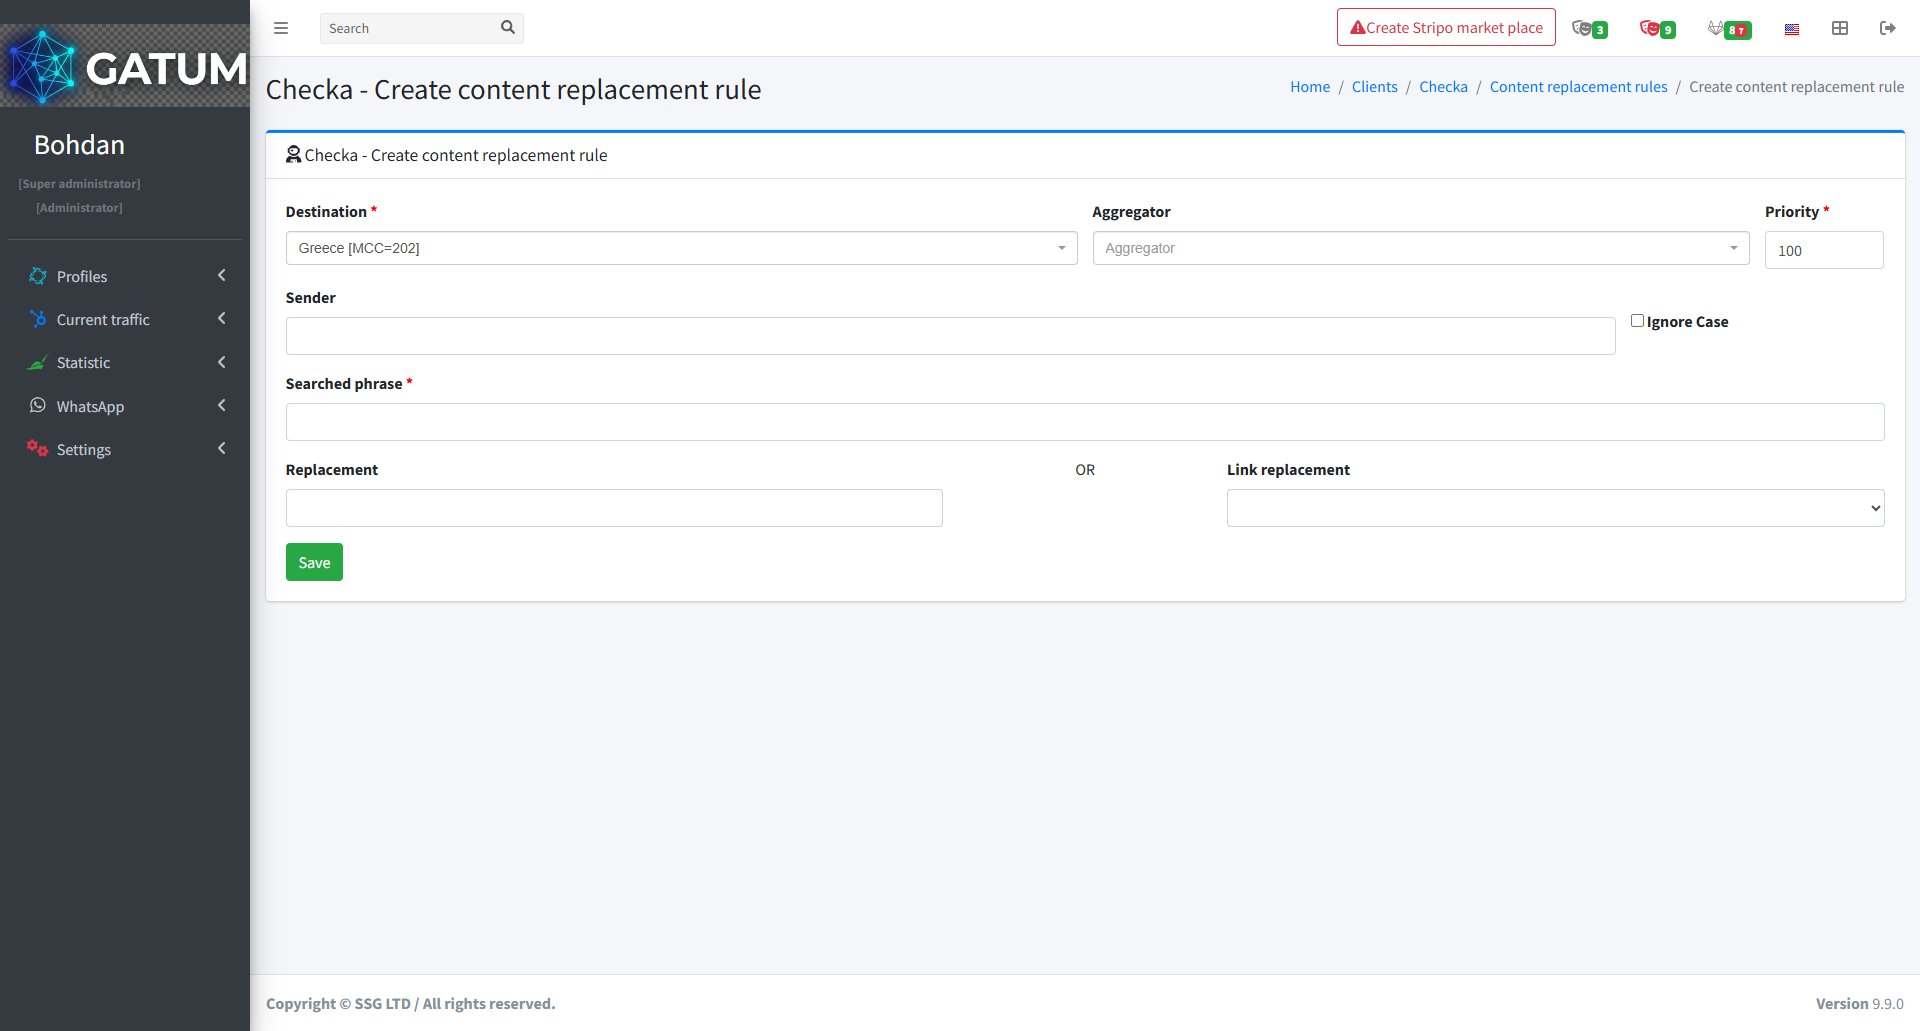
How to Create a Content Replacement Rule?
Content replacement rules let you automatically modify the text of outgoing SMS messages before they're sent. You can use them to swap out specific words or phrases, remove unwanted content, or apply built-in transformations. All traffic from the client goes through these rules regardless of which aggregator is used.
Go to Profiles → Clients.
Click on the client's name.
Open the Replacement rules tab.
Click Create in the Content replacement rules block:
In the window that opens:
Fill in the fields:
Field
Description
Destination
The country or network this rule applies to
Priority
Order in which rules are applied — lower number means higher priority
Aggregator (optional)
Apply this rule only when sending through a specific aggregator. Leave empty to apply to all
Sender (optional)
Apply this rule only to messages with a specific sender name. Leave empty to apply to all
Ignore Case (optional)
Match the searched phrase regardless of capitalisation
Searched phrase
The word or phrase to look for in the message content
Replacement (optional)
The text to replace the searched phrase with
Link replacement (optional)
Select a built-in transformation to apply instead of a text replacement
Click Save.
Built-in Link Replacement Options
The Link replacement dropdown contains ready-made transformations you can apply without writing custom text:
Option
What it does
Persian digits
Converts all Arabic/Roman digits in the message to Persian digits (e.g. 1 → ١, 2 → ٢)
NULL
Erases the phrase found in the Searched phrase field from the message content entirely
Macros
Macros are special commands you enter in the Searched phrase field. They perform specific automated actions on the SMS content:
Macro
What it does
{SAVEDIGITS}
Finds and remembers standalone digit sequences (e.g. codes, passwords)
{SAVEURL}
Finds and remembers a URL in the message
{SAVEPHONE}
Finds and remembers a phone number in the message
{CHANGEDIGITS}
Inserts a character between the remembered digits
{CHANGEDIGITSEACHSECOND}
Inserts a character after every 2 symbols in the remembered digits
{EMPTY}
Matches messages with no content and replaces them with the text in the Replacement field
{BEGIN}
Inserts the value from the Replacement field at the start of the message
{END}
Inserts the value from the Replacement field at the end of the message
{TRIM}
Removes spaces at the beginning and end of the message
{TRIM-RTL}
Removes the right-to-left character (used for Arabic and Hebrew content)
{NEWLINE}
Replaces newline characters with a space
{PHONE}
Replaces the recipient's phone number with custom content
{UPPERCASE}
Converts all message text to upper case
{LOWERCASE}
Converts all message text to lower case
{CLEAR}
Erases all message content
{CUTONEPART}
Cuts the message to one part — only the first part is kept
{CUTIFMORE}
Removes extra parts if the message exceeds one part after content replacement
{RANDOM_SYMBOLS_BEGIN}
Inserts random characters at the start of the message. The number of characters is set in the Replacement field
{RANDOM_SYMBOLS_END}
Inserts random characters at the end of the message
{RANDOM_DIGITS_BEGIN}
Inserts random digits at the start of the message
{RANDOM_DIGITS_END}
Inserts random digits at the end of the message
{CUTBYLENGTH}
Truncates the message to the number of characters specified in the Replacement field
ⓘ
When using multiple macros for the same client, the order of execution is controlled by the Priority field. For example, if you're using {SAVEDIGITS}, {END}, and {CUTBYLENGTH} together, set {SAVEDIGITS} to priority 1, {END} to 2, and {CUTBYLENGTH} to 3 so they run in the right sequence.
If you need a custom macro for a specific use case, contact your Gatum manager and it can be built individually for you.
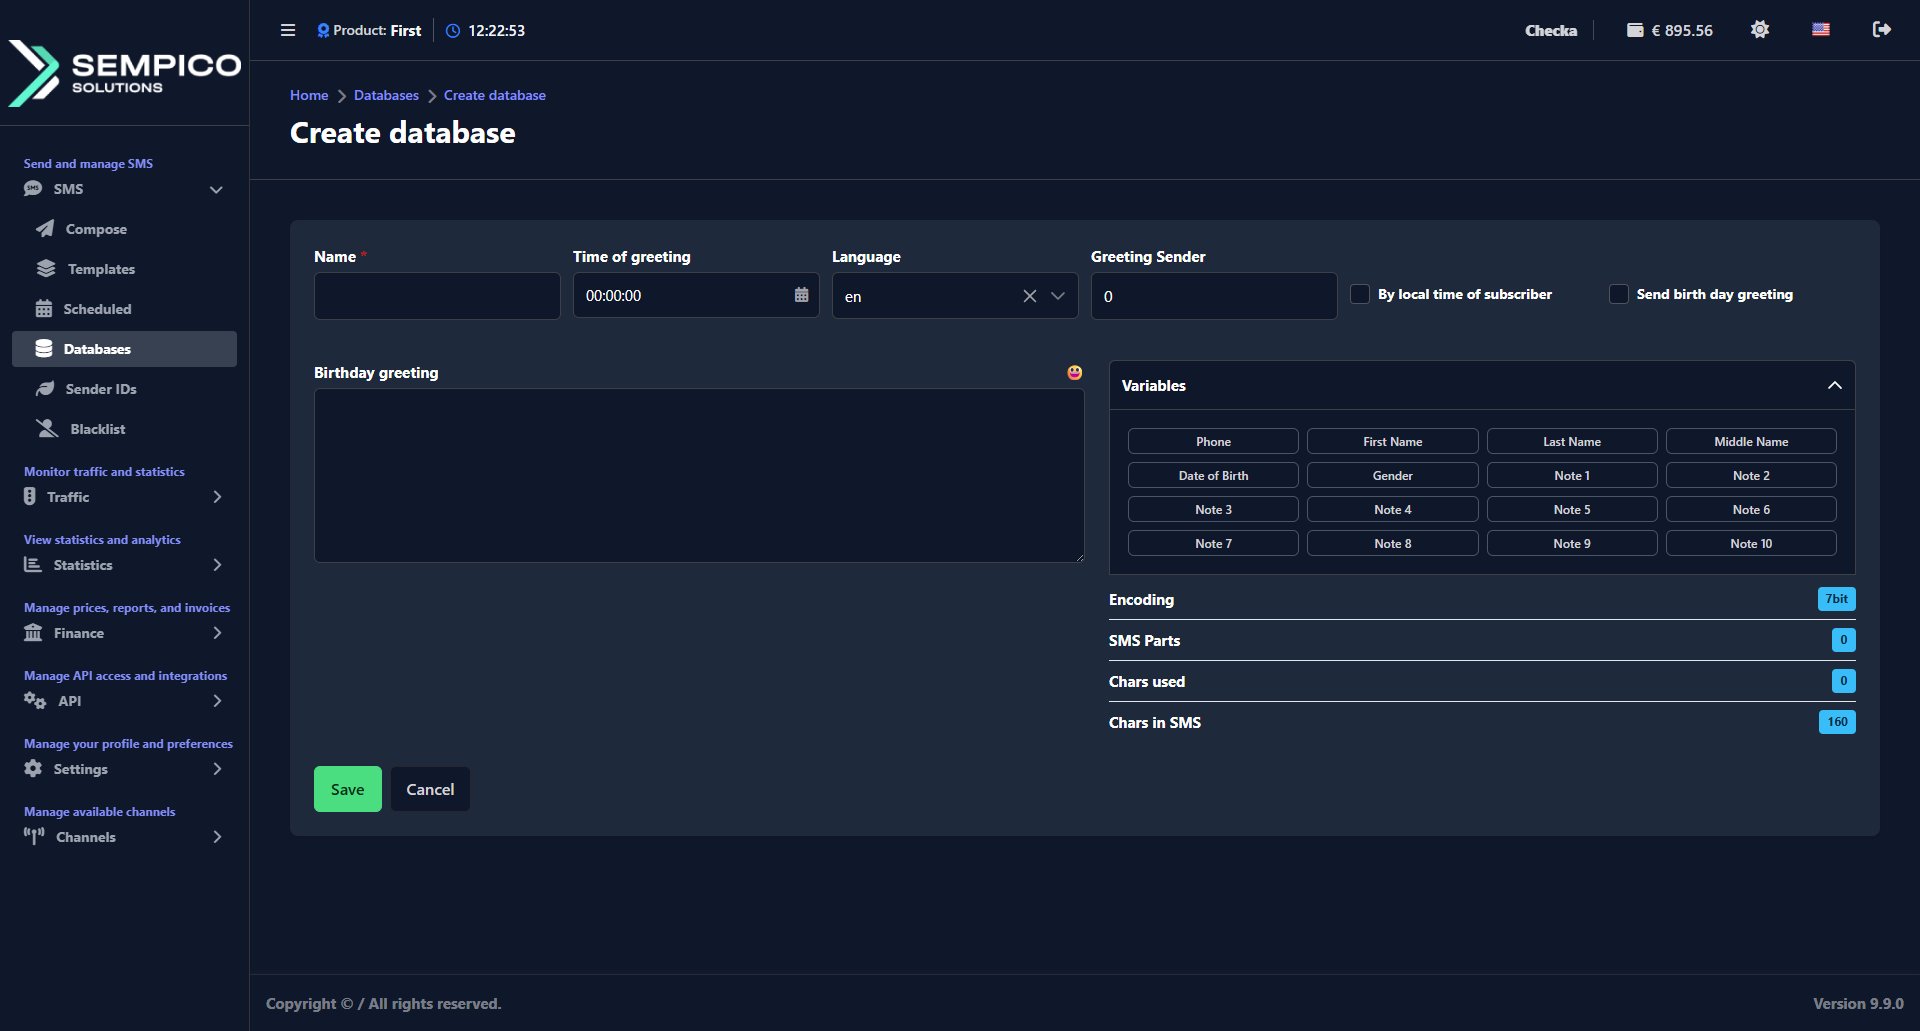
How to Create a Database of Numbers?
Databases let you save and organize contact lists for SMS campaigns. Instead of entering phone numbers manually every time, you create a database once and reuse it across multiple campaigns.
Step 1: Create a Database
Go to SMS → Databases.
Click the Create button:
In the window that opens:
Fill in the required fields:
Field
What to do
Name
A clear name for the database. For example, "Clients UK" or "Newsletter subscribers"
Time of greeting
The time when the birthday greeting should be sent
Language
The language of the birthday greeting
Greeting Sender (optional)
The Sender ID used for birthday greetings
By local time of subscriber
Enable to send the greeting at the subscriber's local time
Send birthday greeting
Enable to activate automatic birthday greetings
Birthday greeting (optional)
The SMS text for the birthday greeting. Supports Variables and emoji
Click Save.
The database will appear in the list on the Databases page.
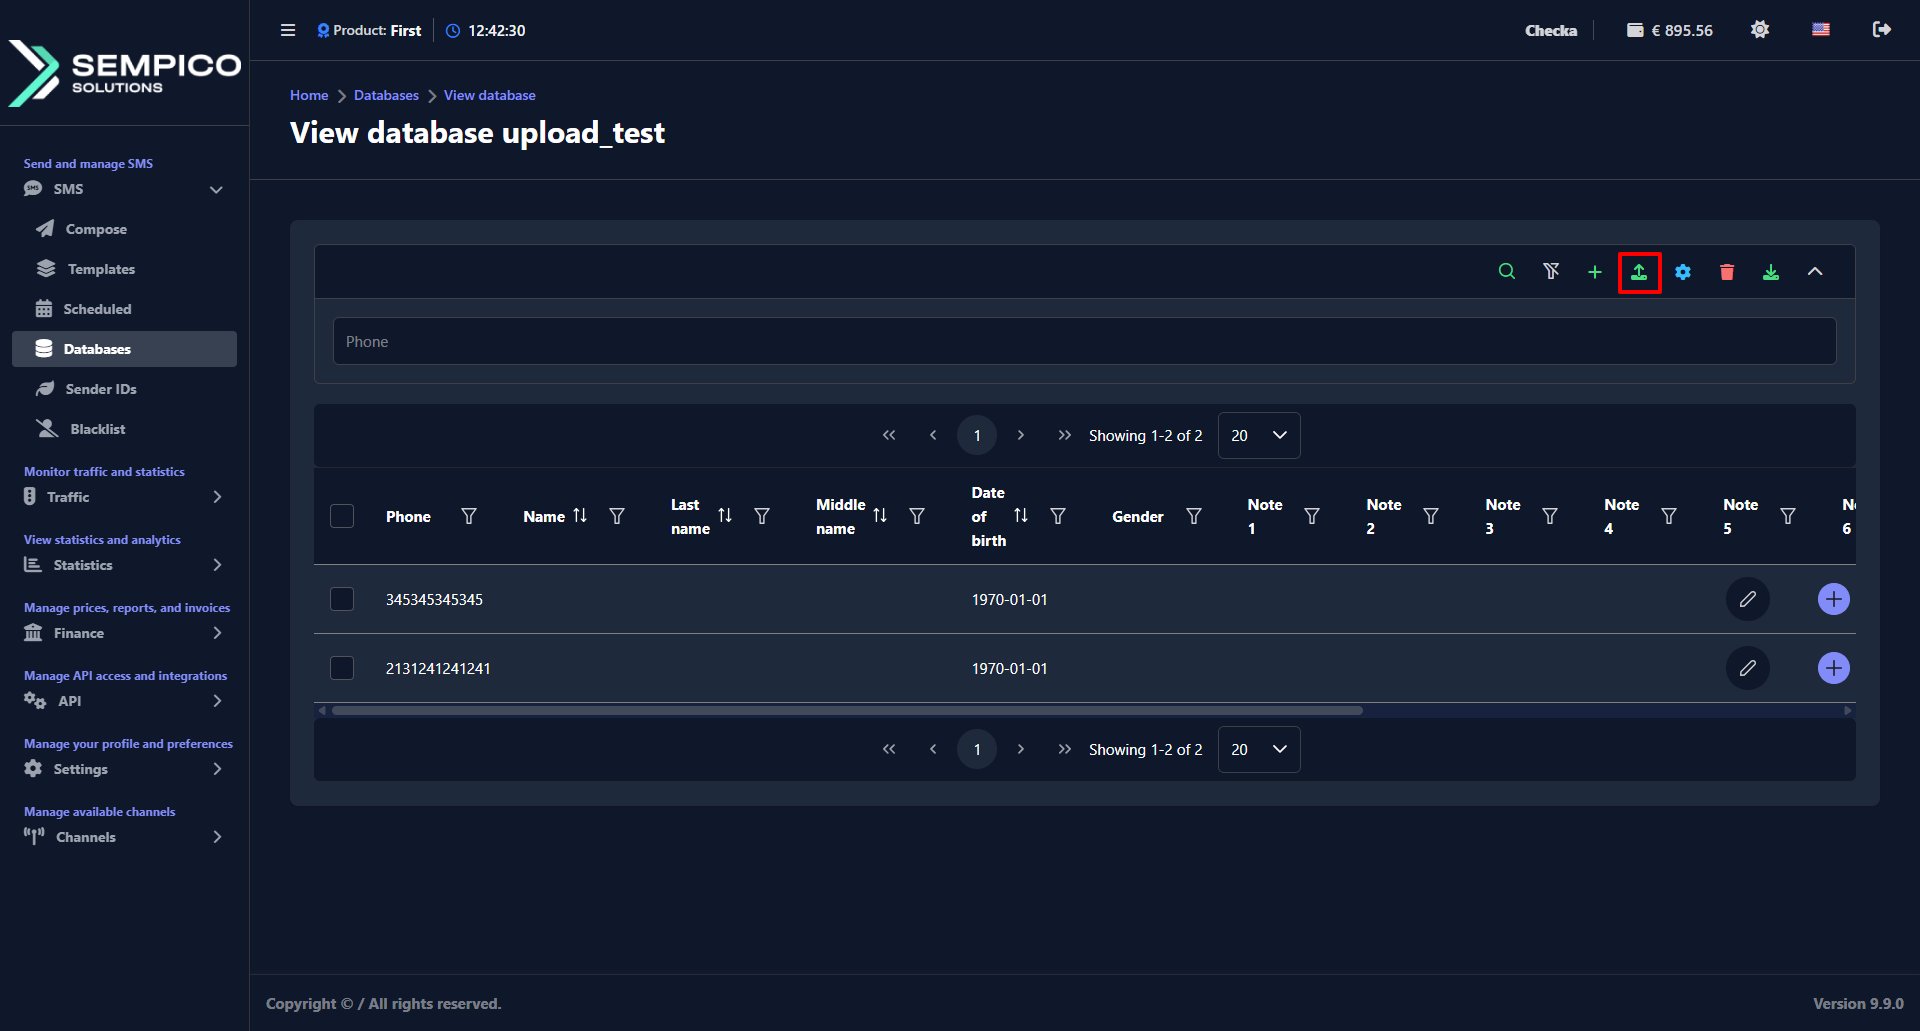
Step 2: Add Numbers to the Database
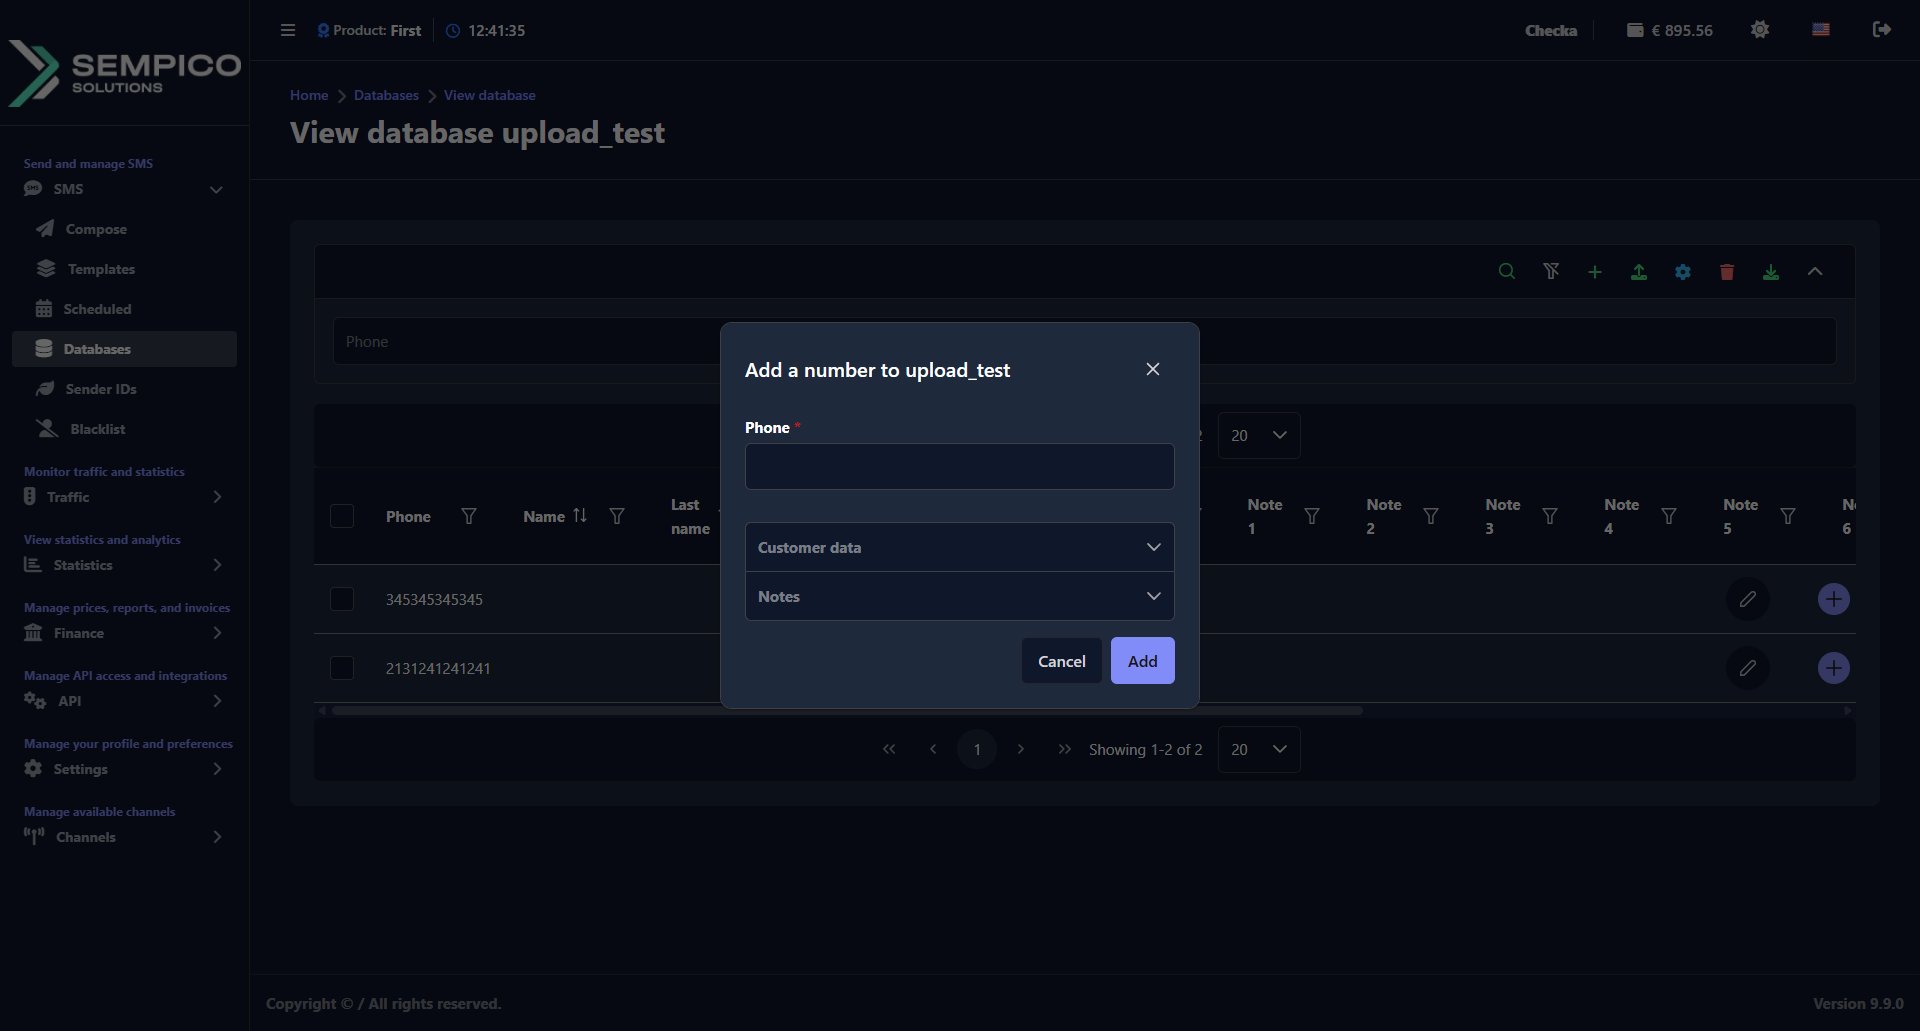
On the Databases page, click the + button on the right side of the database row, then click View:
You can add numbers in two ways:
Option A: Add One Number Manually
Click the + button in the top right corner of the page:
In the window that opens:
Fill in the fields:
Click Add.
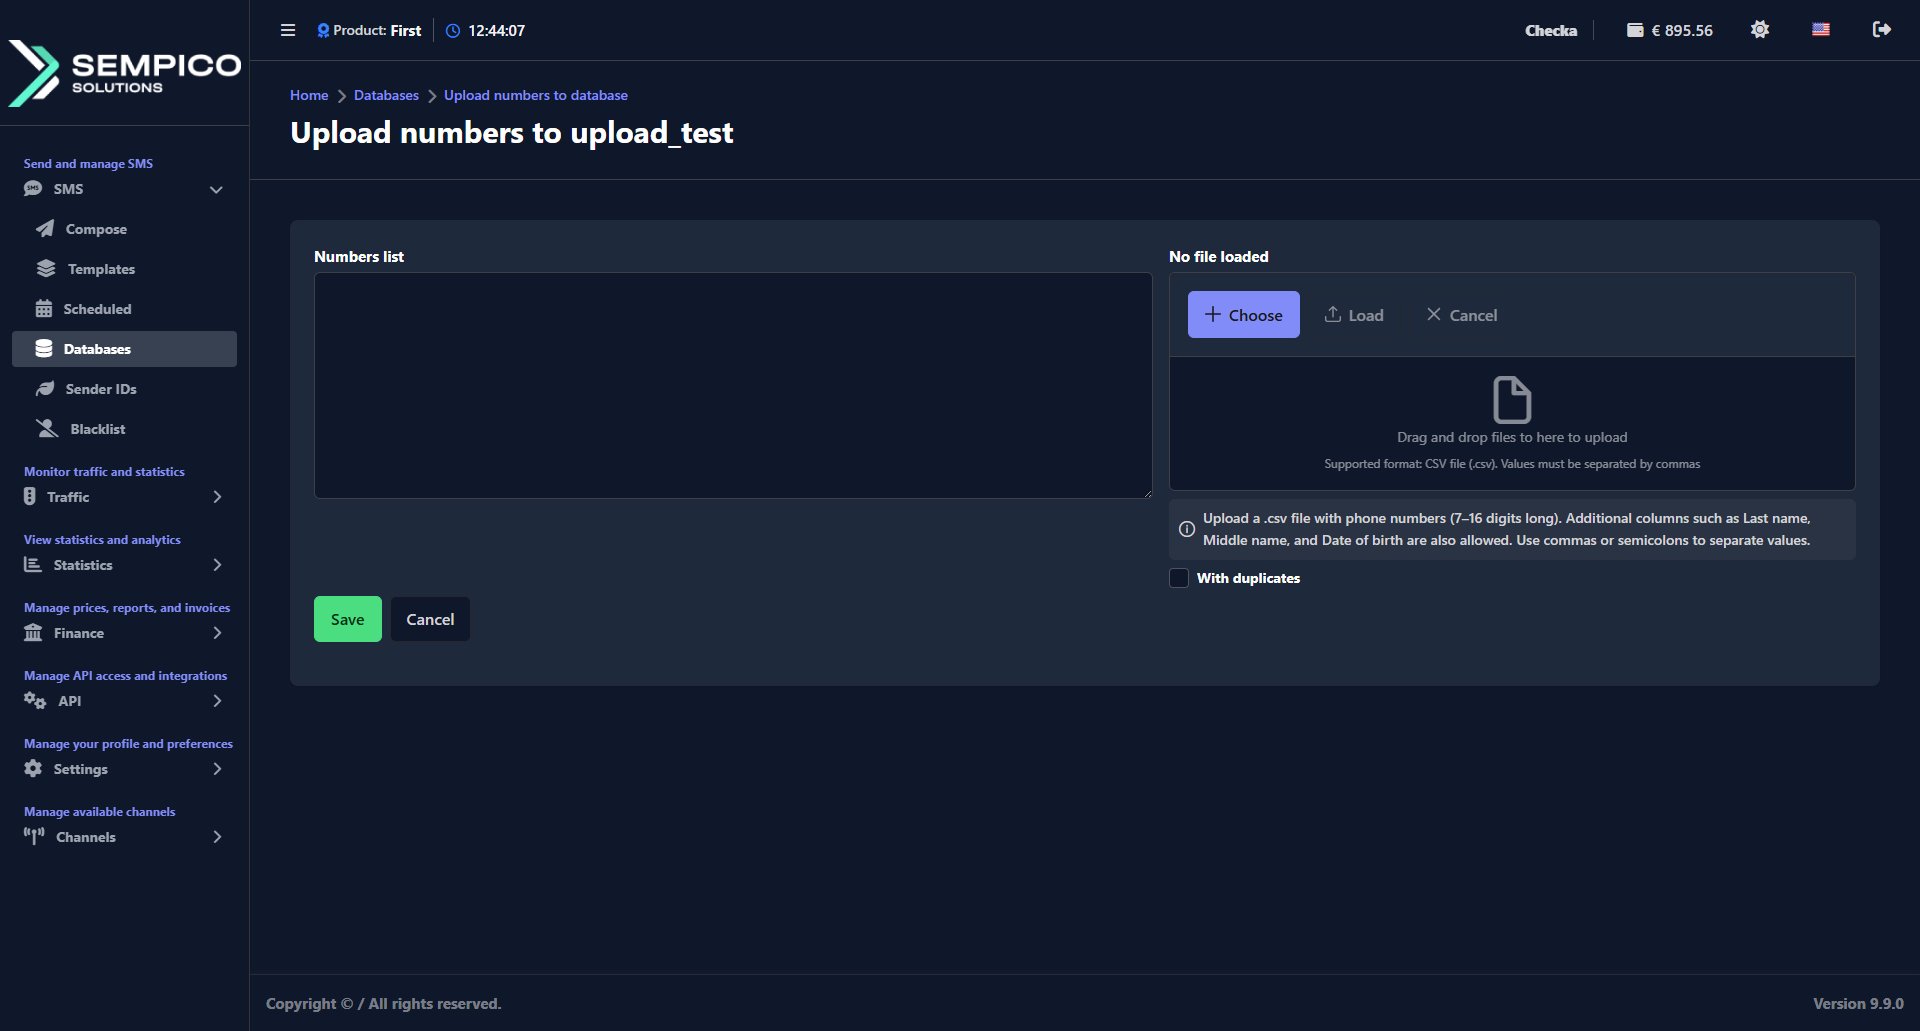
Option B: Upload Numbers from a File
Click the Upload numbers button (arrow up icon) in the top right corner:
In the window that opens:
Add numbers in one of two ways:
Enter them manually in the Numbers list field — one number per line or separated by commas
Upload a CSV file using the file upload block on the right — click Choose to select the file, then click Load
The CSV file must contain phone numbers 7–16 digits long. Additional columns, such as Last name, Middle name, and Date of birth, are supported. Use commas or semicolons to separate values.
Enable With duplicates if you want to allow the same number to appear more than once in the database.
Click Save.
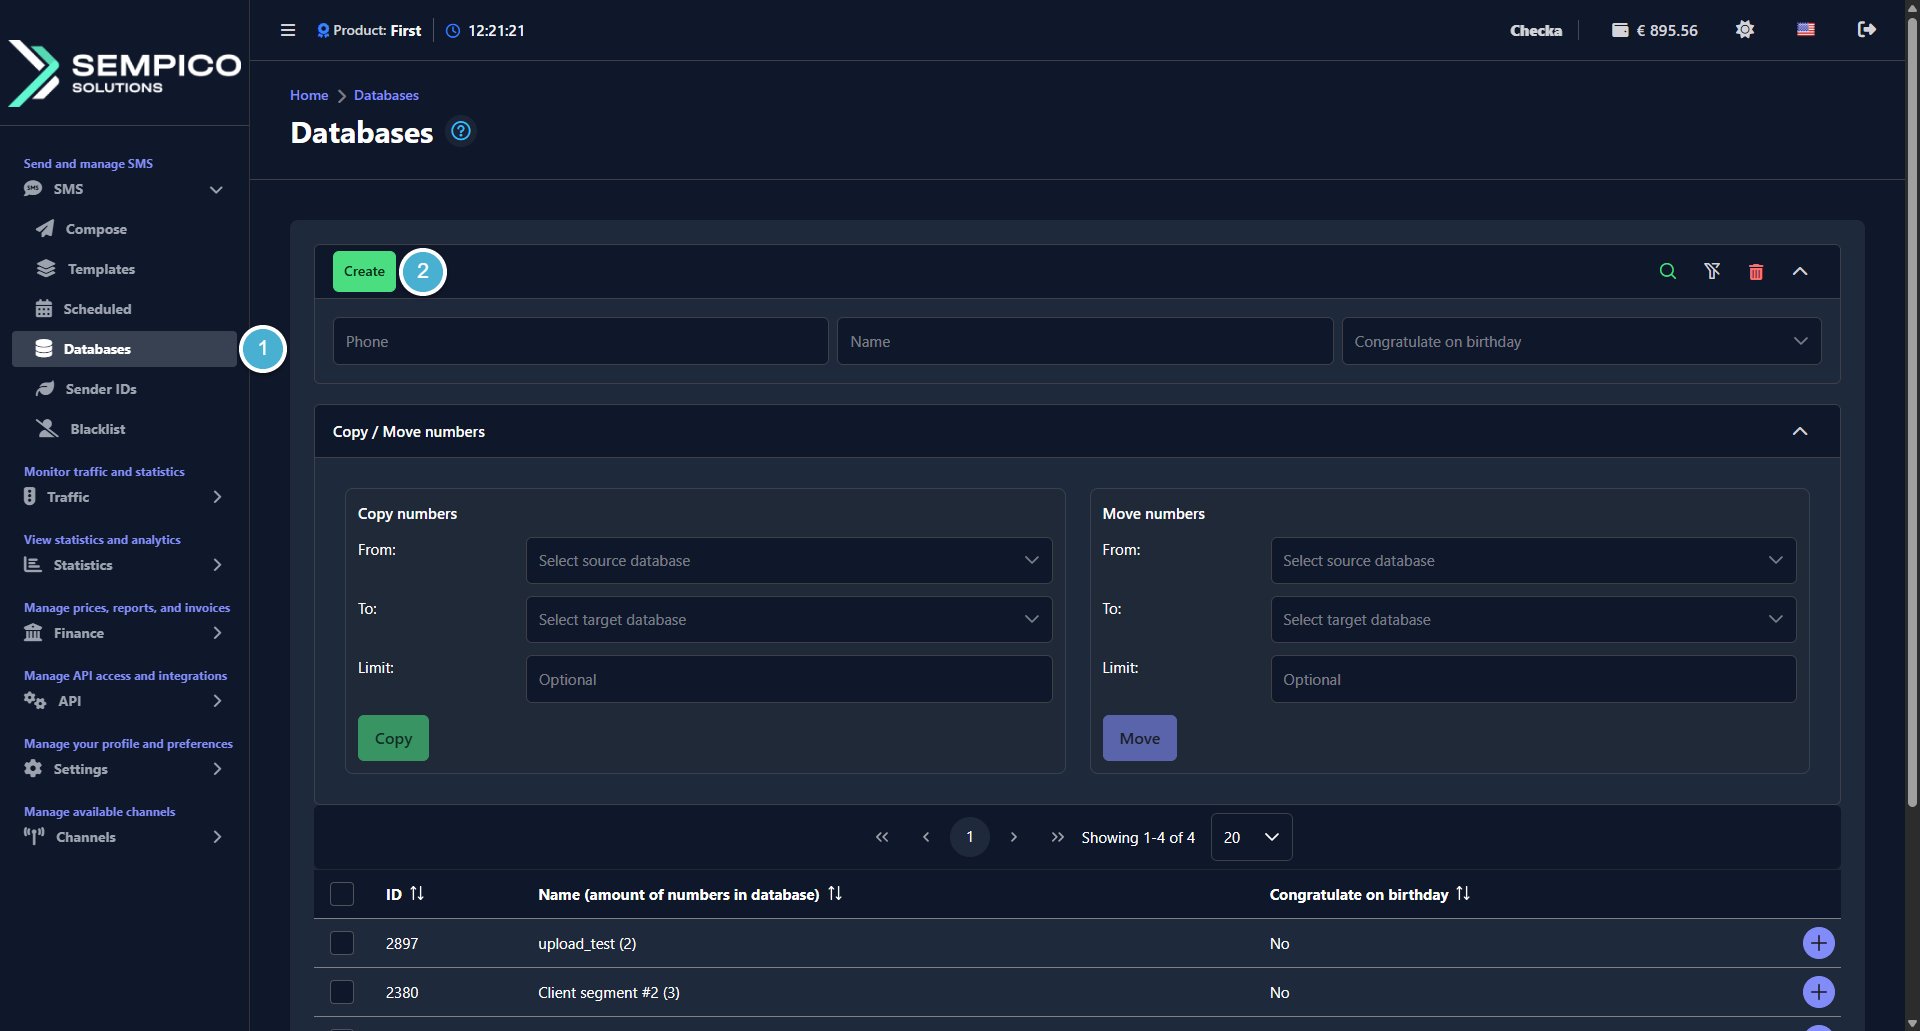
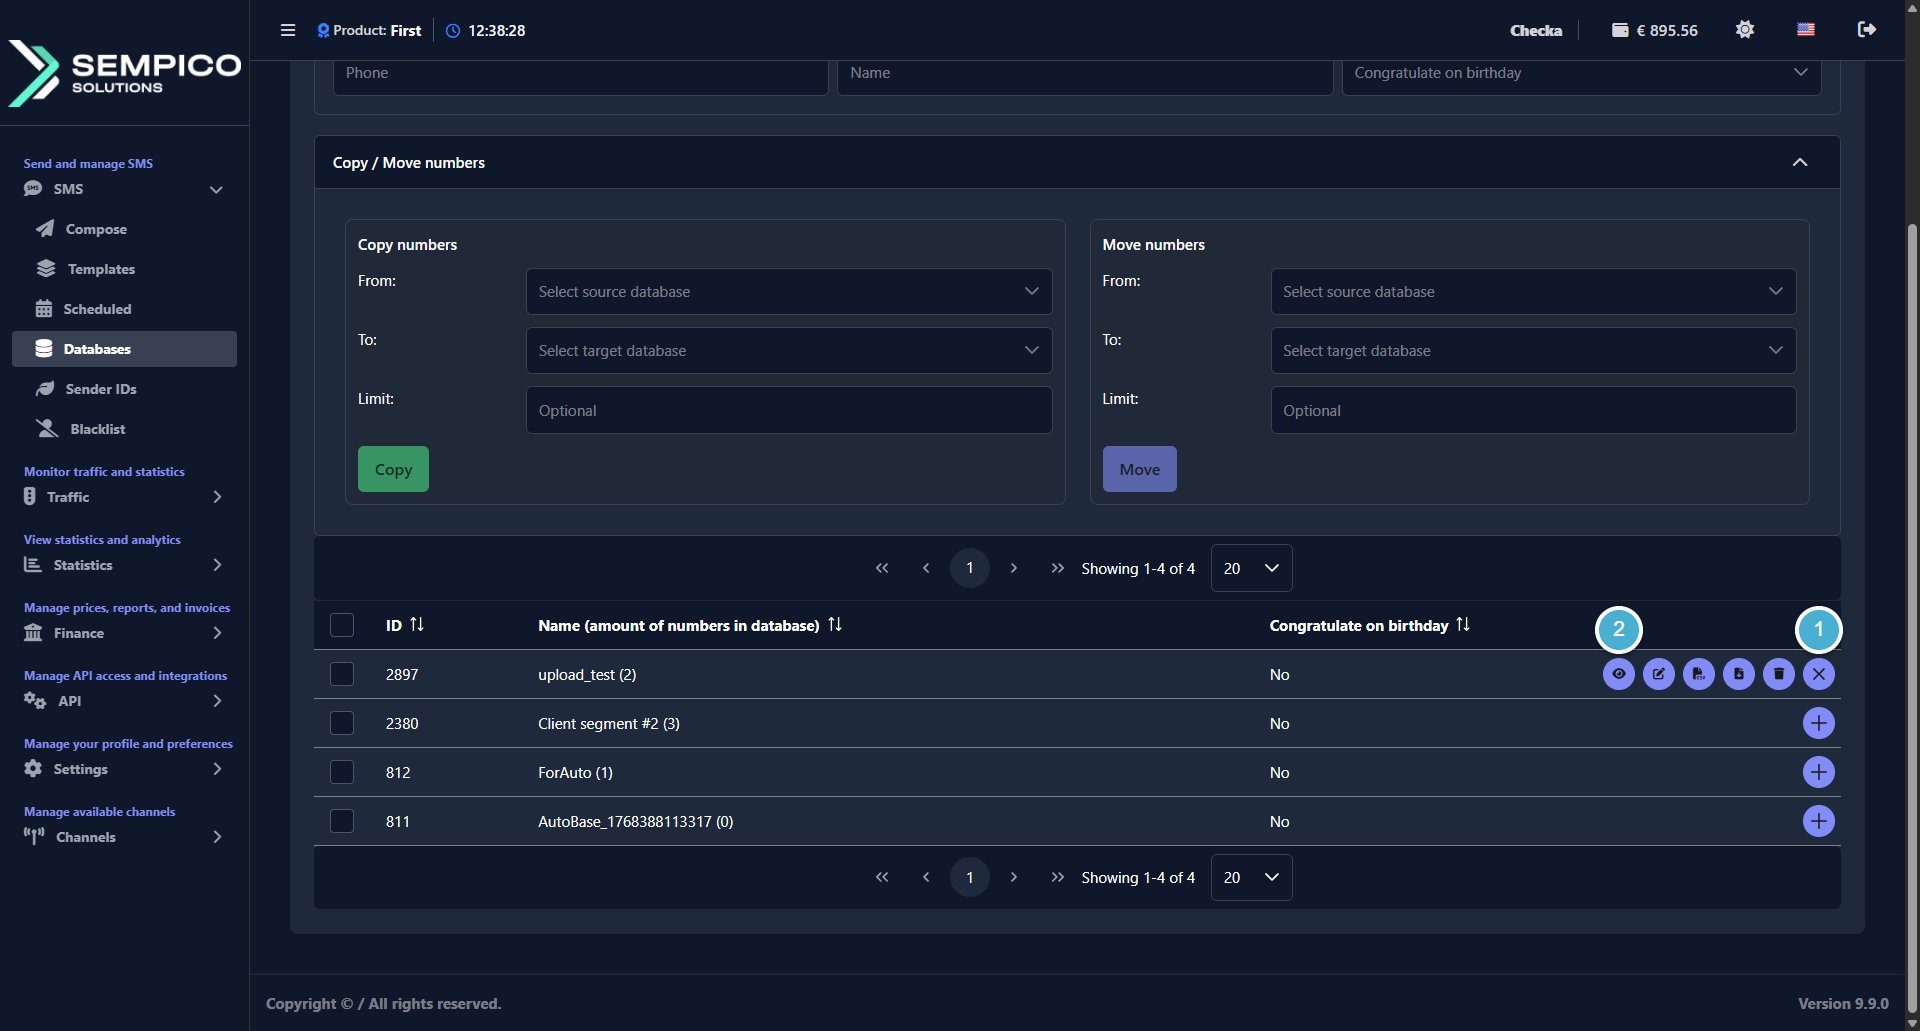
Copy or Move Numbers Between Databases
On the main Databases page, you will find the Copy / Move numbers block that lets you transfer numbers from one database to another:
To copy numbers:
In the Copy numbers block, select the source database in the From field and the target database in the To field.
Optionally, set a Limit to copy only a specific number of records.
Click Copy. The numbers will be added to the target database. The source database remains unchanged.
To move numbers:
In the Move numbers block, select the source database in the From field and the target database in the To field.
Optionally, set a Limit to move only a specific number of records.
Click Move. The numbers will be added to the target database and removed from the source.
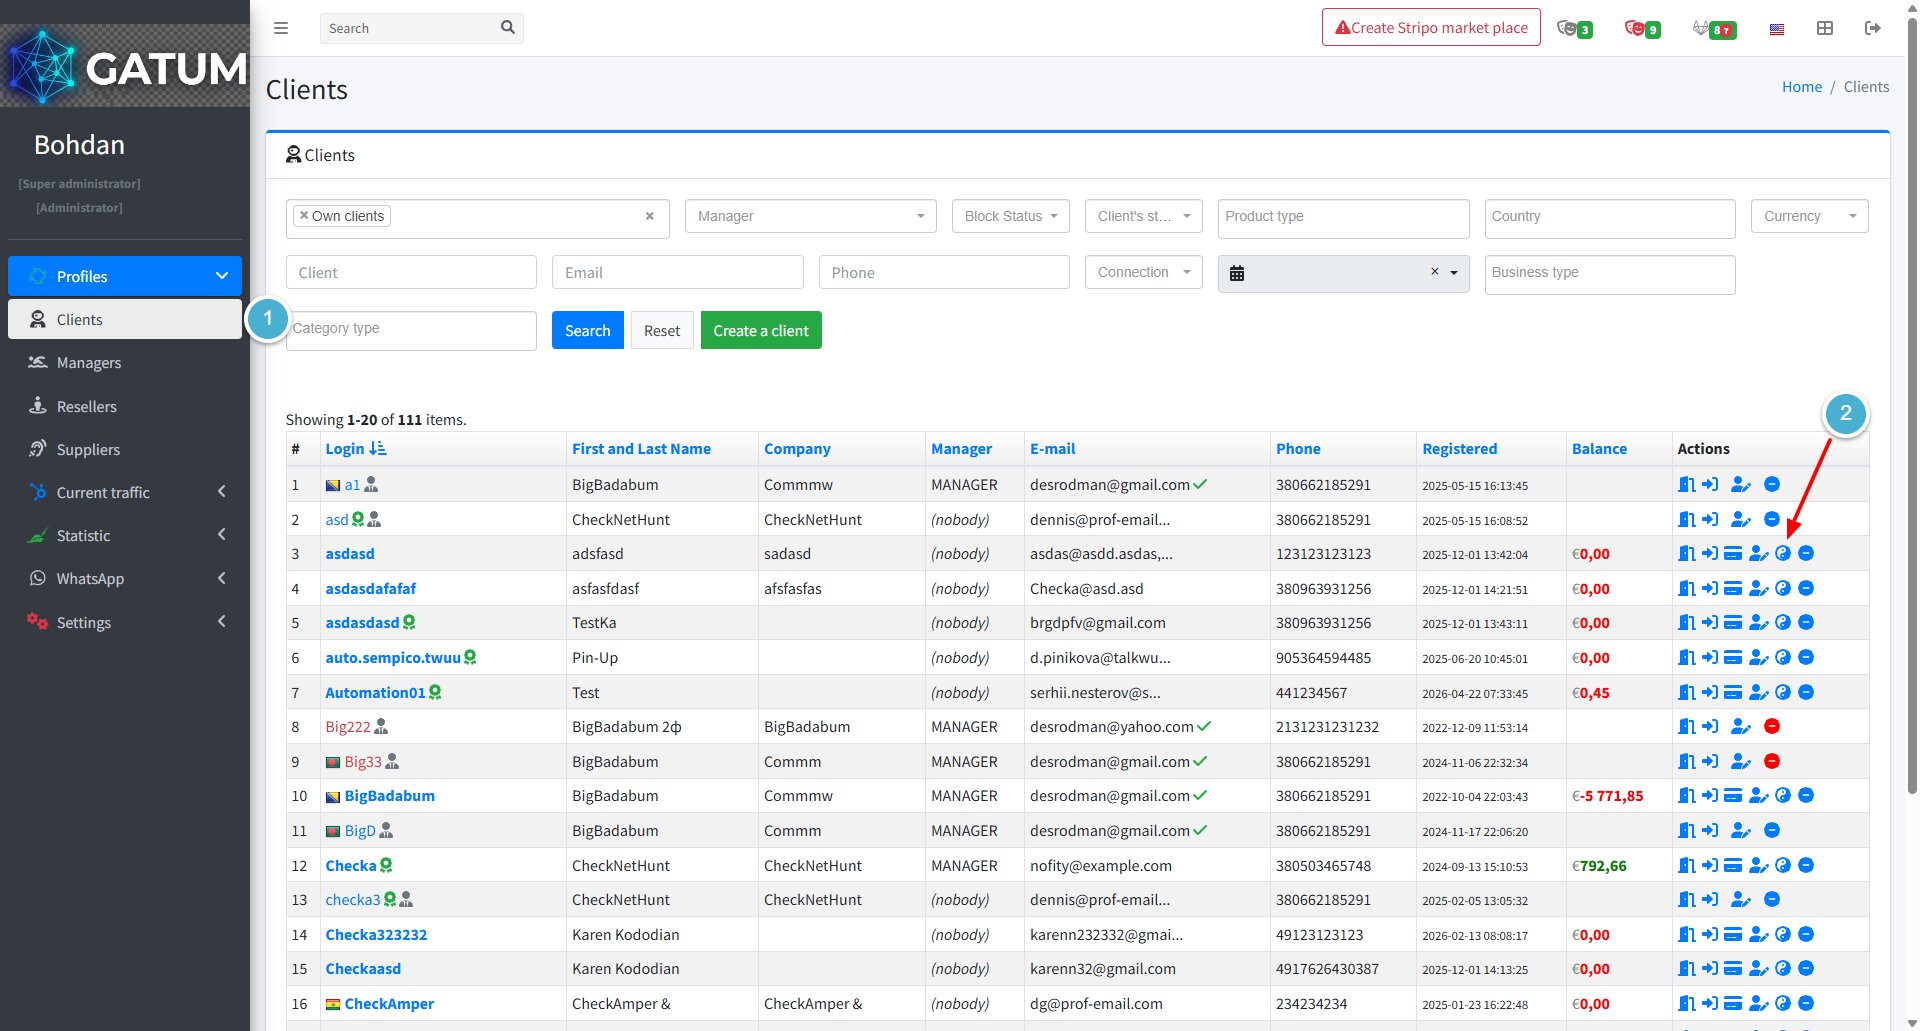
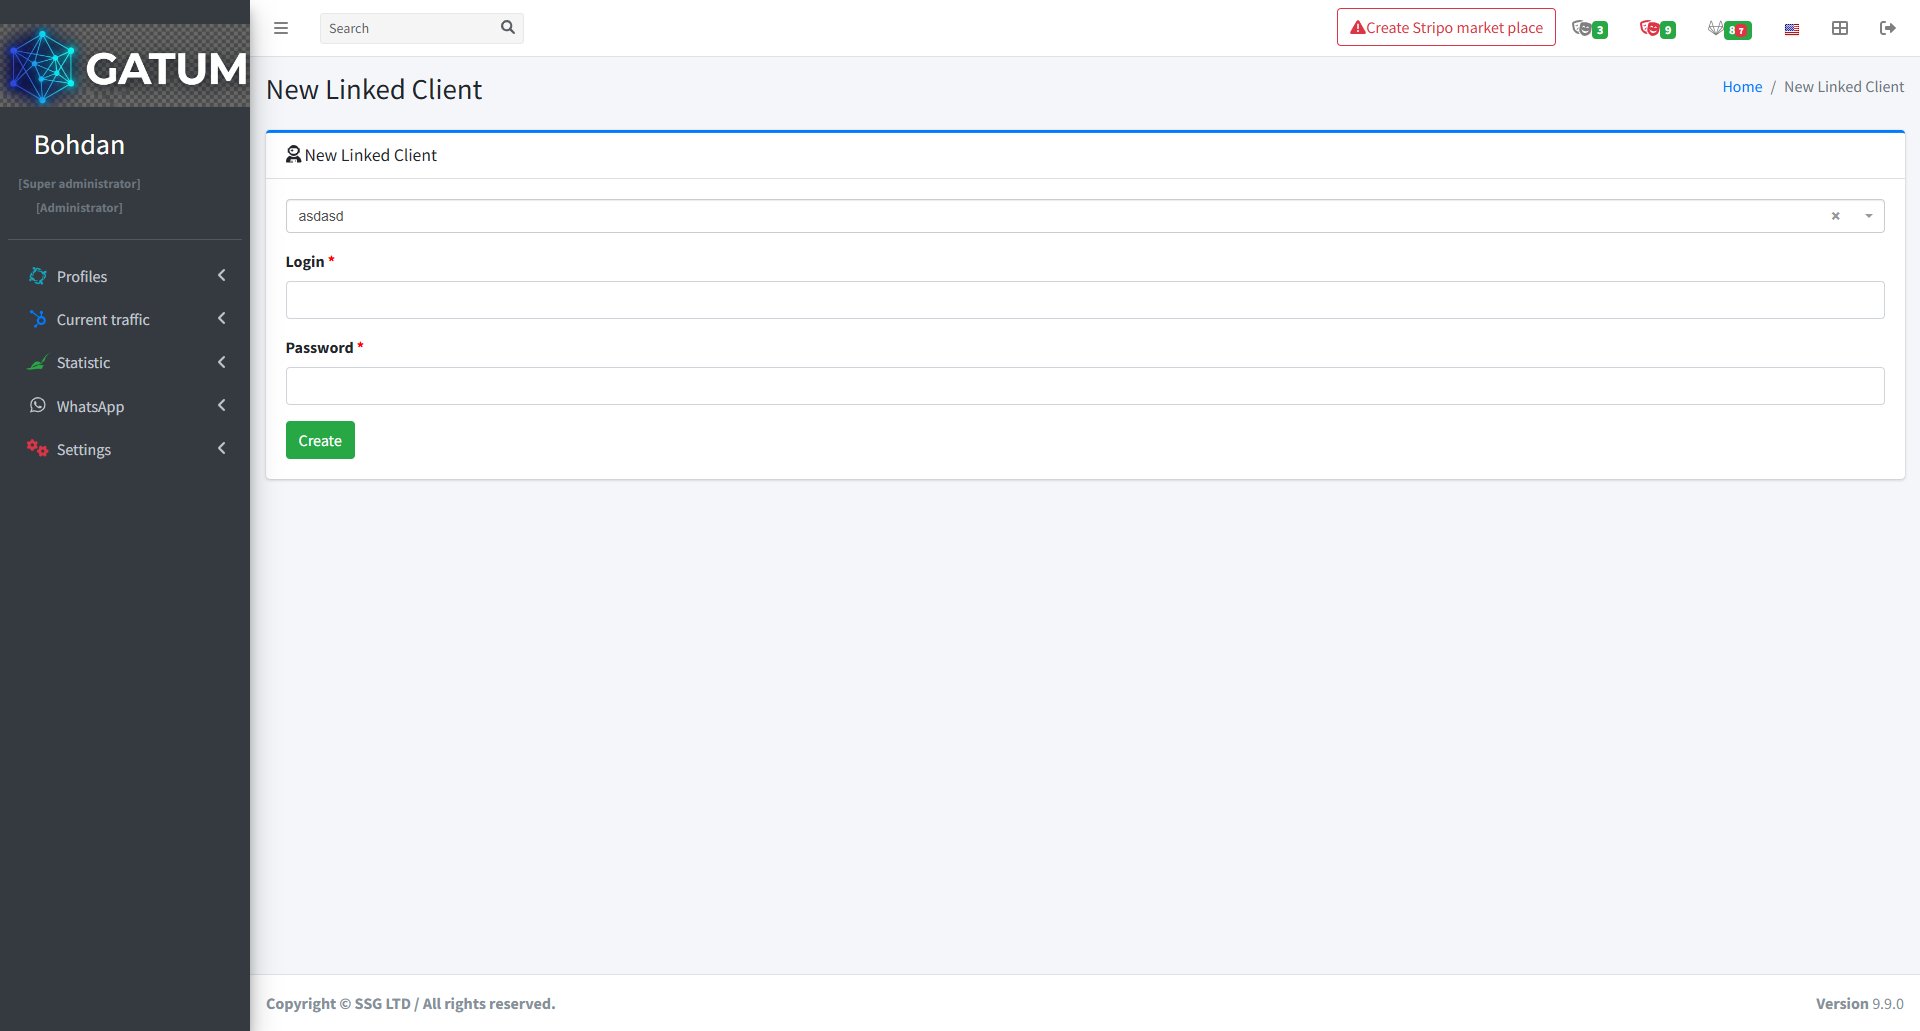
How to Create a Linked Account?
Related accounts let a large client work with multiple logins while sharing a single balance. Each linked account can have its own prices, routes, and SMPP settings, but draws from the same balance pool as the main account. This makes it easier to manage one client's funds regardless of how many accounts they operate from.
Go to Profiles → Clients.
In the Actions column, click the linked accounts icon next to the client.
In the window that opens:
Fill in the fields:
Field
Description
Parent account
Pre-filled with the main account this linked account will be connected to
Login
The login for the new account
Password
The password for the new account
ⓘ Name the linked account so it sorts next to the main account in the client list. For example, if the main account is Orchid_magazine, name the linked one Orchid_magazine_DIR.
Click Create.
The linked account will be created with the same basic settings as the main account. You can then configure separate prices, routes, and SMPP accounts for it independently. The linked account shares the main account's balance – it has no separate top-up function. All related accounts appear in the Clients list alongside the main account.
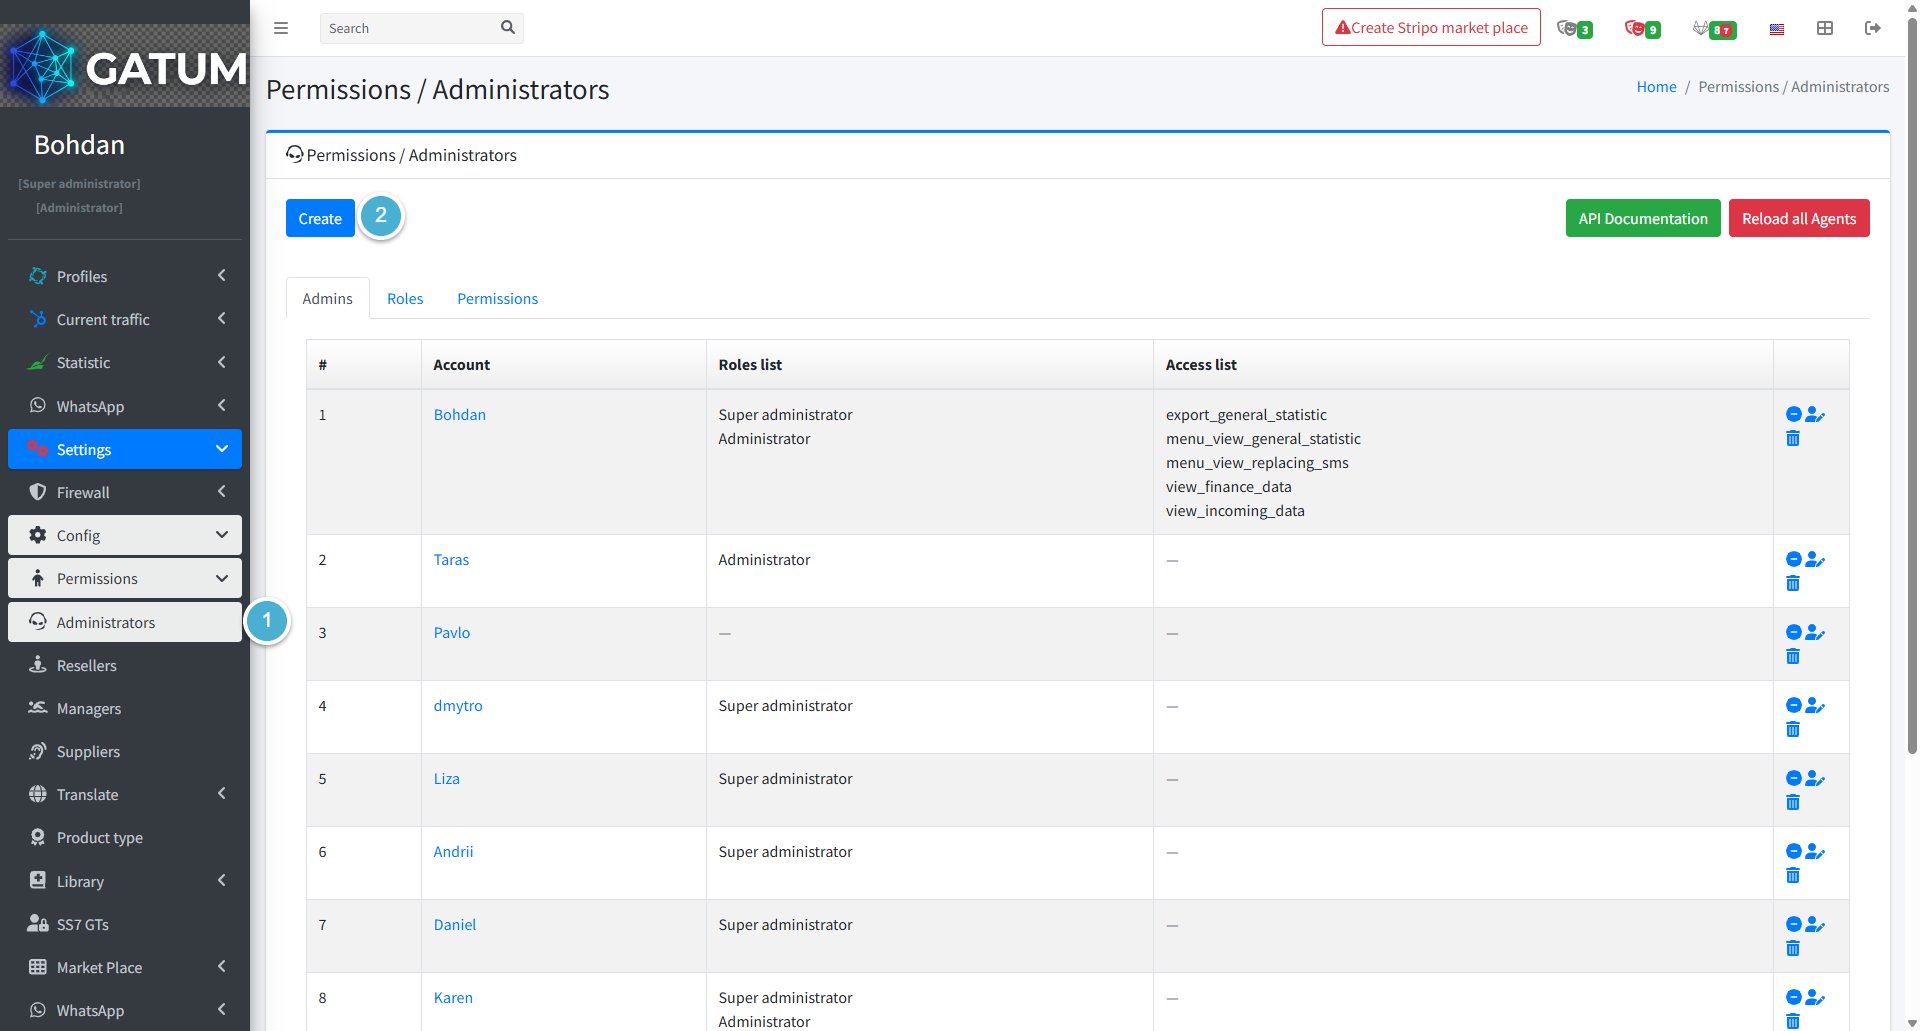
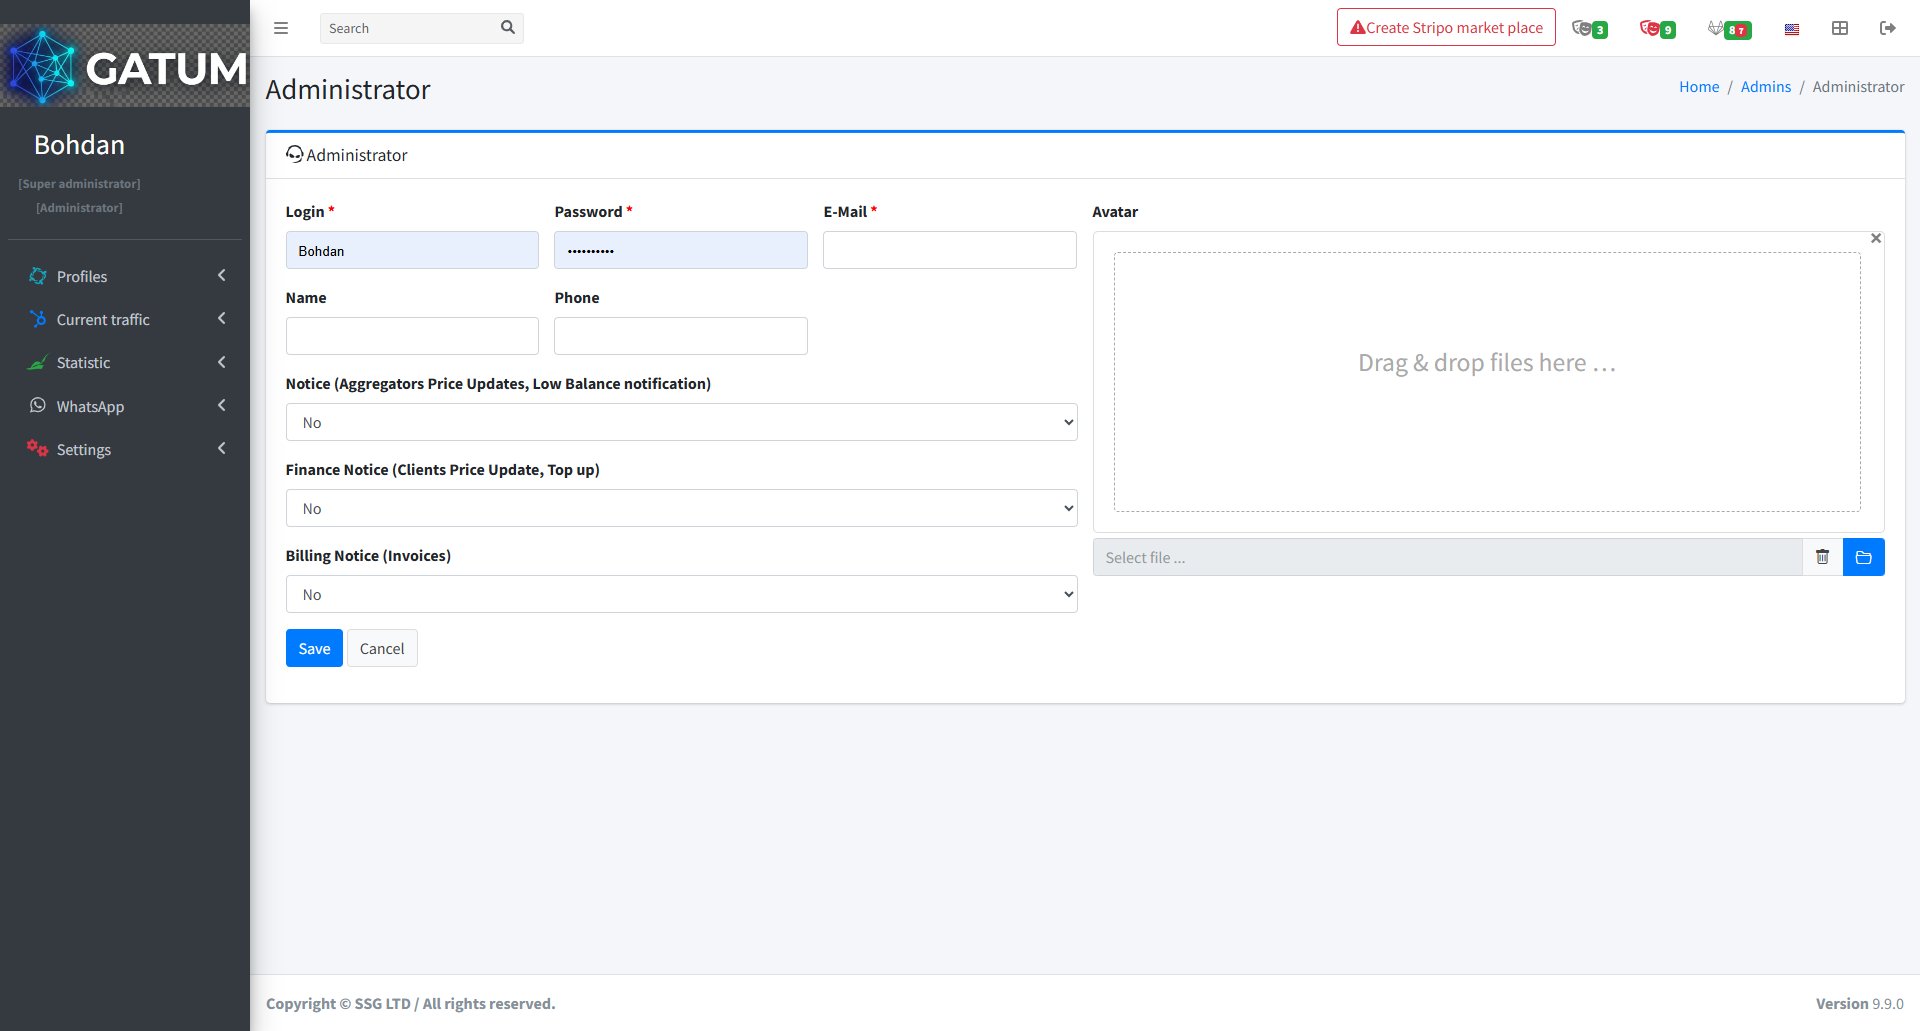
How to Create a New Administrators on the Platform?
Administrators are platform accounts with access to the admin panel. You can create multiple administrators and assign each one a specific role and set of permissions to match their responsibilities.
Go to Settings → Config → Permissions → Administrators.
Click Create.
In the window that opens:
Fill in the fields:
Field
Description
Login
The username the administrator will use to log in to the panel.
Password
The login password for this account.
E-Mail
The administrator's email address. Used for notifications and password recovery.
Name (optional)
The administrator's display name.
Phone (optional)
The administrator's contact phone number.
Notice (optional)
Whether this administrator receives email notifications about aggregator price updates and low balance alerts.
Finance Notice (optional)
Whether this administrator receives notifications about client price updates and top-up events.
Billing Notice (optional)
Whether this administrator receives notifications about invoices.
Avatar (optional)
A profile photo for this administrator. Drag and drop a file or use the upload button.
Click Save.
Once saved, the account appears in the Administrators list. The new administrator can log in immediately, but will only see what their permissions allow. To configure their access, see How to Grant Access to Administrators.
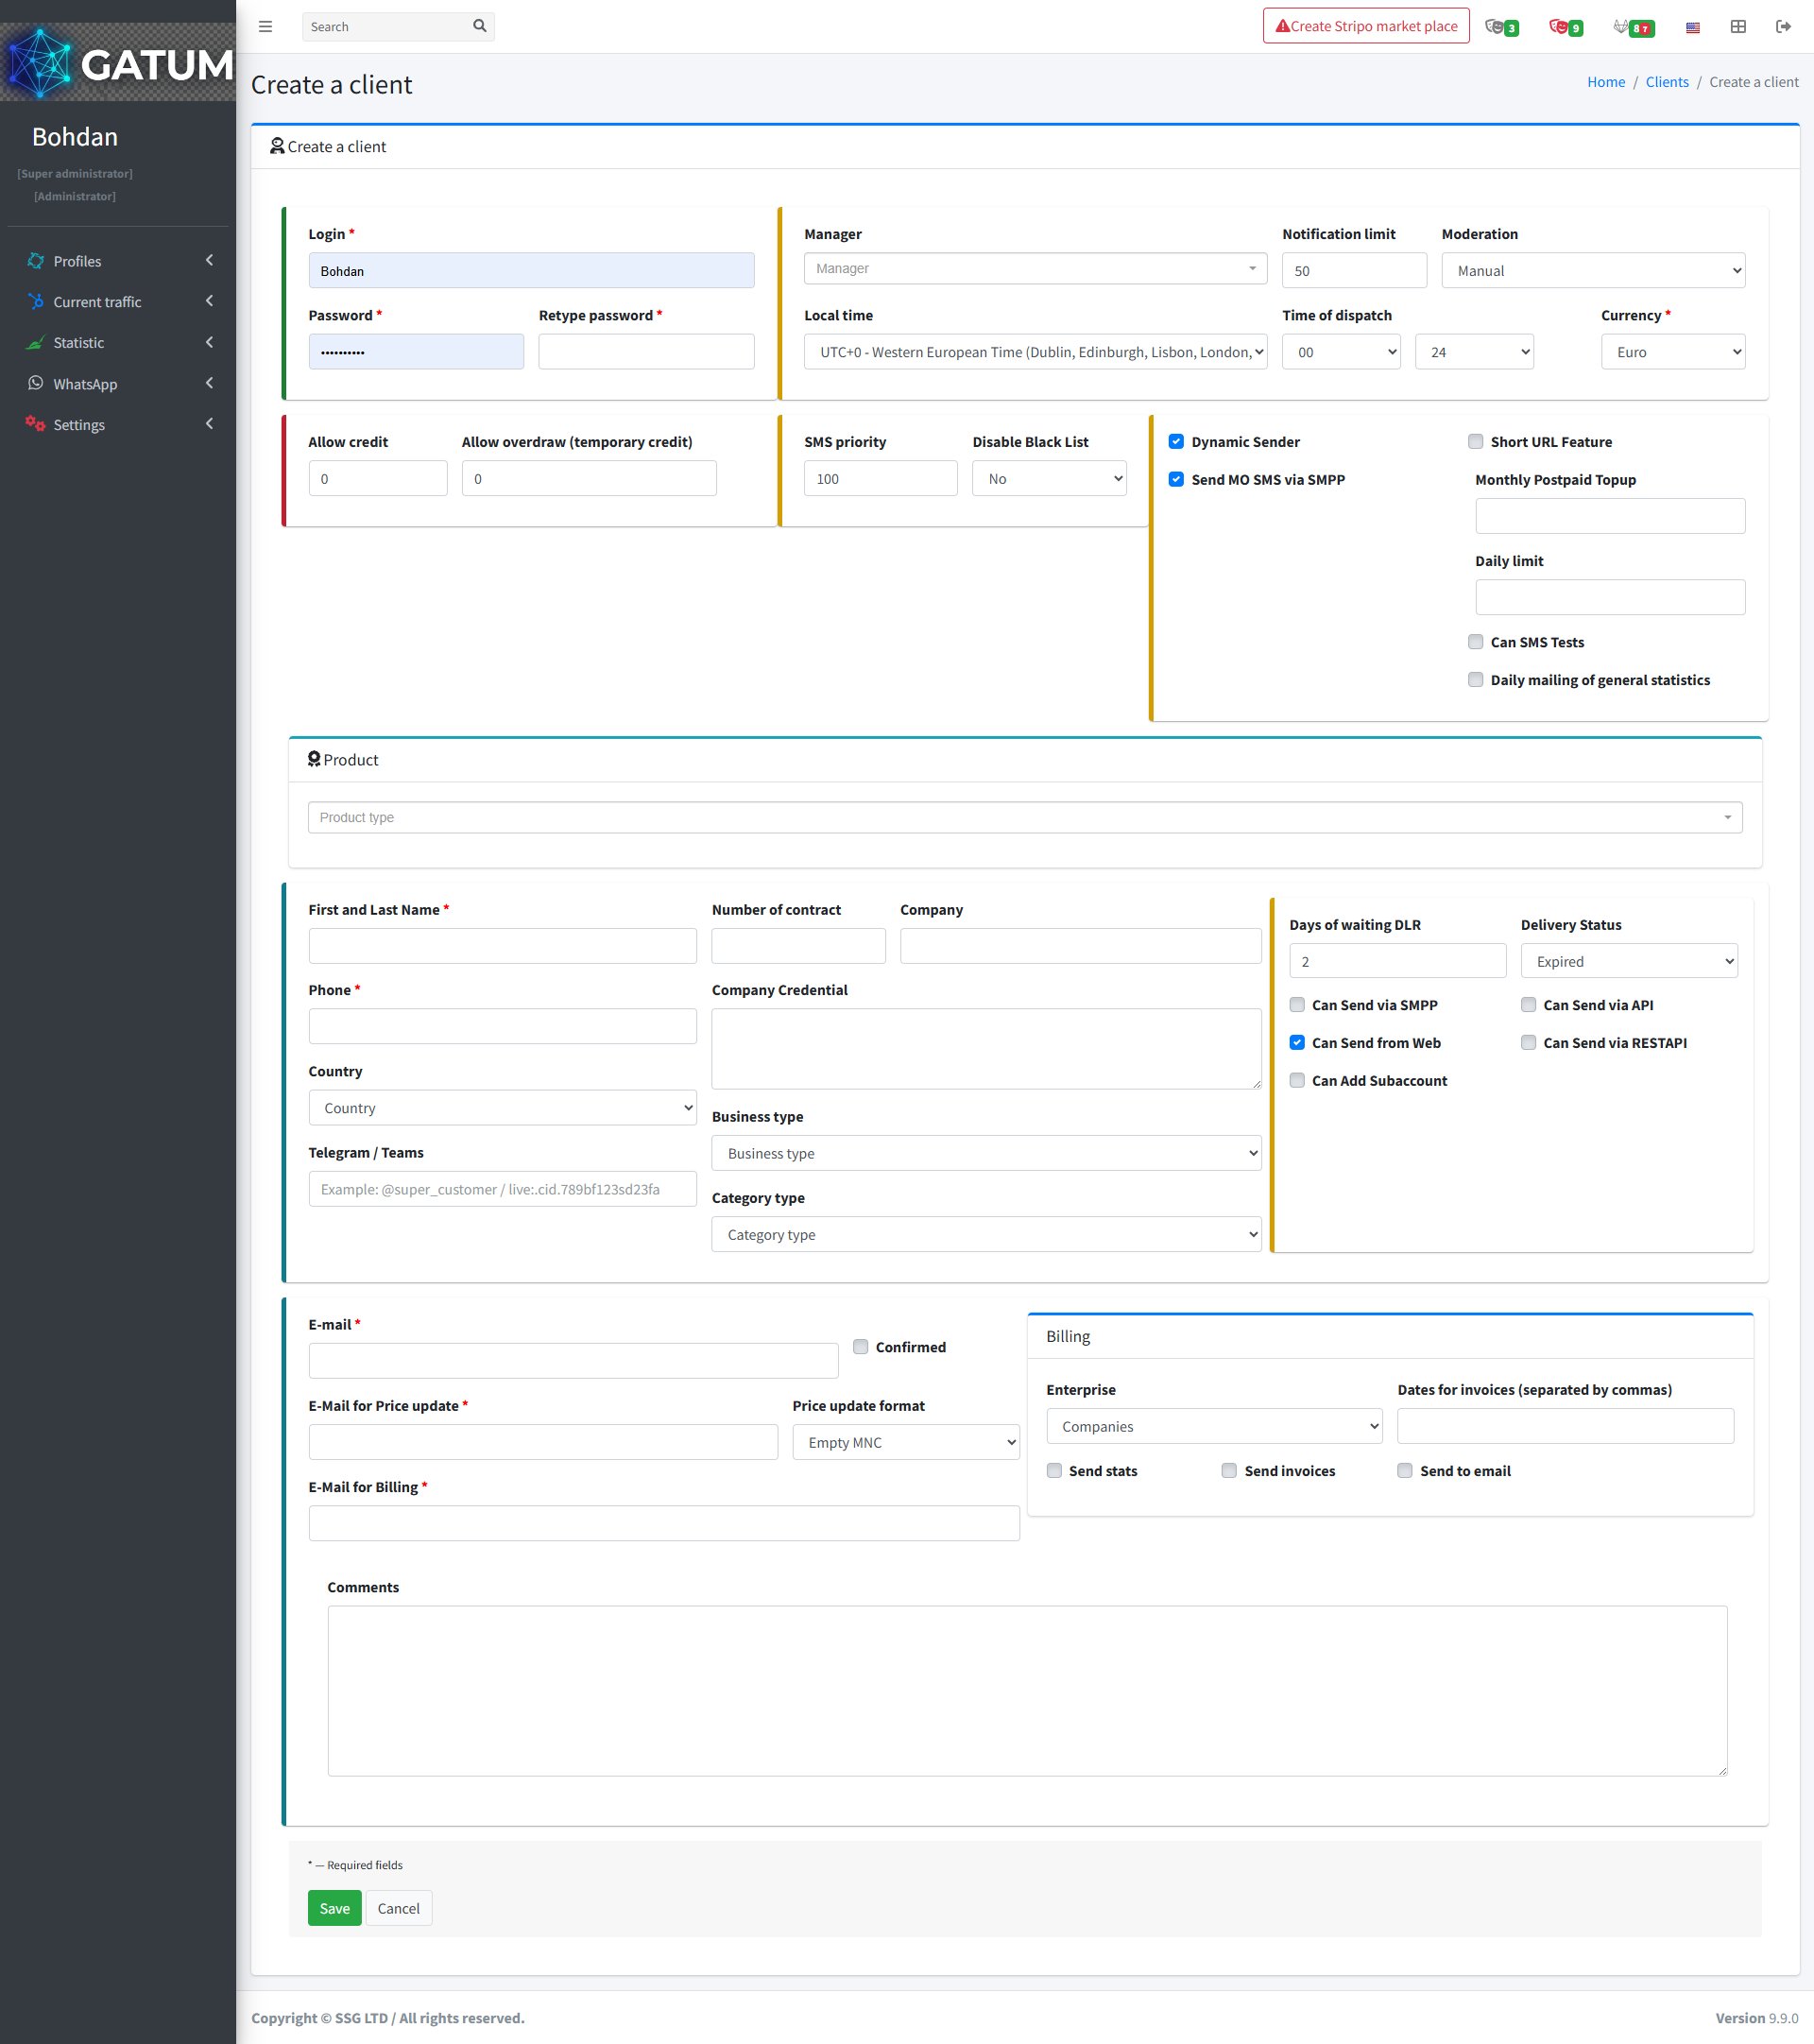
How to Create a New Client on the Platform?
Creating a client account gives them access to the web panel where they can send SMS, manage their campaigns, and view statistics. Here's how to set one up from the admin panel.
Go to Profiles → Clients.
Click Create a client.
In the window that opens:
Fill in the required fields:
Field
Description
Login
The login the client will use to access their panel. Displayed as the client's name across the admin panel – use one word, with underscores if needed (e.g. Orchid_magazine)
Password
Account password
Retype password
Repeat the password to confirm
Currency
Currency for all transactions and balance displays. Cannot be changed after saving
First and Last Name
Contact name for this client (typically the responsible manager)
Phone
Client's phone number
E-mail
Email for balance and account notifications
E-mail for Price update
Email for price change notifications
E-mail for Billing
Email where invoices will be sent
Manager (optional)
Assign a manager to this client
Notification limit (optional)
Balance threshold for low balance email alerts
Moderation (optional)
Sender moderation mode – Manual or Automatic
Local time (optional)
Client's timezone
Time of dispatch (optional)
Allowed sending hours
Allow credit (optional)
Permanent credit limit
Allow overdraw (optional)
Temporary overdraw limit
SMS priority (optional)
Priority for this client's messages in the queue
Disable Black List (optional)
Bypass the platform's blacklist for this client
Dynamic Sender (optional)
Allow the client to use any sender name freely
Send MO SMS via SMPP (optional)
Forward incoming messages to the client via SMPP
Short URL Feature (optional)
Enable short URL generation in messages
Monthly Postpaid Topup (optional)
Amount added to the client's balance monthly for postpaid billing
Daily limit (optional)
Maximum number of messages the client can send per day
Can SMS Tests (optional)
Allow the client to send test messages
Daily mailing of general statistics (optional)
Send the client a daily statistics email
Product type (optional)
Assign a product preset to this client
Number of contract (optional)
Contract reference number
Company (optional)
Client's company name
Company Credential (optional)
Additional company details
Country (optional)
Client's country
Business type (optional)
Business category
Category type (optional)
Client category
Telegram / Teams (optional)
Client's Telegram or Teams contact
Days of waiting DLR (optional)
How many days to wait for a delivery report before marking a message as expired
Delivery Status (optional)
Default delivery status for expired messages
Can Send via SMPP (optional)
Allow SMPP connection
Can Send via API (optional)
Allow API sending
Can Send from Web (optional)
Allow sending from the web panel
Can Send via RESTAPI (optional)
Allow REST API sending
Can Add Subaccount (optional)
Allow the client to create sub-accounts
Enterprise (optional)
Legal entity type for billing
Dates for invoices (optional)
Invoice generation dates
Send stats (optional)
Send statistics reports to the client
Send invoices (optional)
Send invoices automatically
Send to email (optional)
Send billing documents by email
Comments (optional)
Internal notes for this client
Click Save.
You'll be taken to the client's profile page, where you can continue setting up their routes, prices, and connection details.
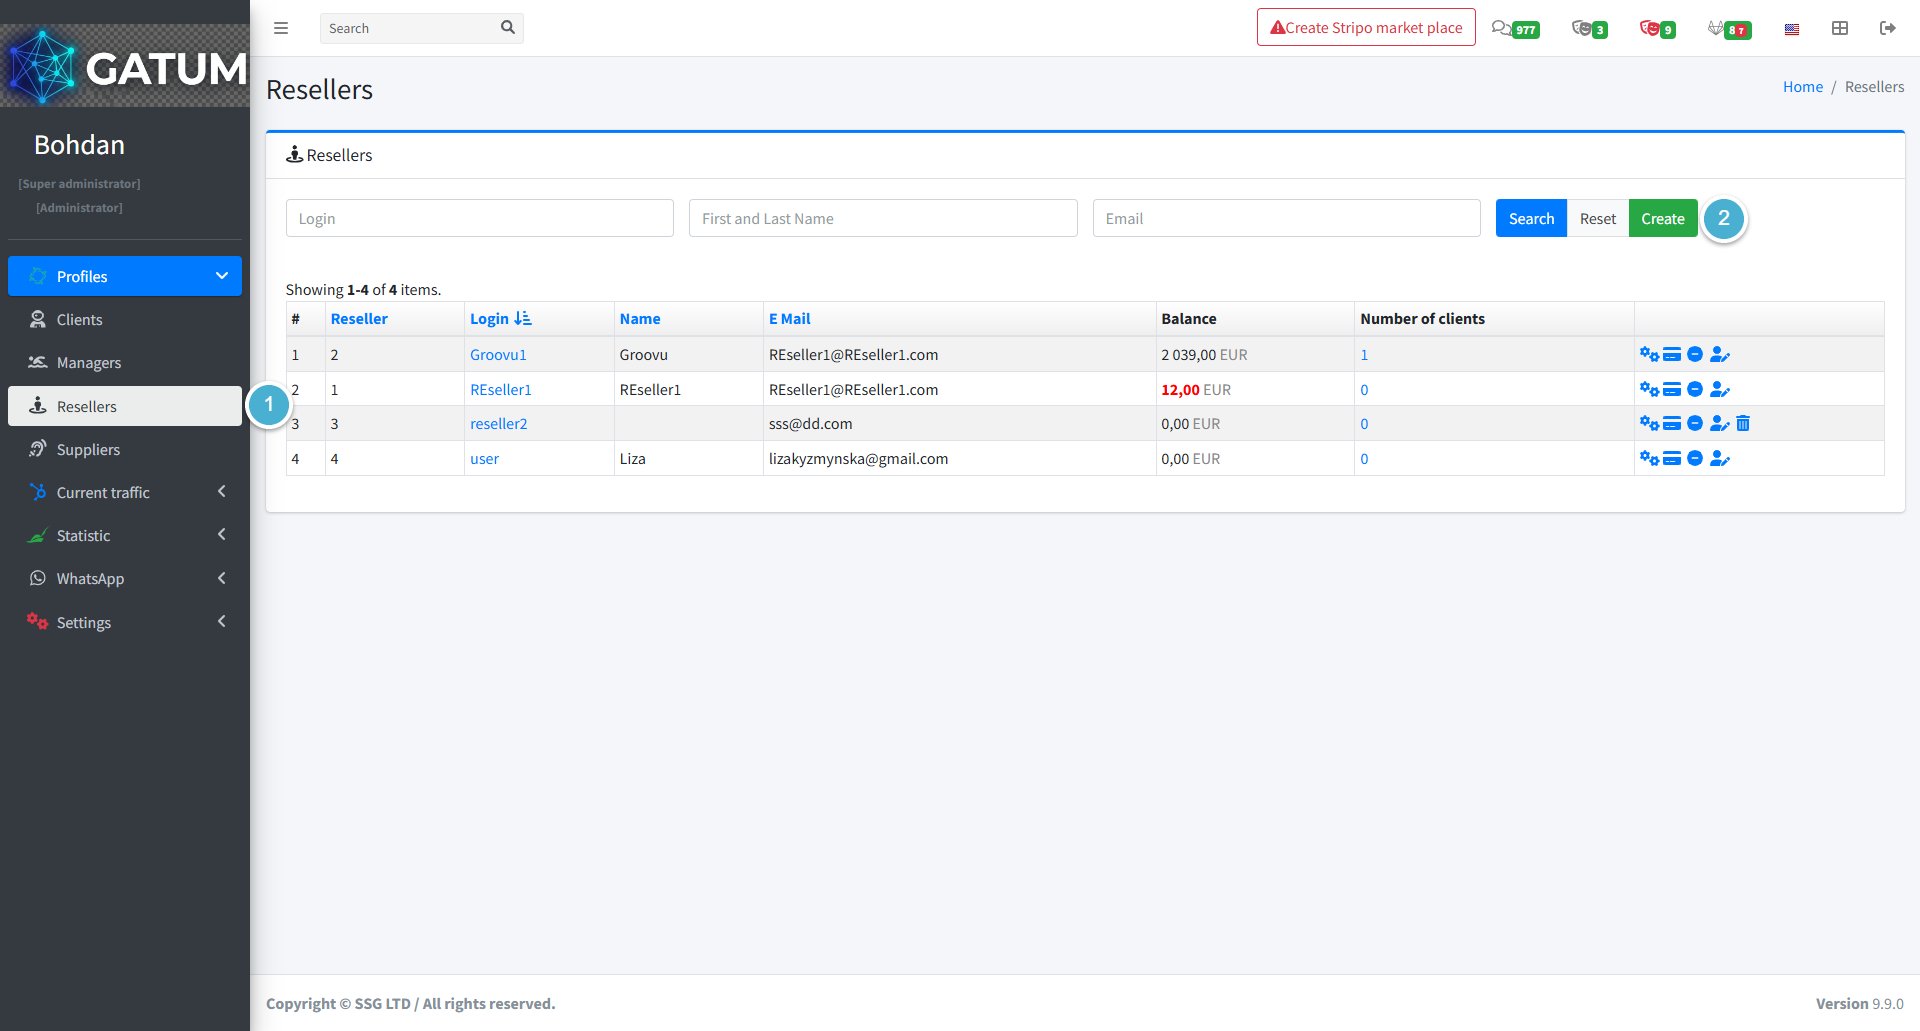
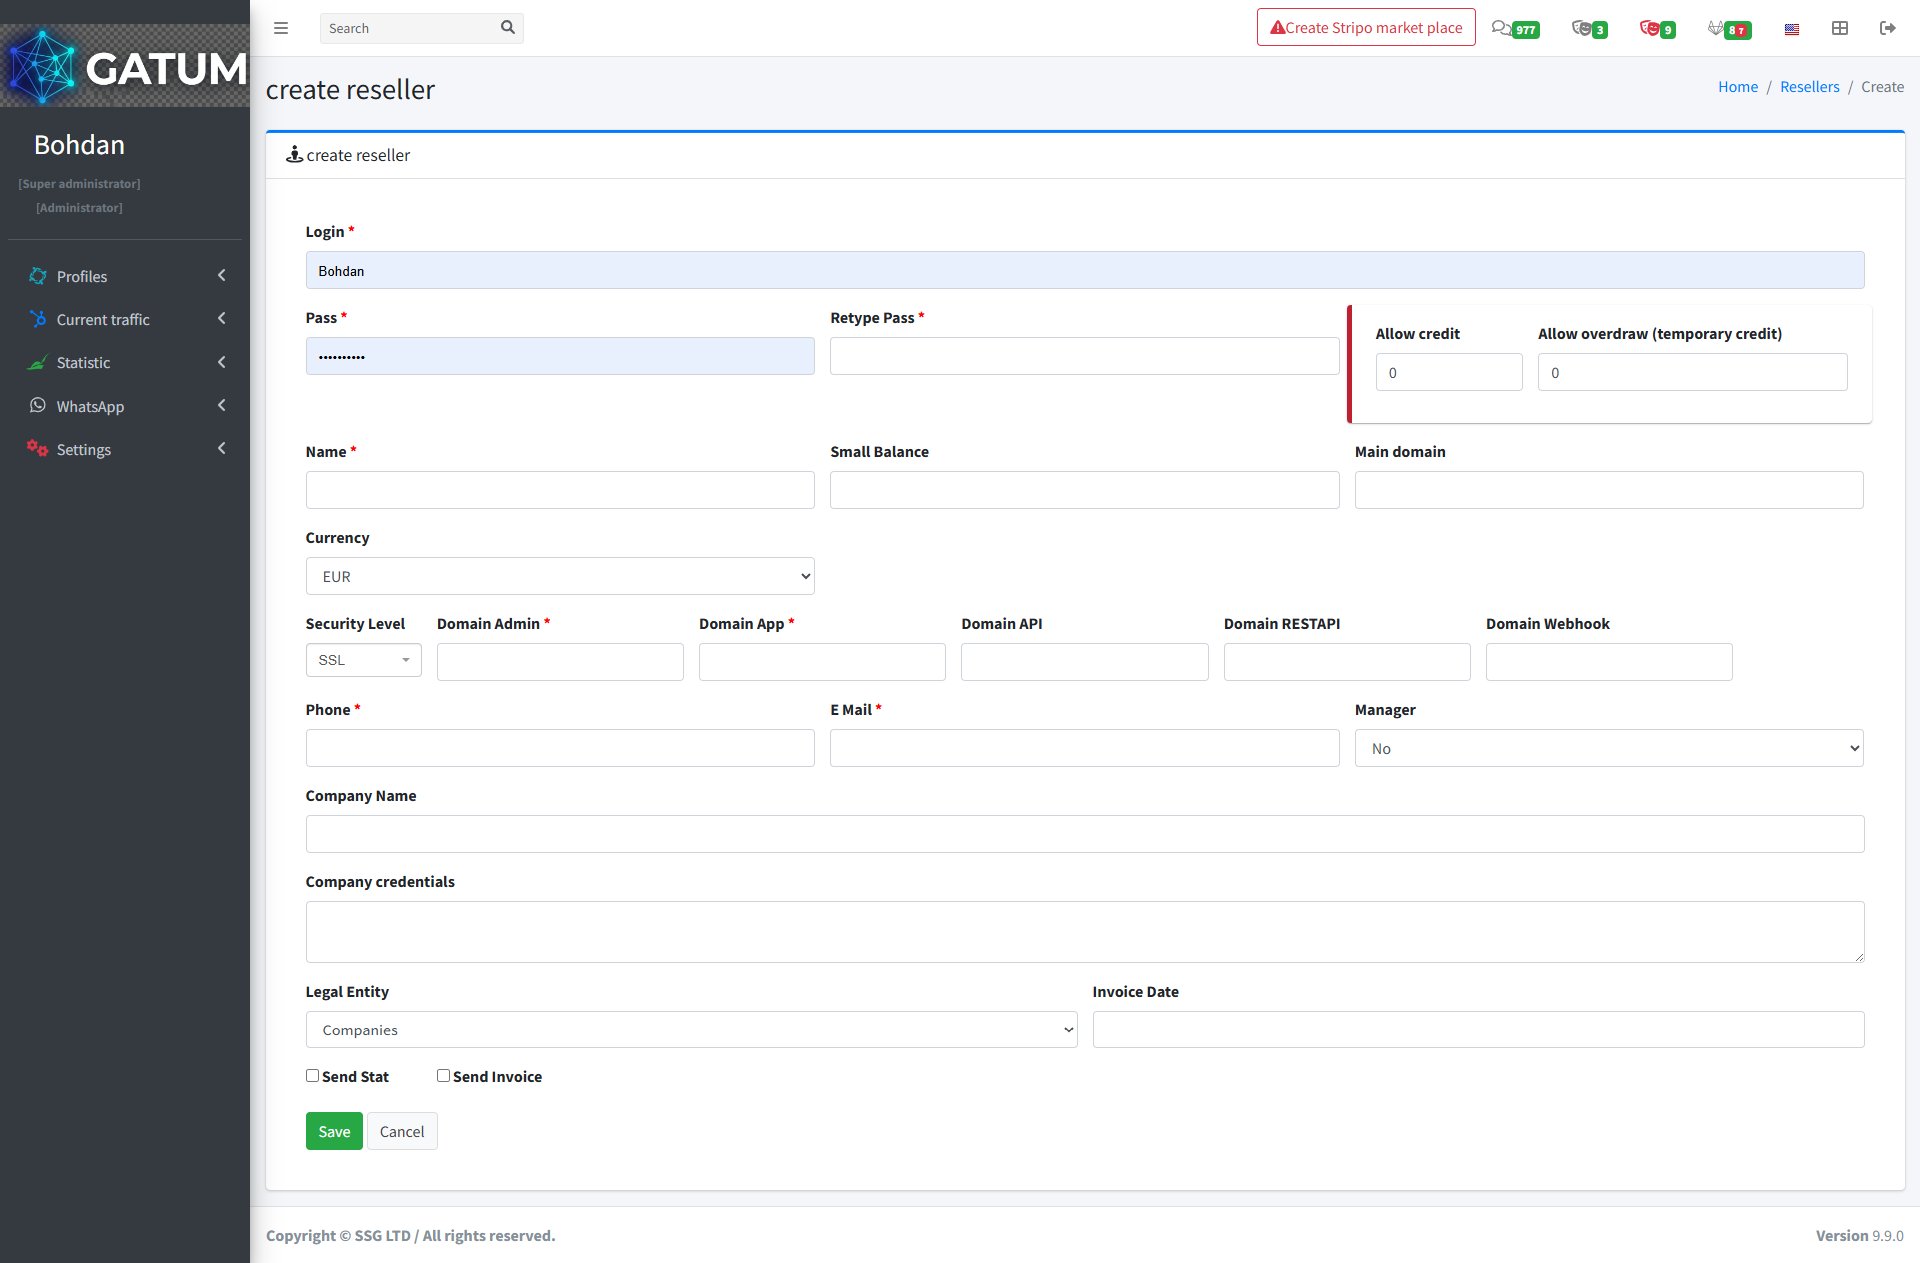
How to Create a New Reseller and Add Basic Settings?
The Gatum admin panel lets you create reseller accounts and manage their settings — prices, routing, and payments — all from one place.
How to Create a Reseller
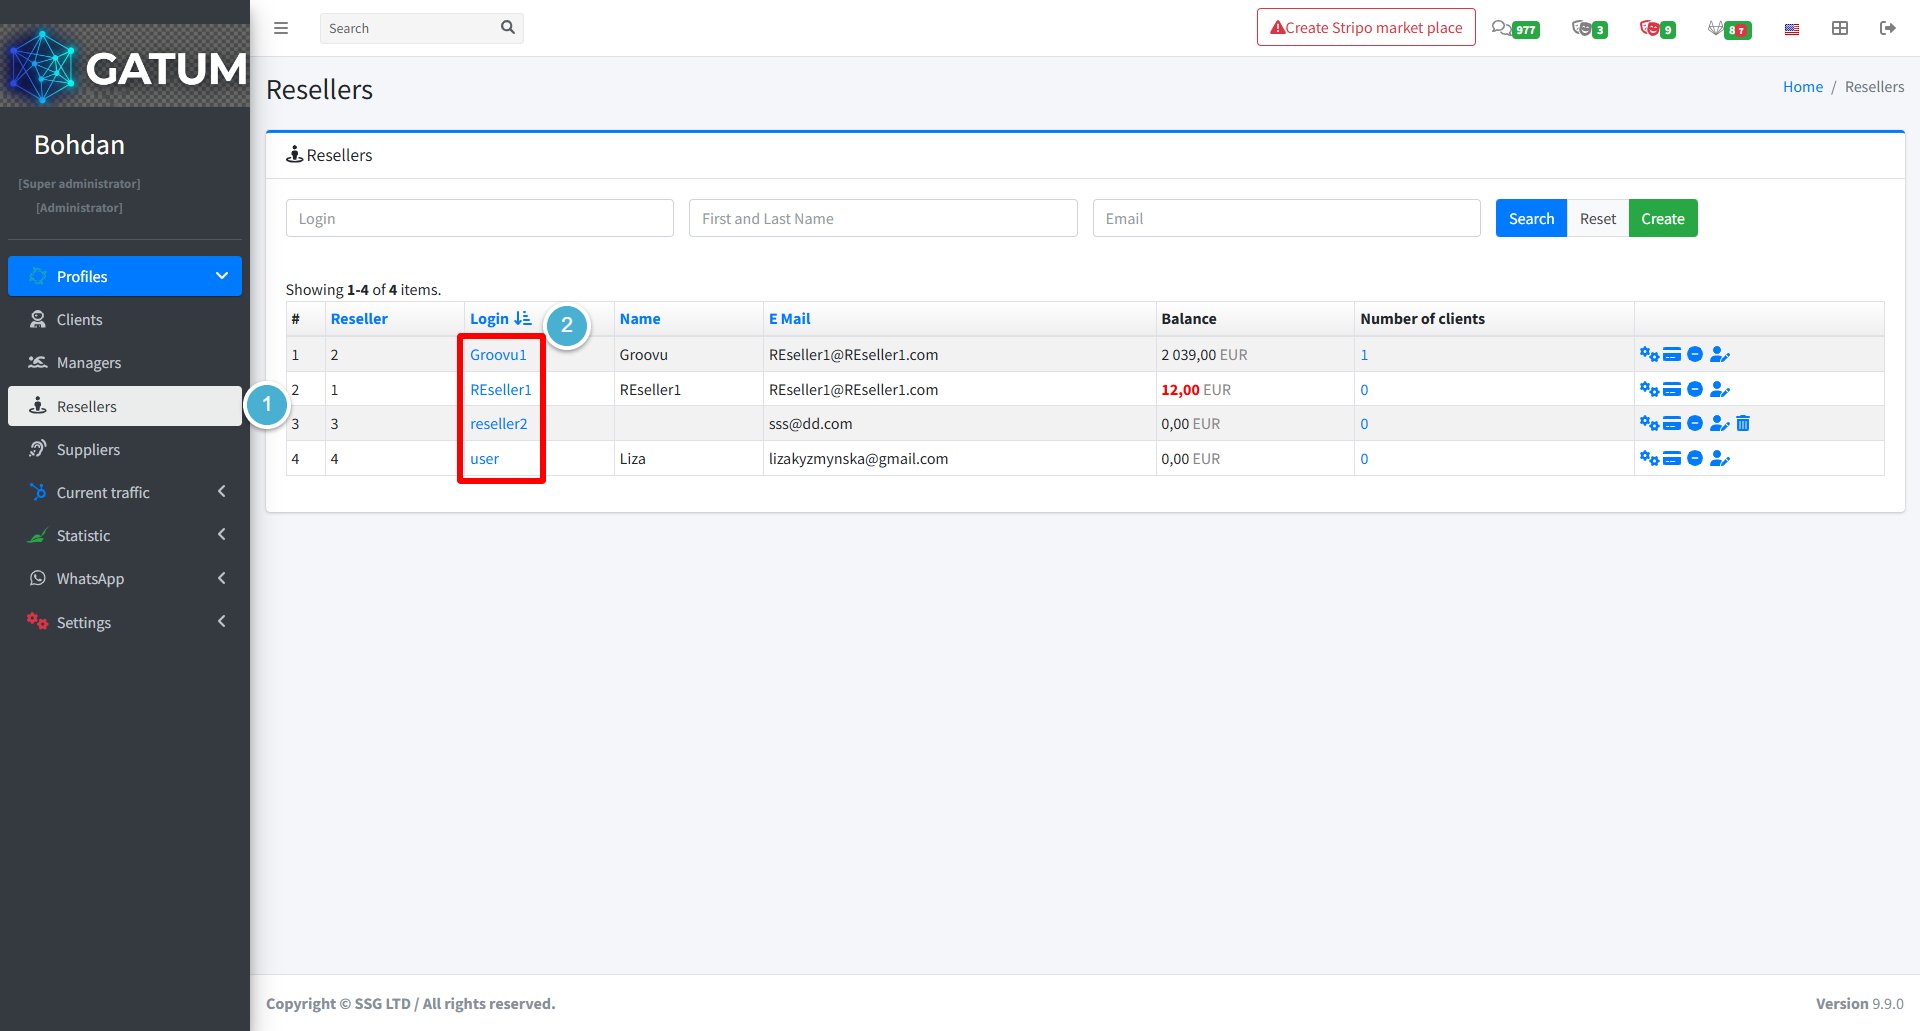
Go to Profiles → Resellers.
Click Create:
On the page that opens:
Fill in the fields:
Field
Description
Login
The login the reseller will use to access their panel
Pass
Account password
Retype Pass
Repeat the password to confirm
Name
Reseller's first and last name
Small Balance (optional)
The balance threshold for low balance notifications
Main domain (optional)
Main domain associated with the reseller
Currency (optional)
Currency the reseller will work with (default: EUR)
Security Level (optional)
Connection security type (default: SSL)
Domain Admin
Admin panel domain for the reseller
Domain App
Application domain
Domain API (optional)
API domain
Domain RESTAPI (optional)
REST API domain
Domain Webhook (optional)
Webhook domain
Phone
Reseller's phone number
E Mail
Reseller's email address
Manager (optional)
Assign a manager to this reseller
Company Name (optional)
Reseller's company name
Company credentials (optional)
Additional company details
Legal Entity (optional)
Legal entity type
Invoice Date (optional)
Date for invoice generation
Allow credit (optional)
Credit limit for postpaid work
Allow overdraw (optional)
Temporary credit limit
Send Stat (optional)
Send statistics reports to the reseller
Send Invoice (optional)
Send invoices to the reseller automatically
Click Save.
You'll be taken to the reseller's profile page, where you can continue setting up their account.
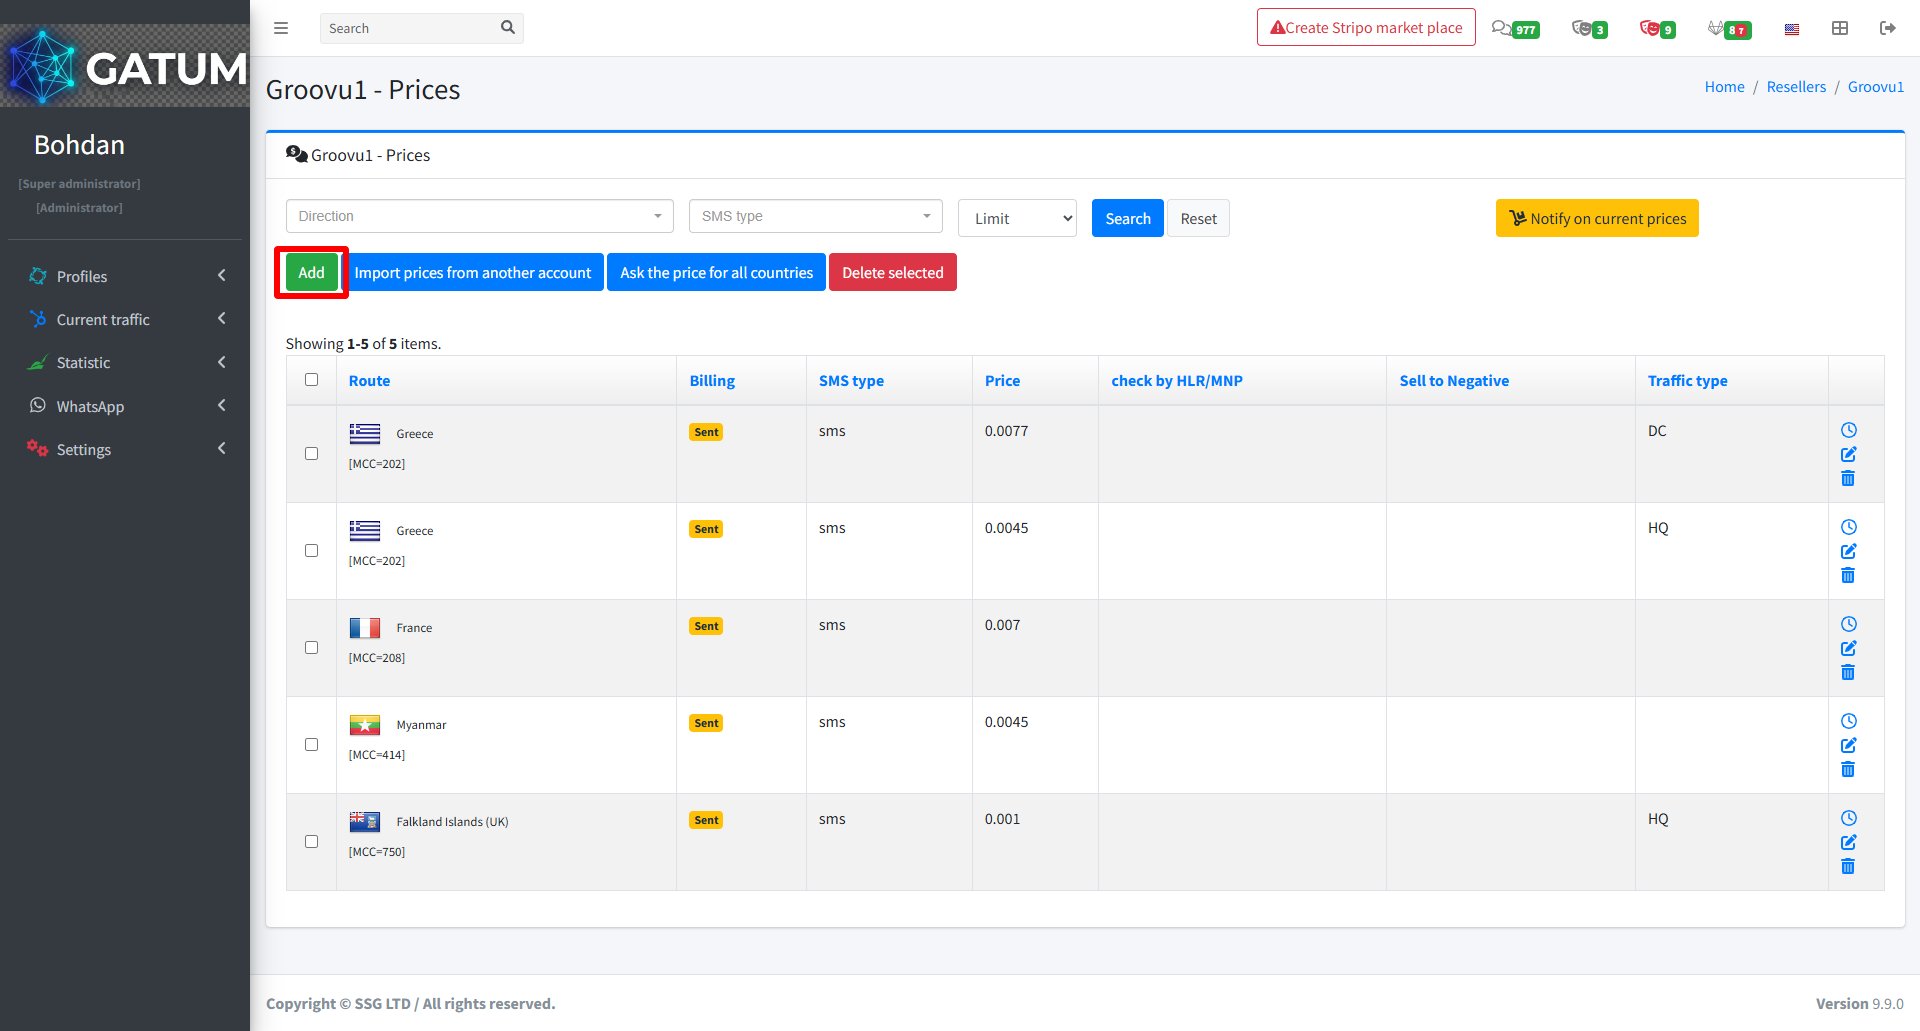
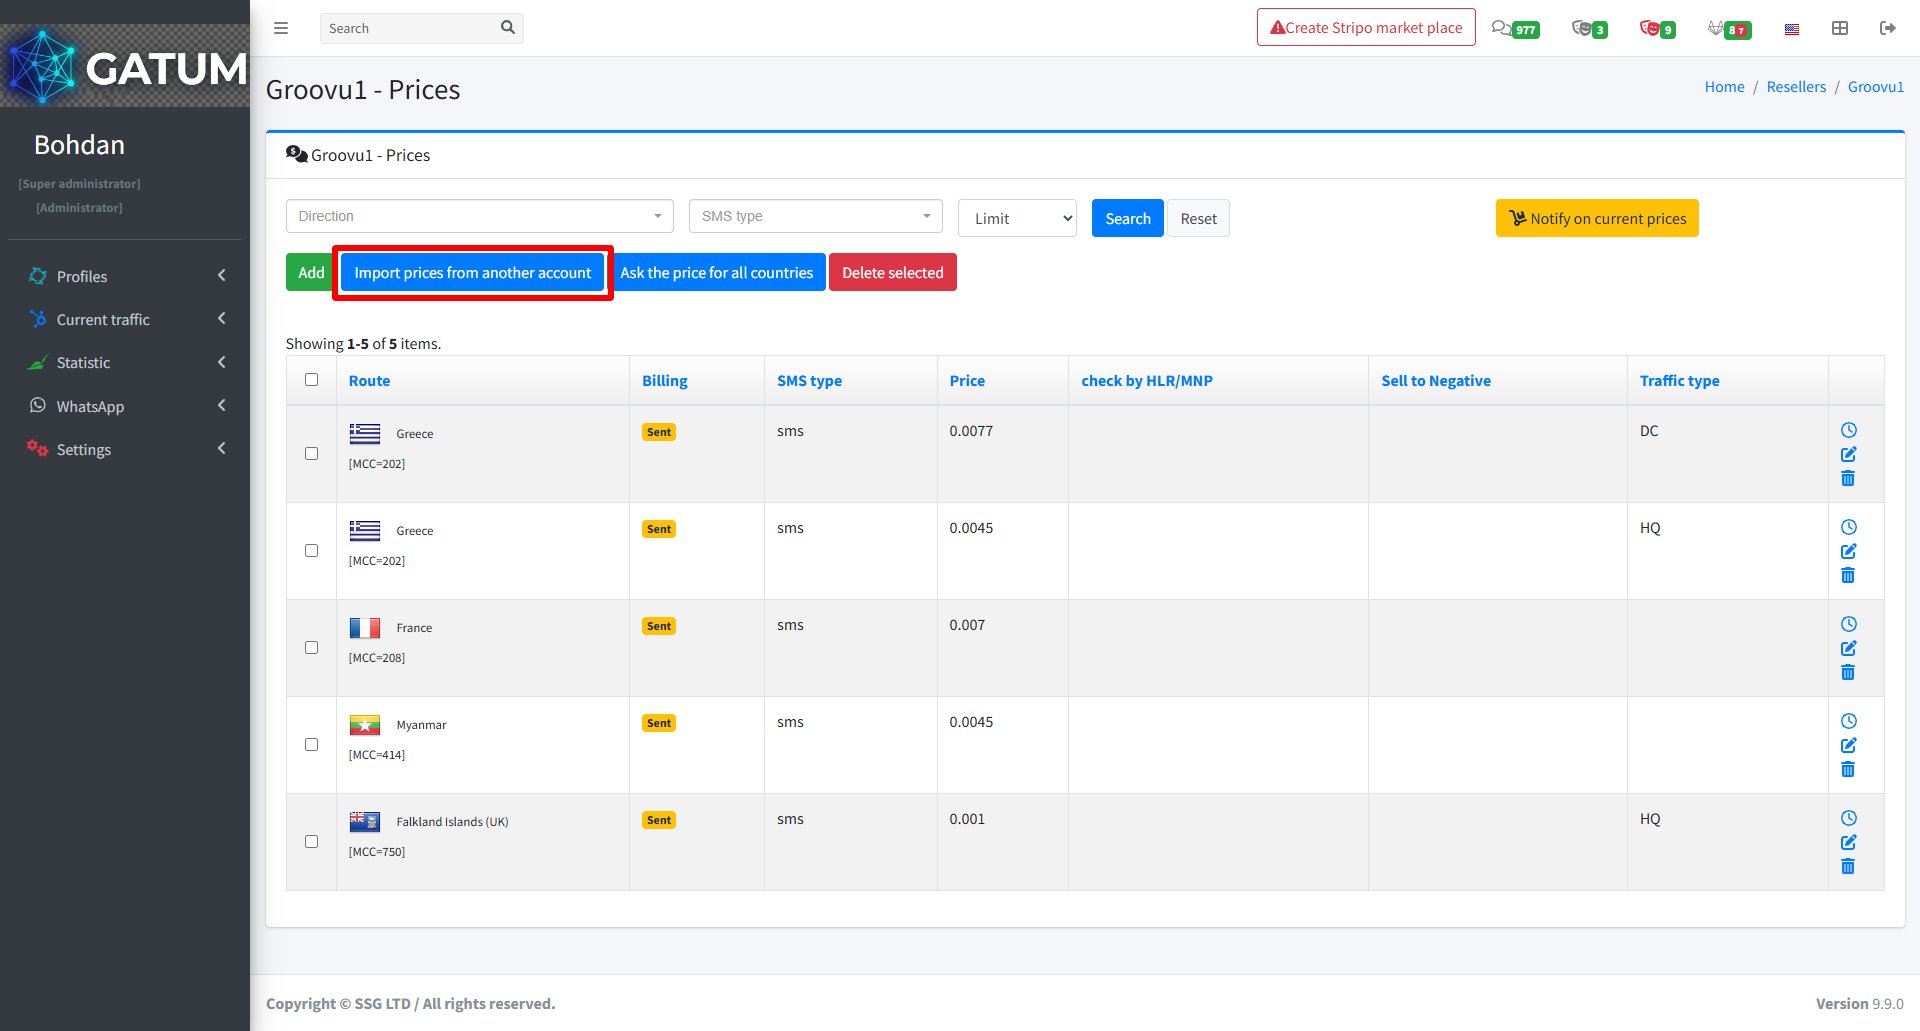
How to Set Up Prices
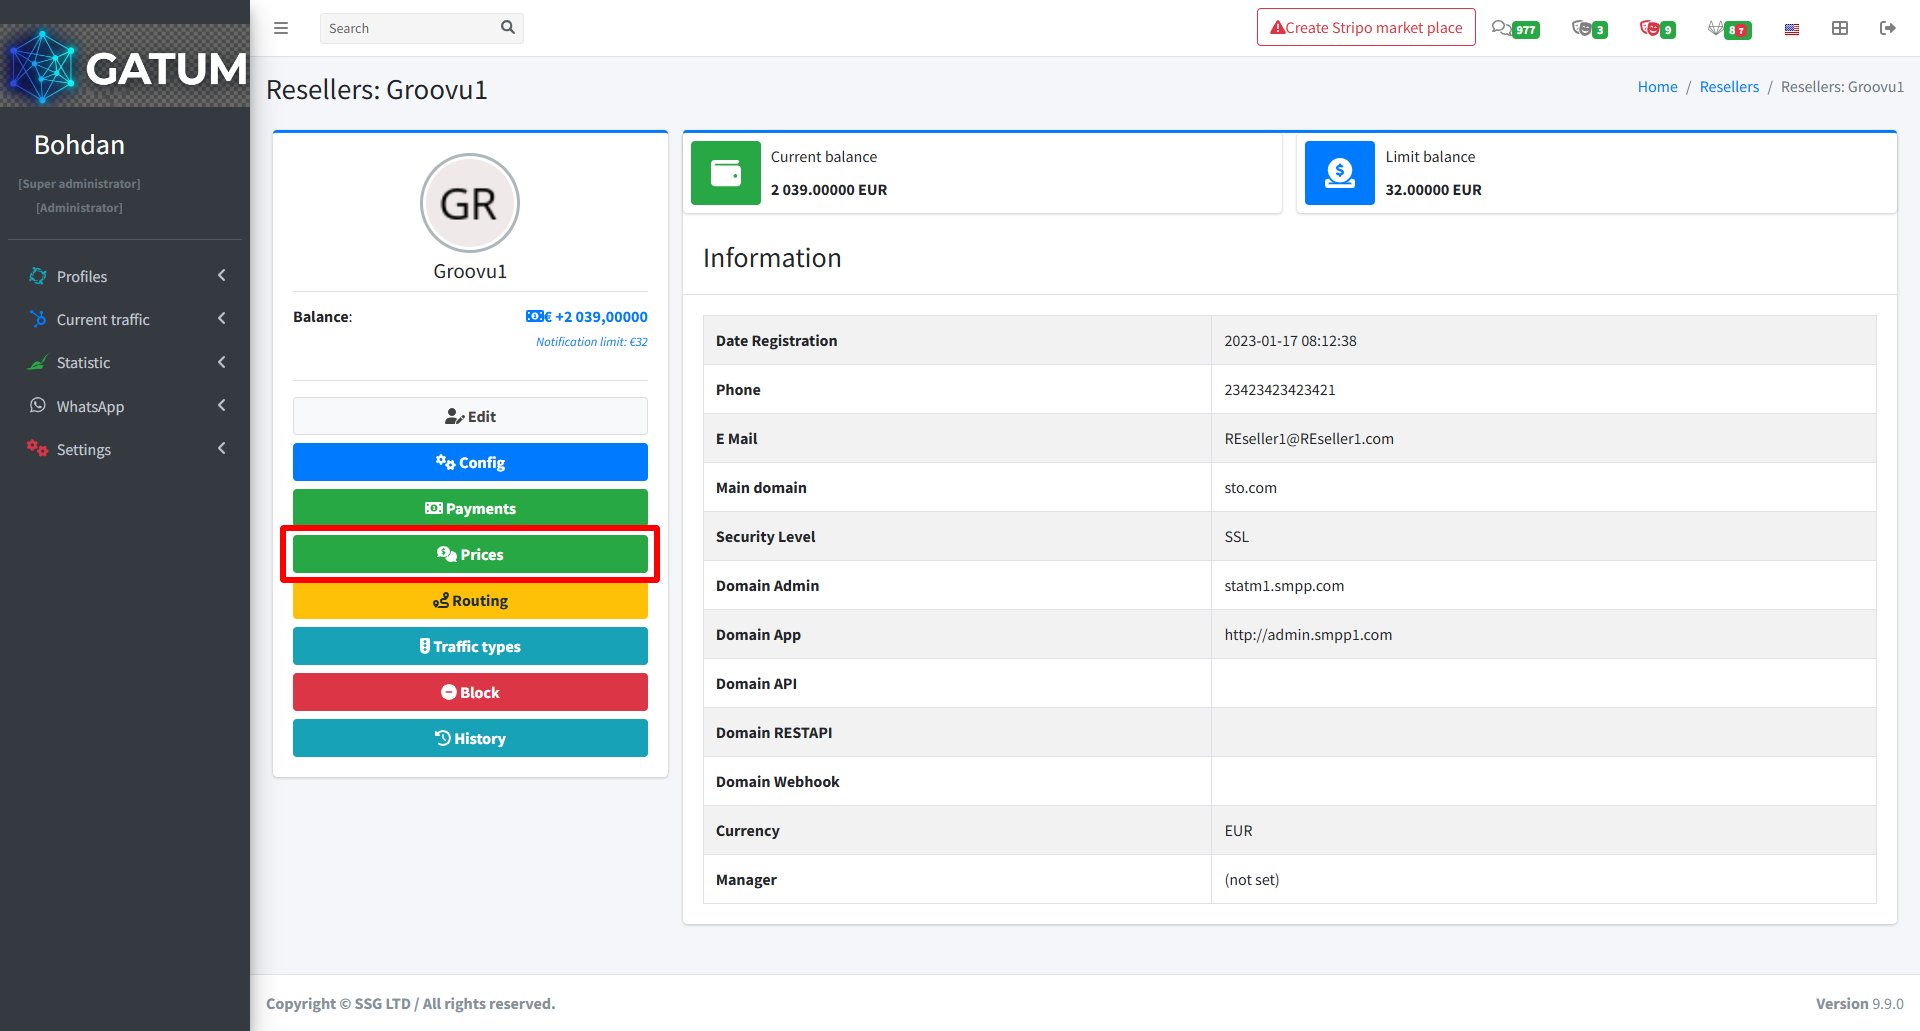
Go to Profiles → Resellers.
Click on the reseller's name.
In the reseller's settings page, click Prices:
There are three ways to add prices:
1) Add prices manually — click Add.
On the page that opens:
Fill in the fields:
Field
Description
SMS type
Message type for this price
Billing type
How messages are counted for billing (e.g. by sent)
Destination
The country or network this price applies to
Price
Price per message
Sell to Negative (optional)
Allow sending even if the reseller's balance is negative
Type (optional)
Traffic type for this price
Features (optional)
Additional routing features
Click Create.
2) Import prices from another account — click Import prices from another account.
On the page that opens:
Select the reseller account to copy prices from and click Import.
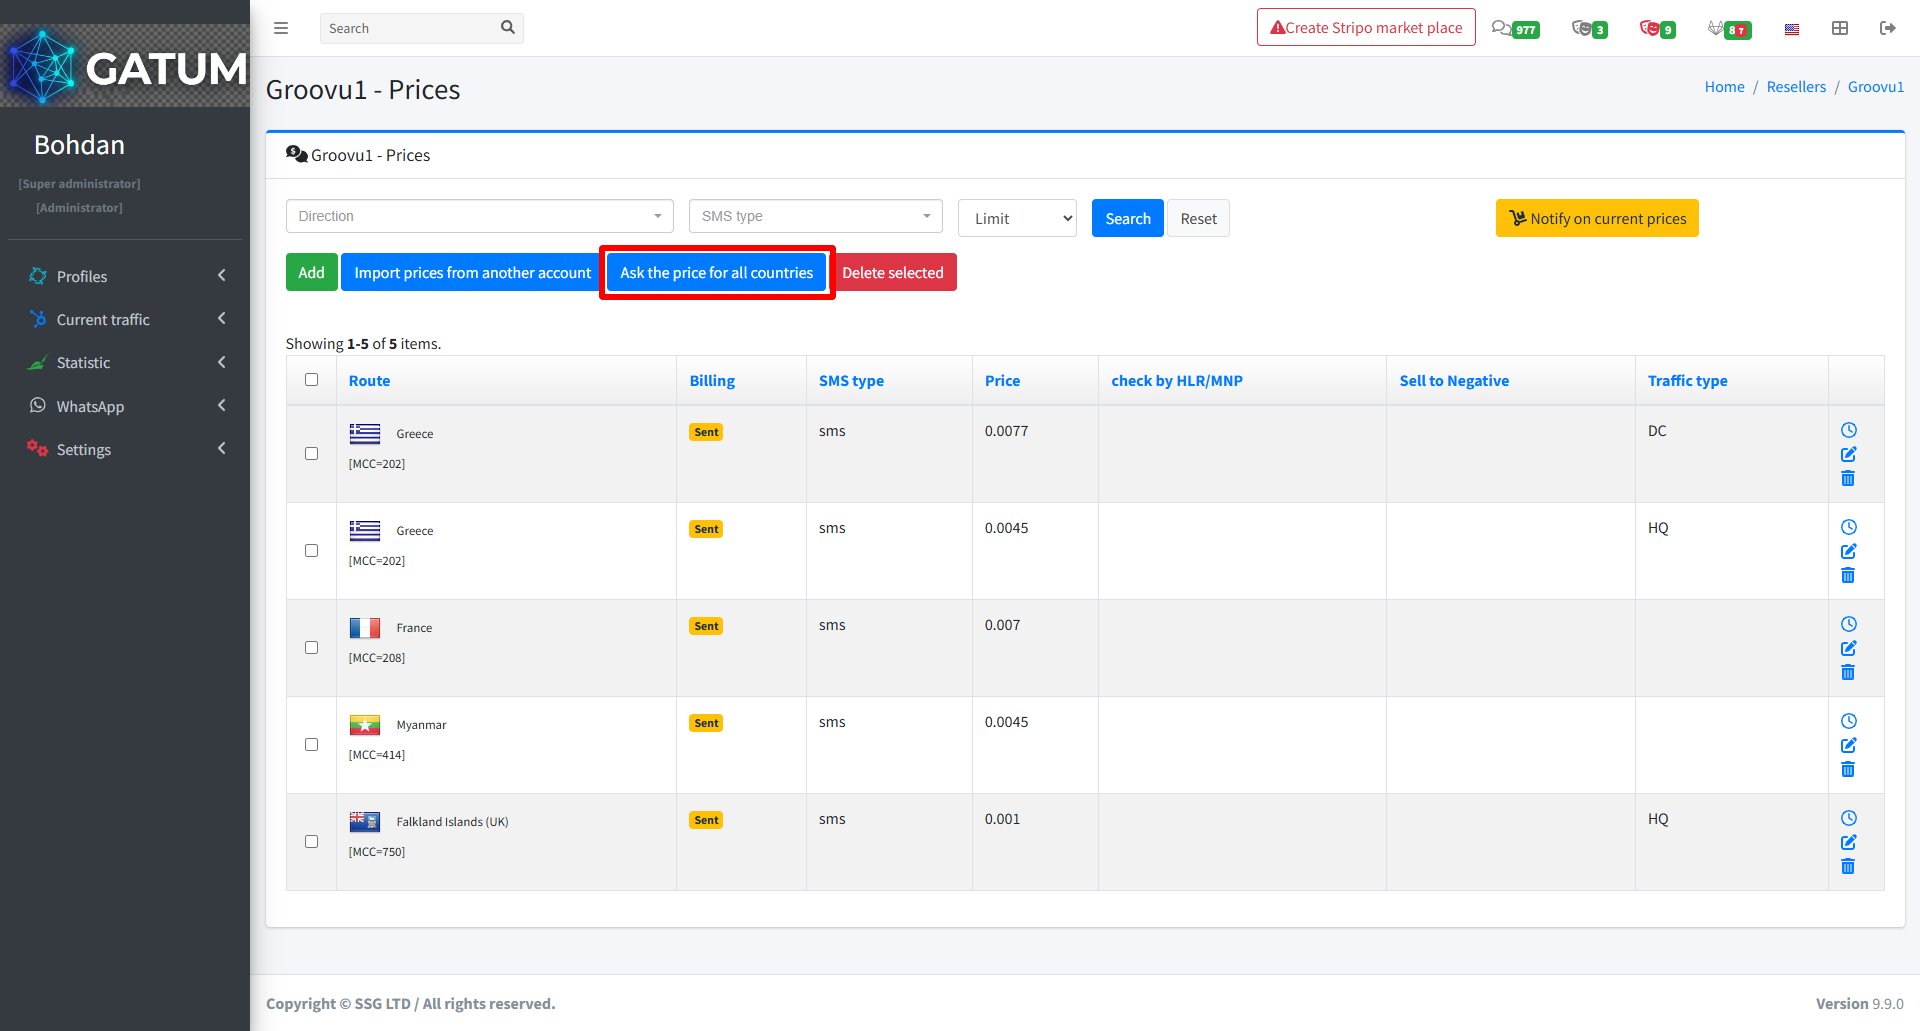
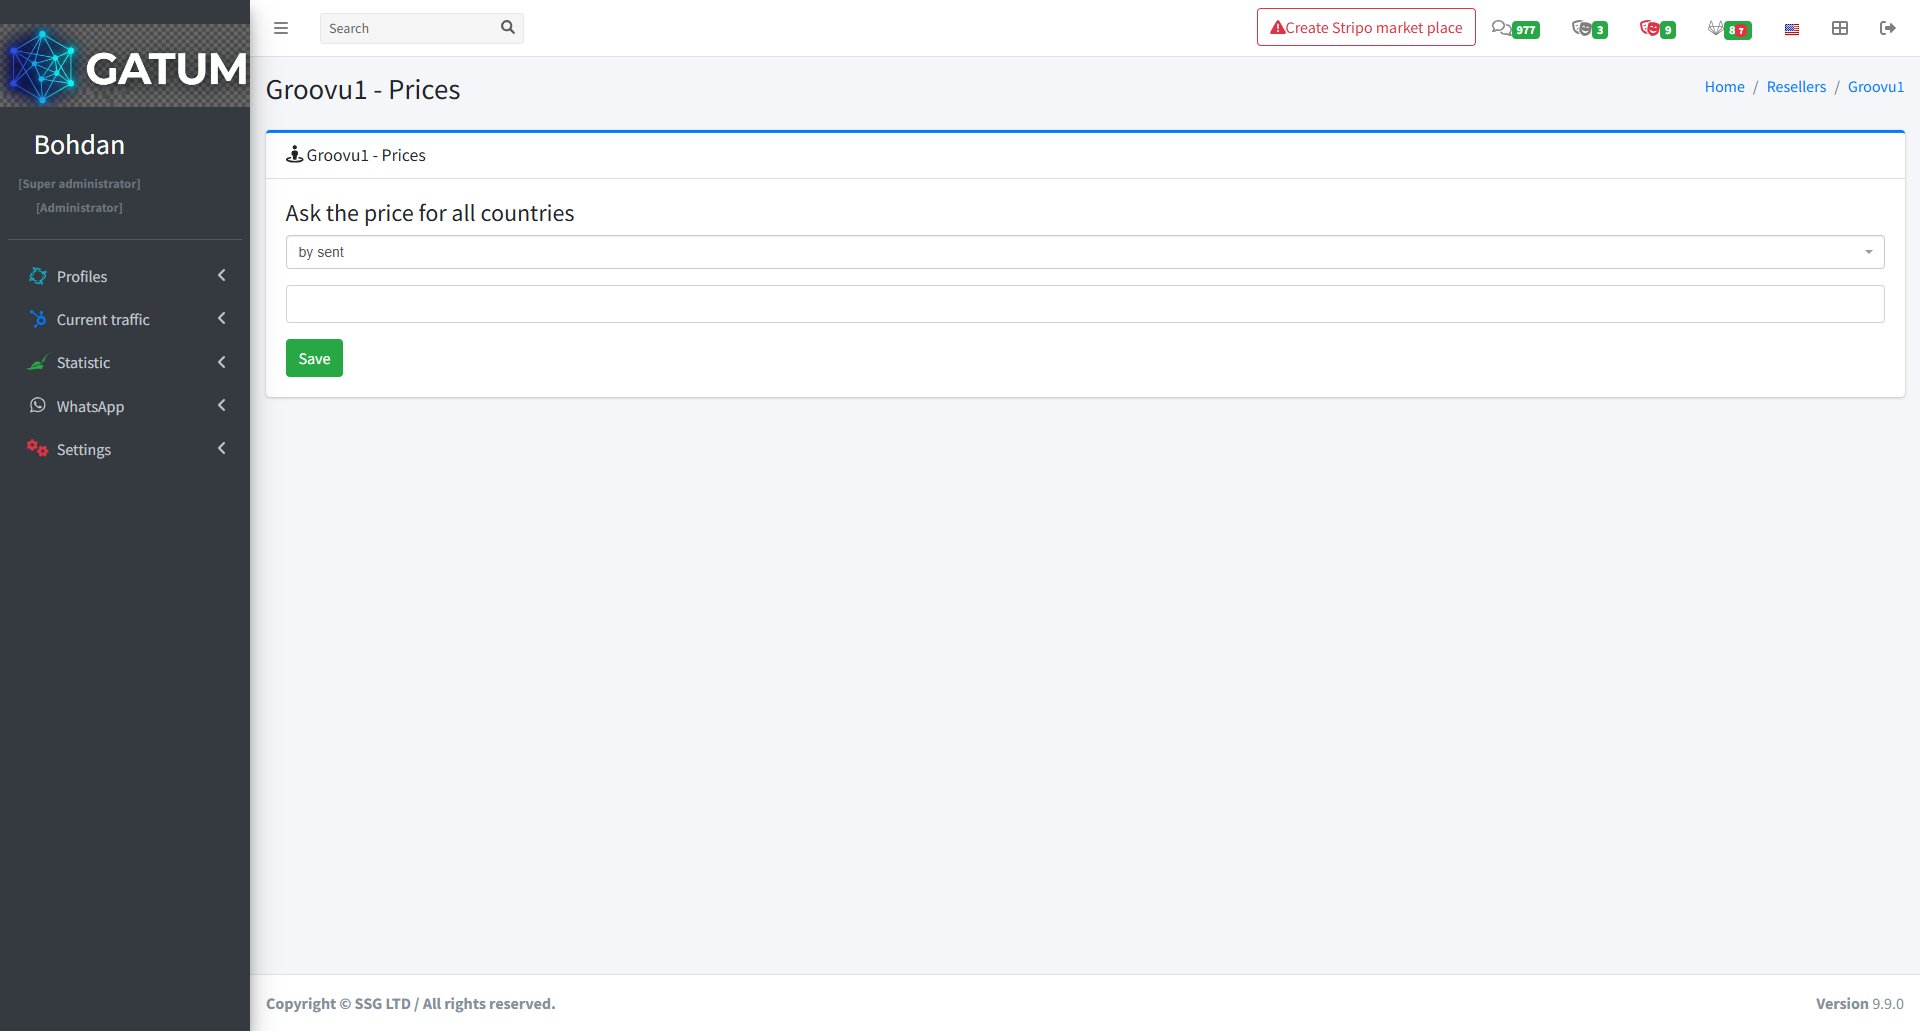
3) Ask the price for all countries — click Ask the price for all countries.
On the page that opens:
Select the billing type from the dropdown and click Save.
Prices take effect immediately after saving.
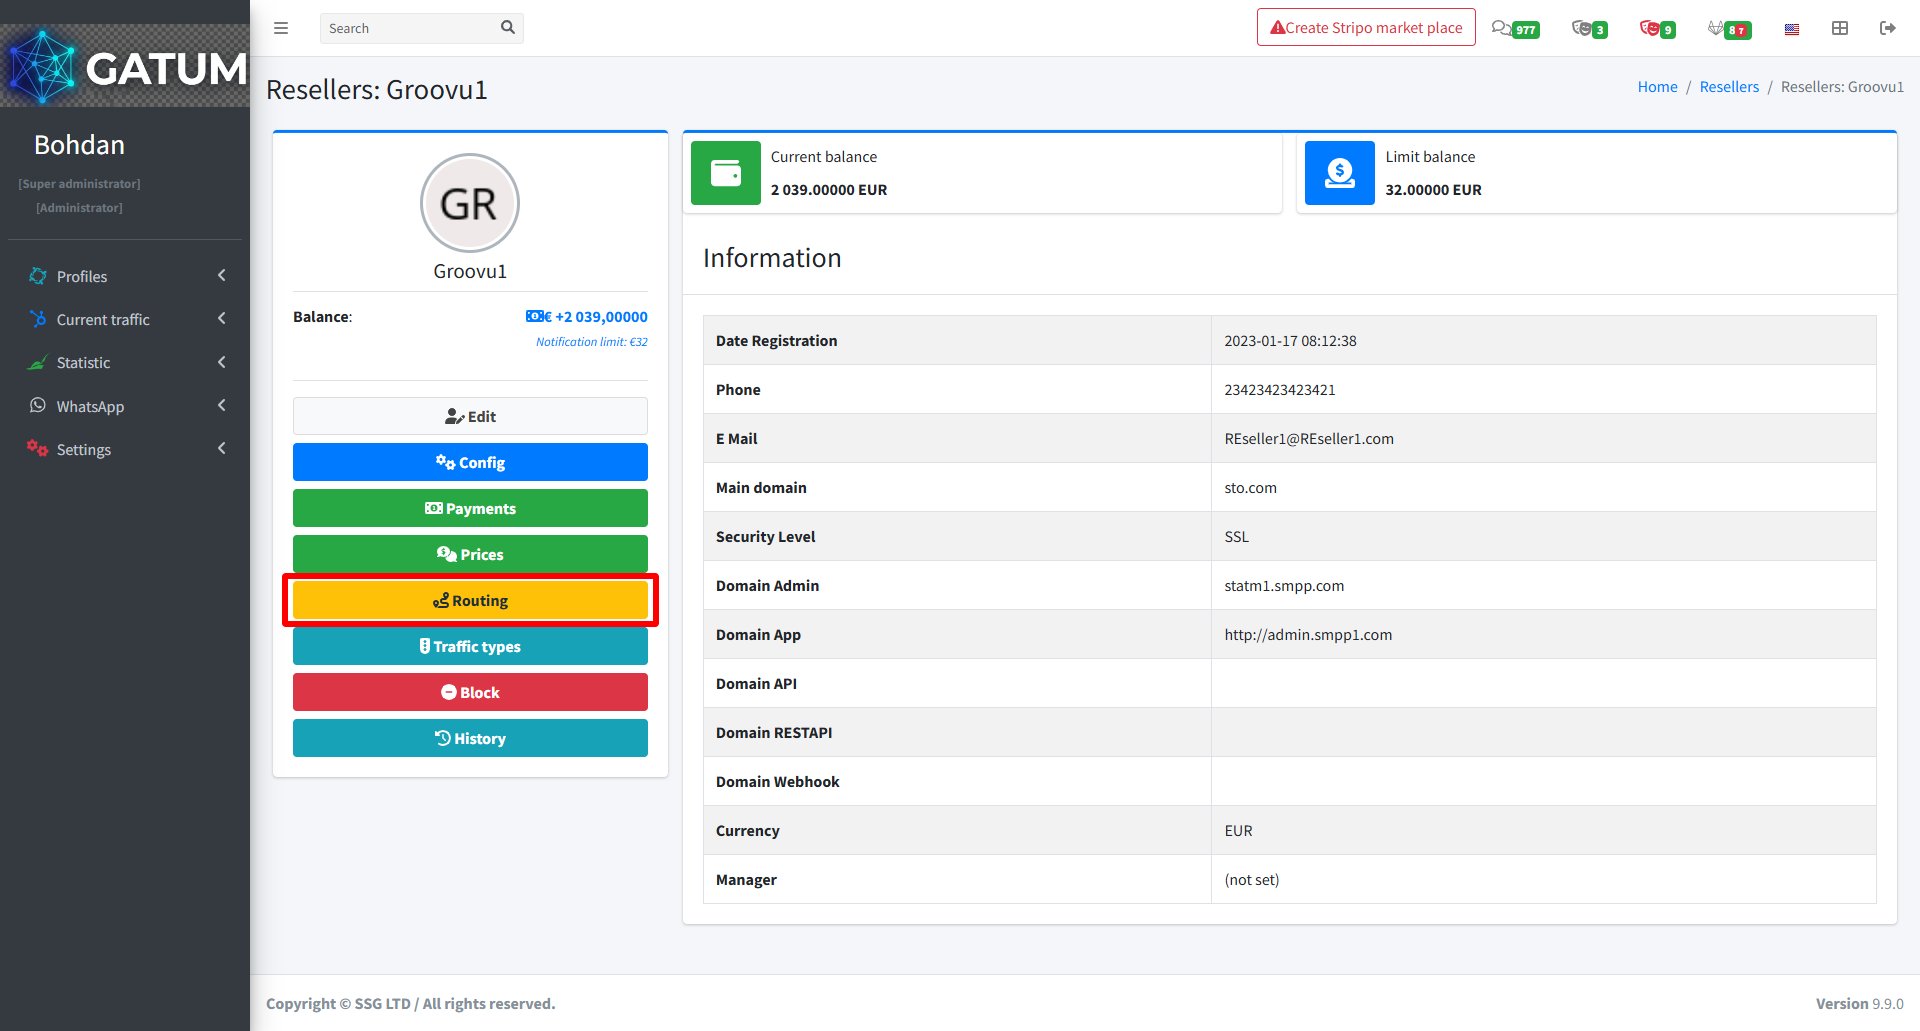
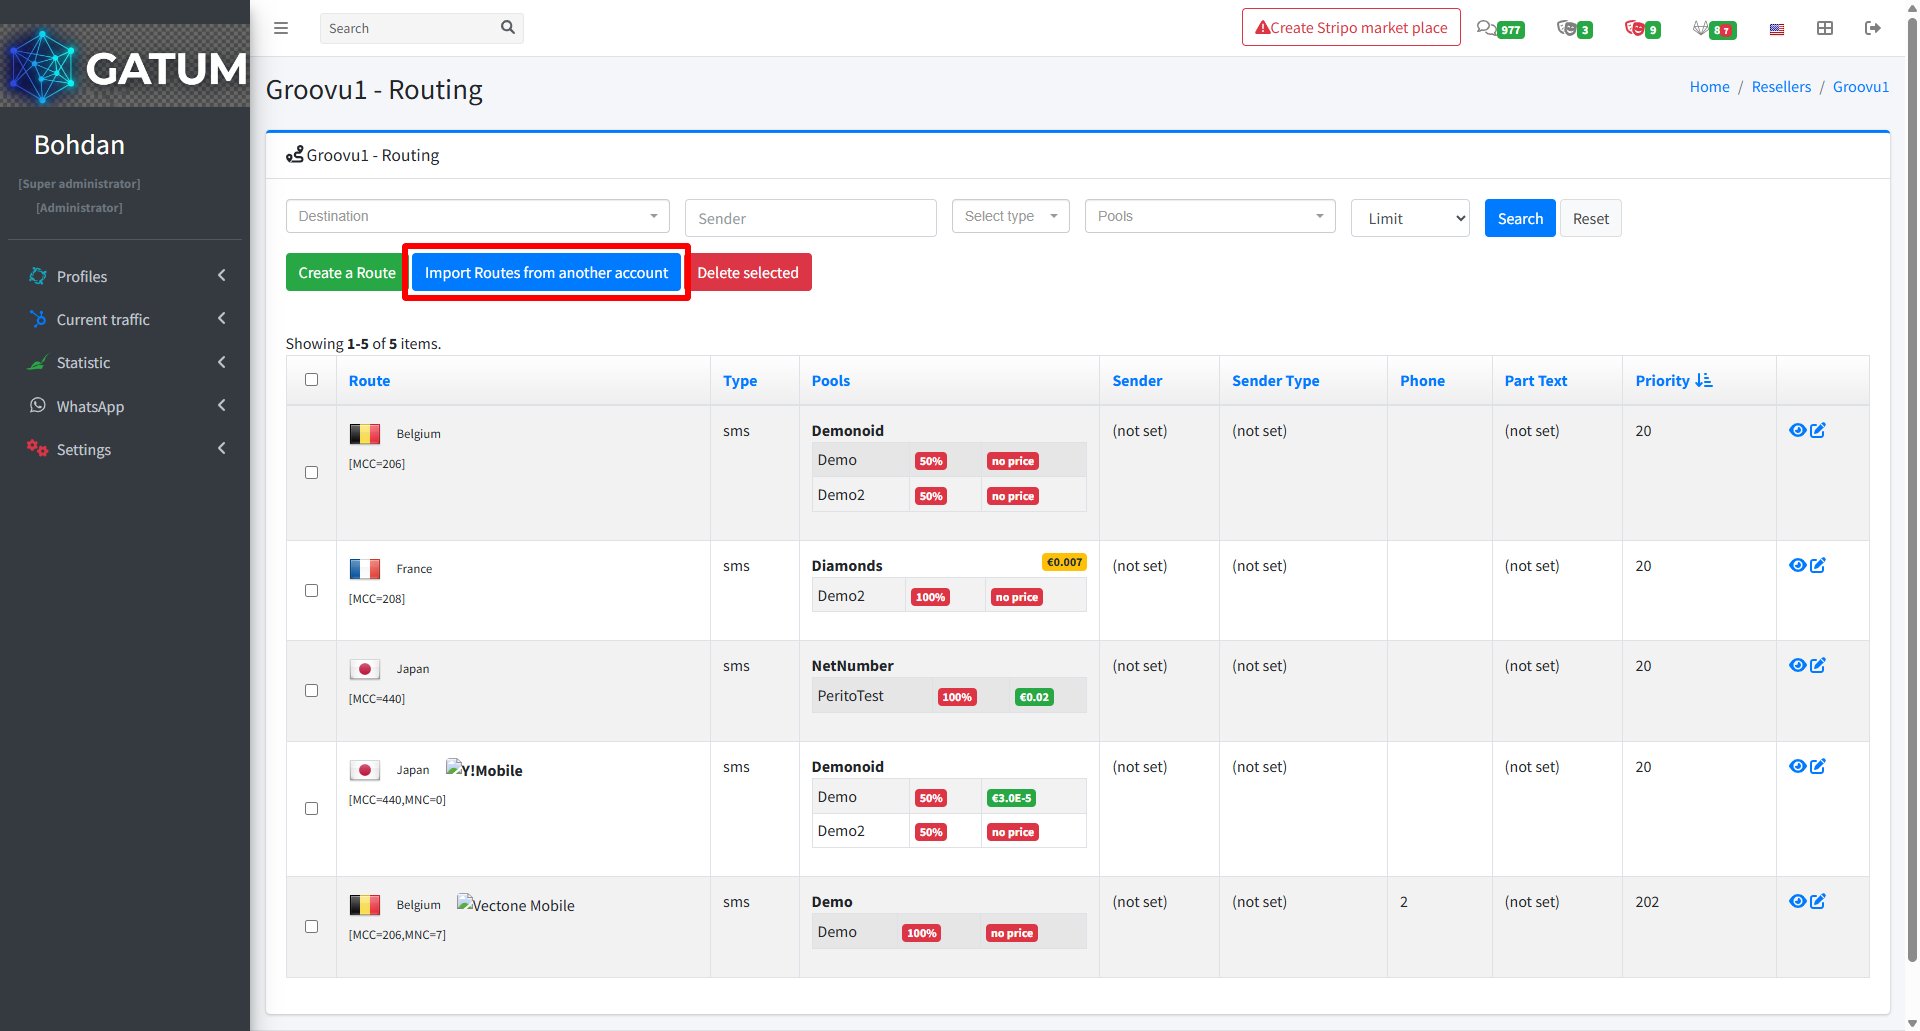
How to Set Up Routing
Go to Profiles → Resellers.
Click on the reseller's name.
In the reseller's settings page, click Routing:
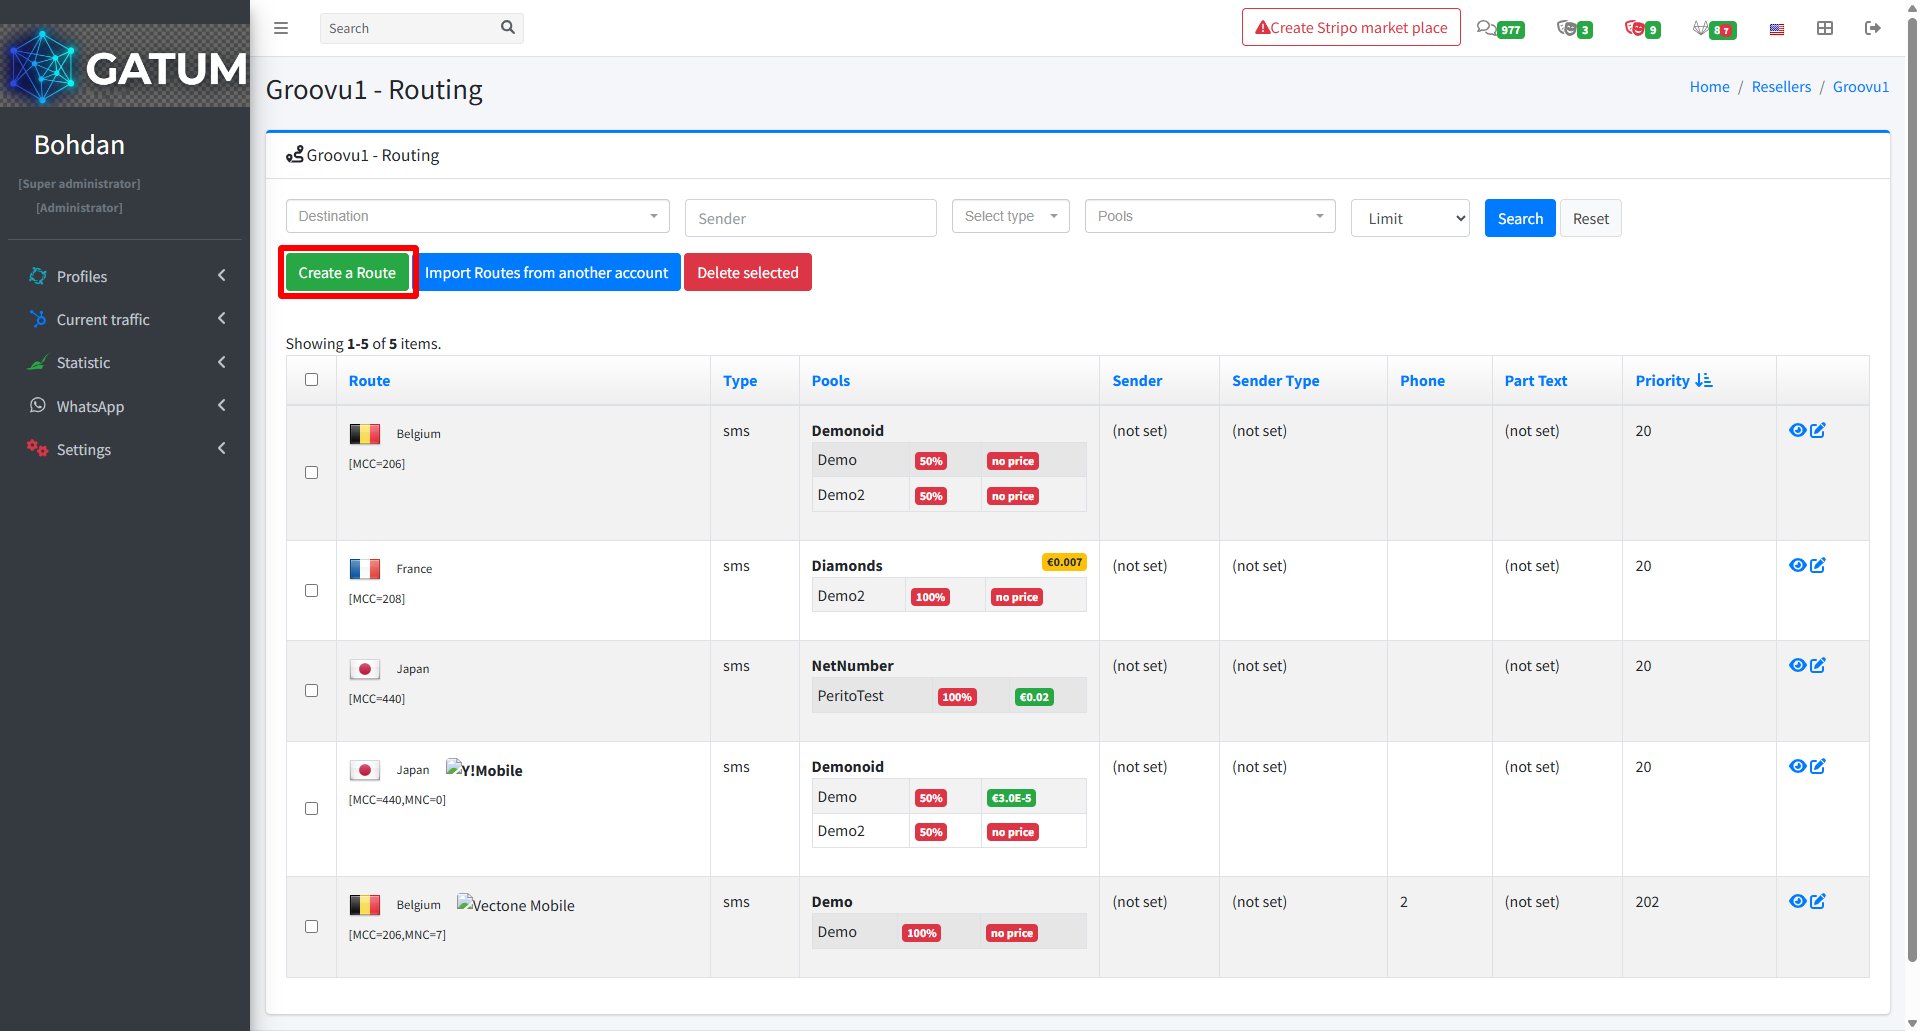
There are two ways to add routing:
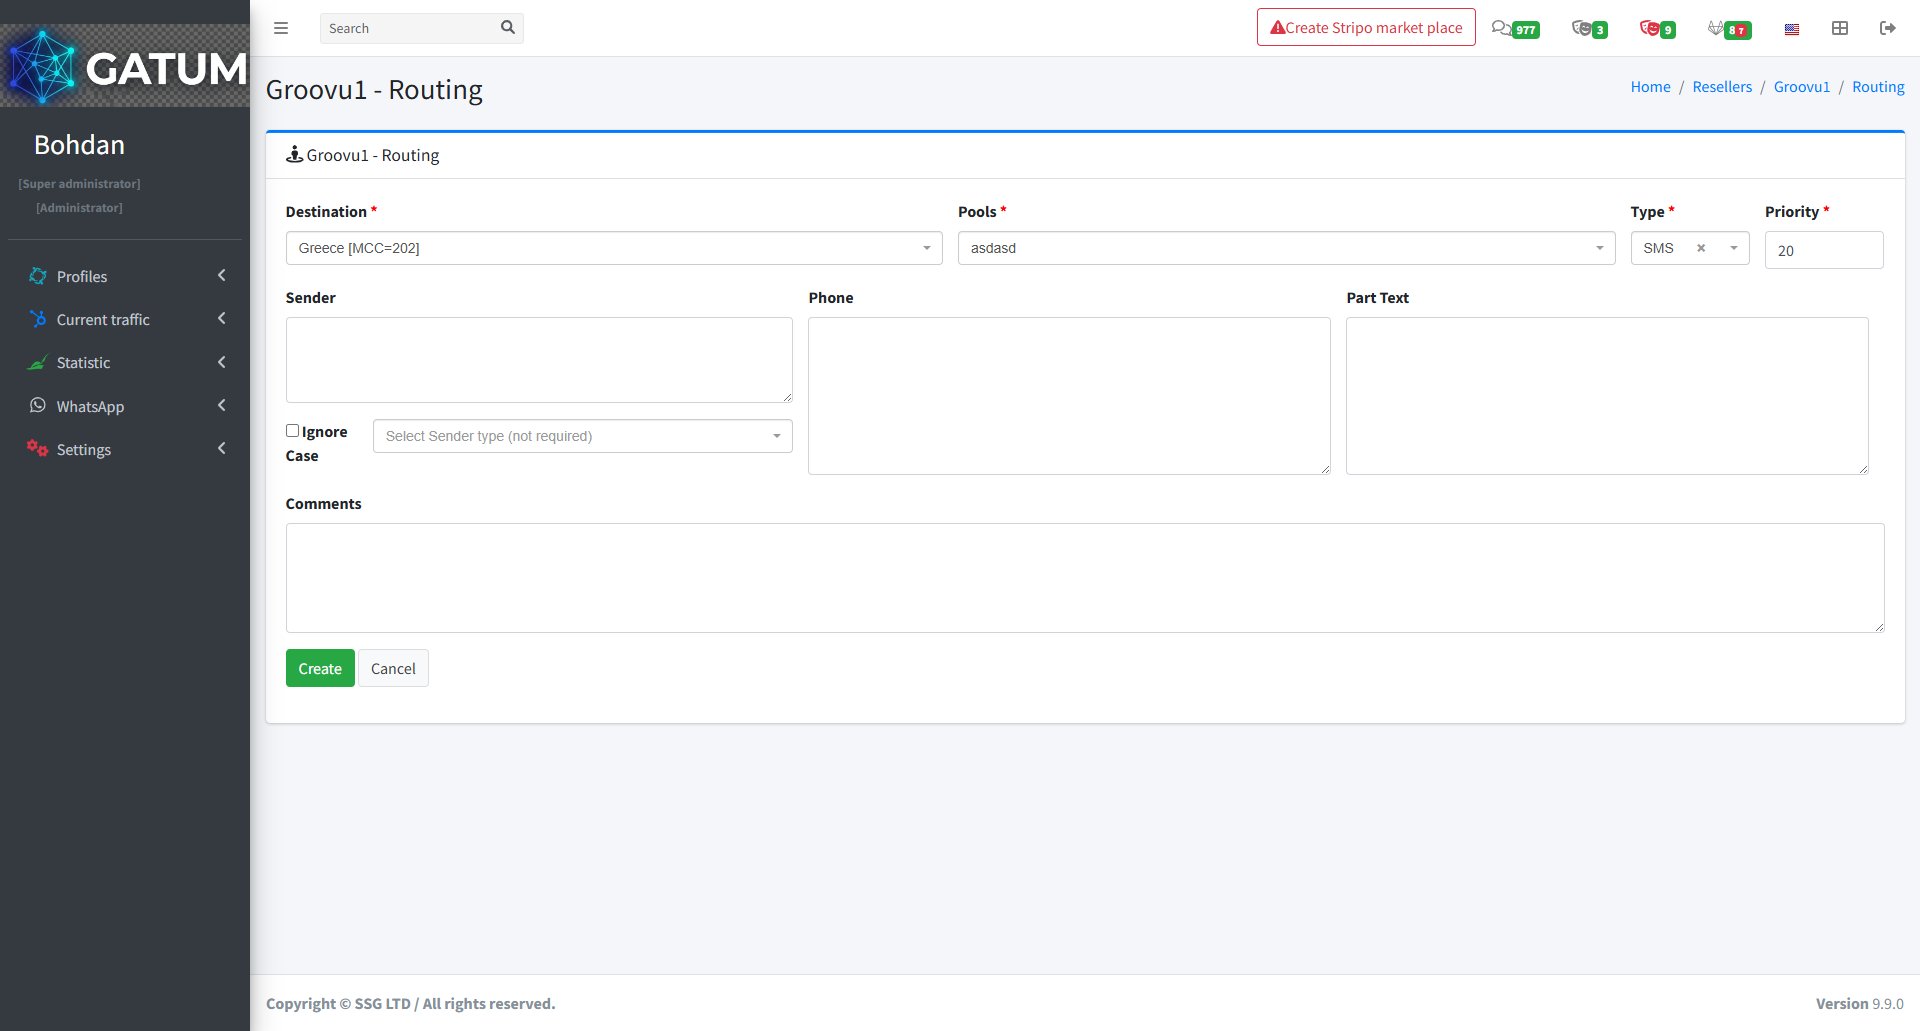
1) Create a route manually — click Create a Route.
On the page that opens:
Fill in the fields:
Field
Description
Destination
The country or network this route applies to
Pools
The pool used to send traffic
Type
Message type (e.g. SMS)
Priority
Route priority — lower numbers are used first
Sender (optional)
Restrict this route to a specific sender name
Phone (optional)
Restrict this route to a specific phone number
Part Text (optional)
Restrict this route by message content
Ignore Case (optional)
Ignore case when matching the sender or text
Sender type (optional)
Restrict this route to a specific sender type
Comments (optional)
Internal notes for this route
Click Create.
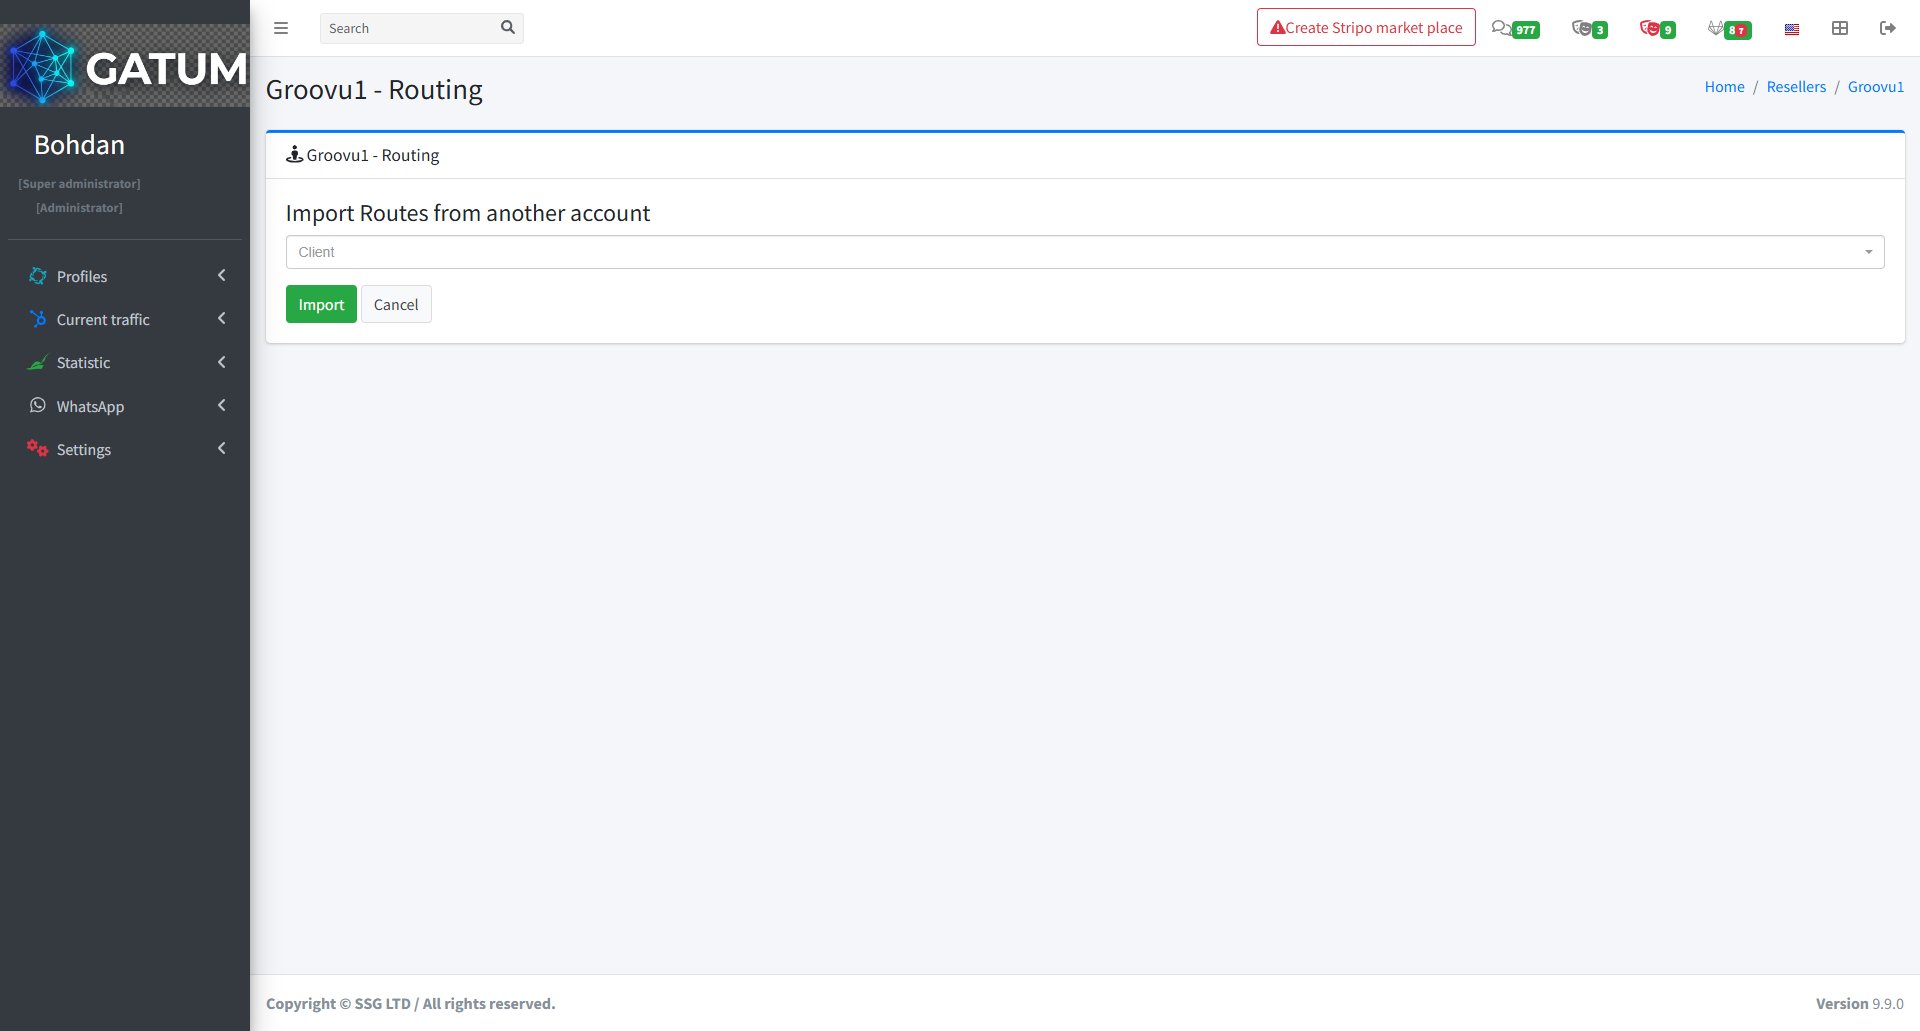
2) Import routes from another account — click Import Routes from another account.
On the page that opens:
Select the client account to copy routing from and click Import.
Routing changes apply to the reseller's traffic immediately after saving.
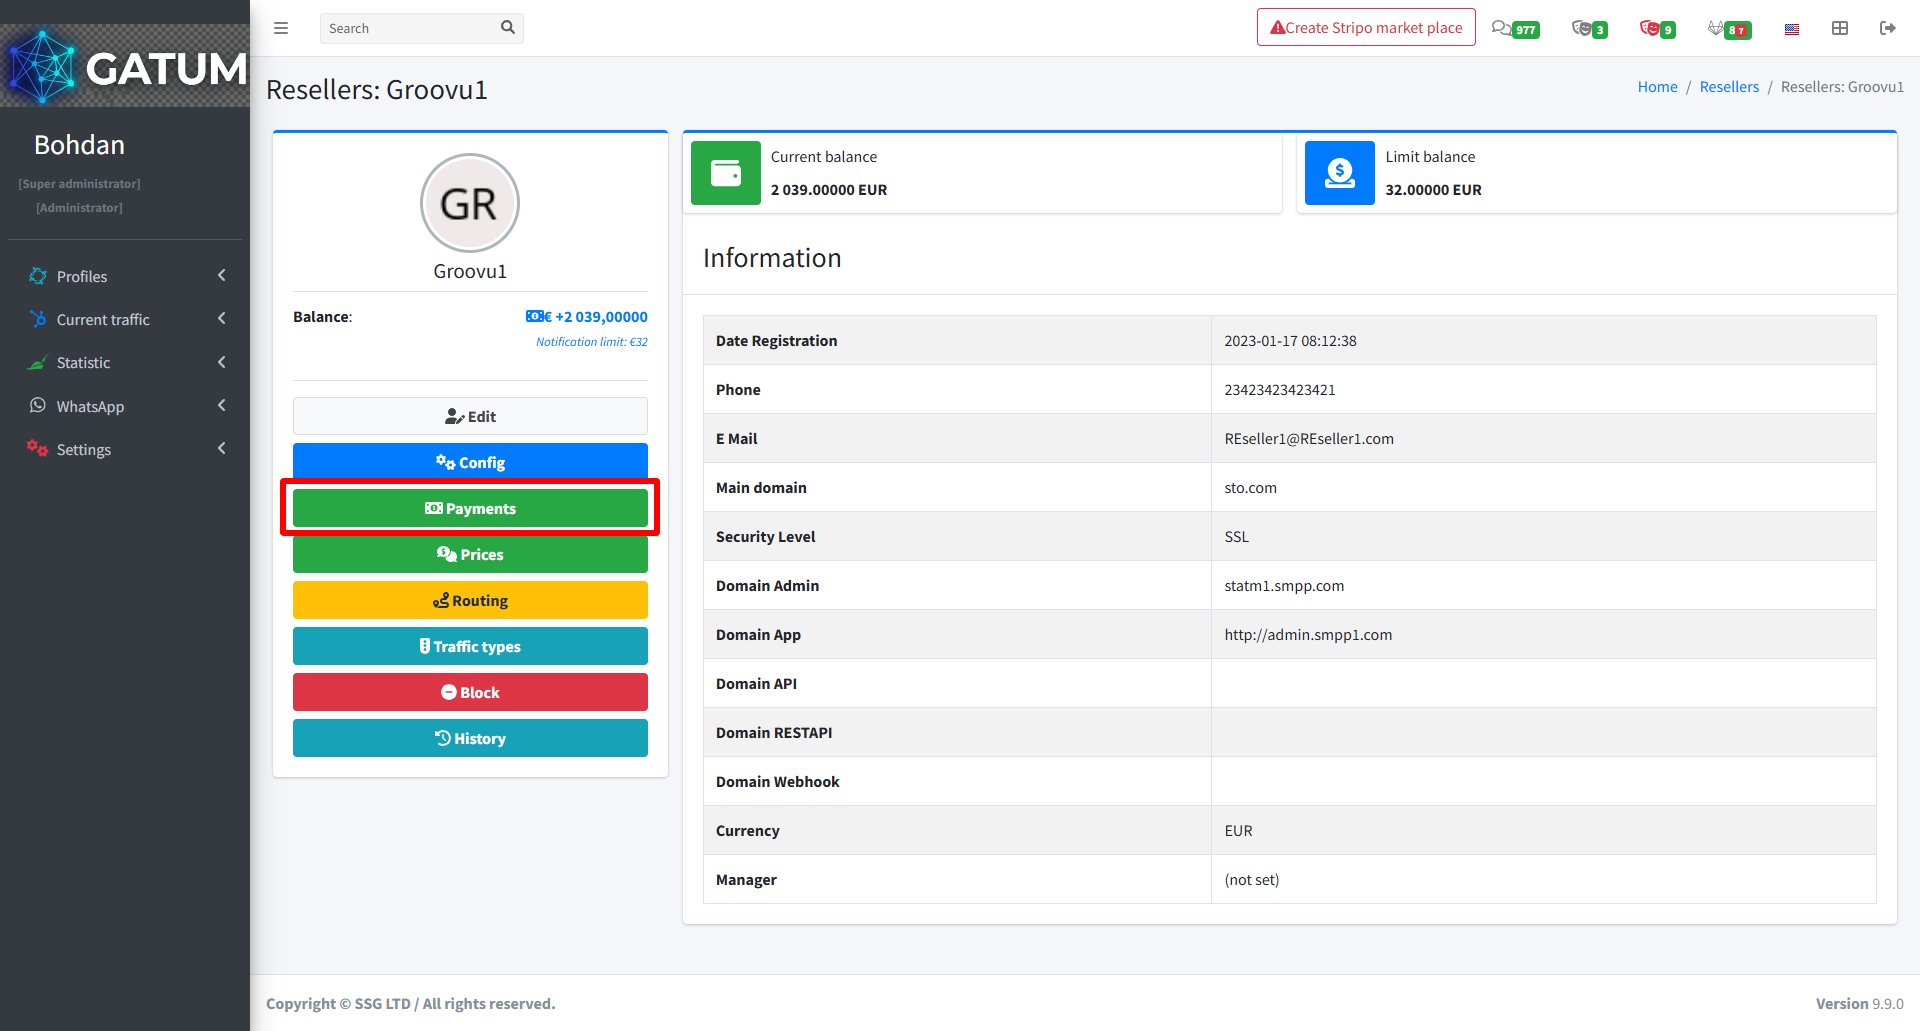
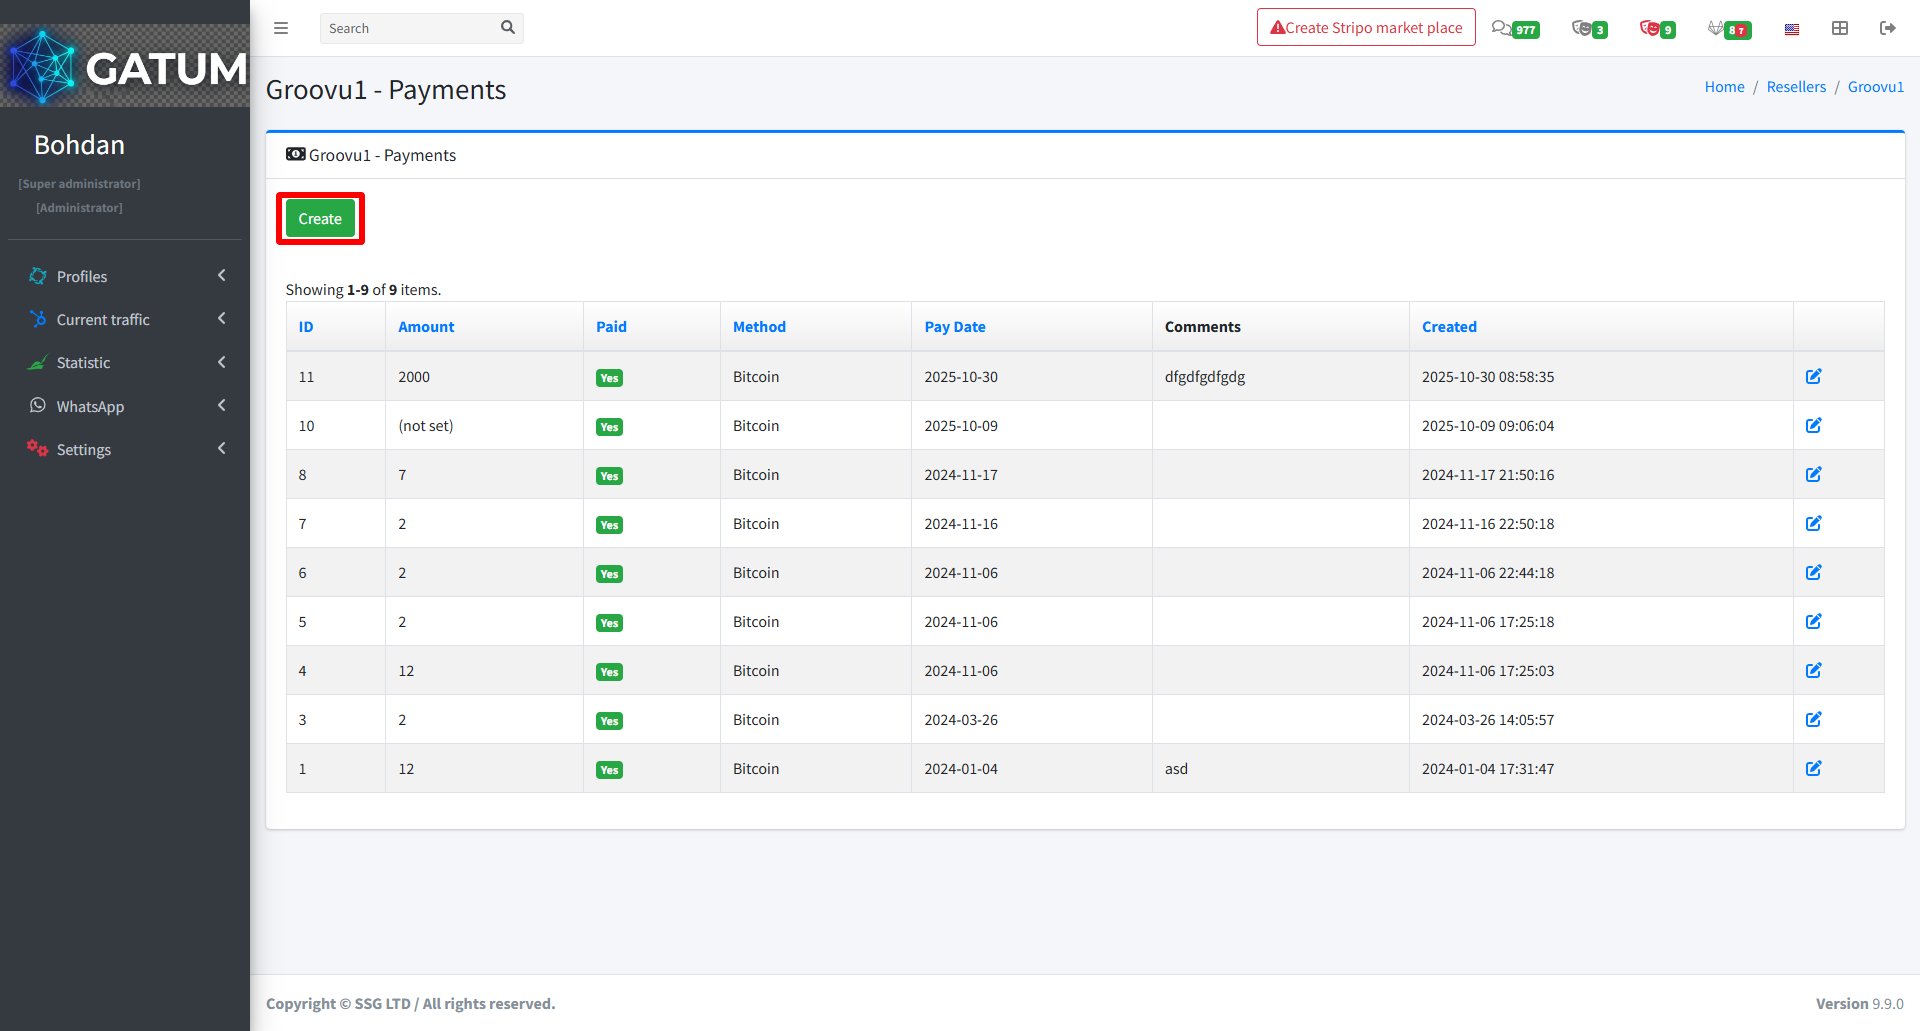
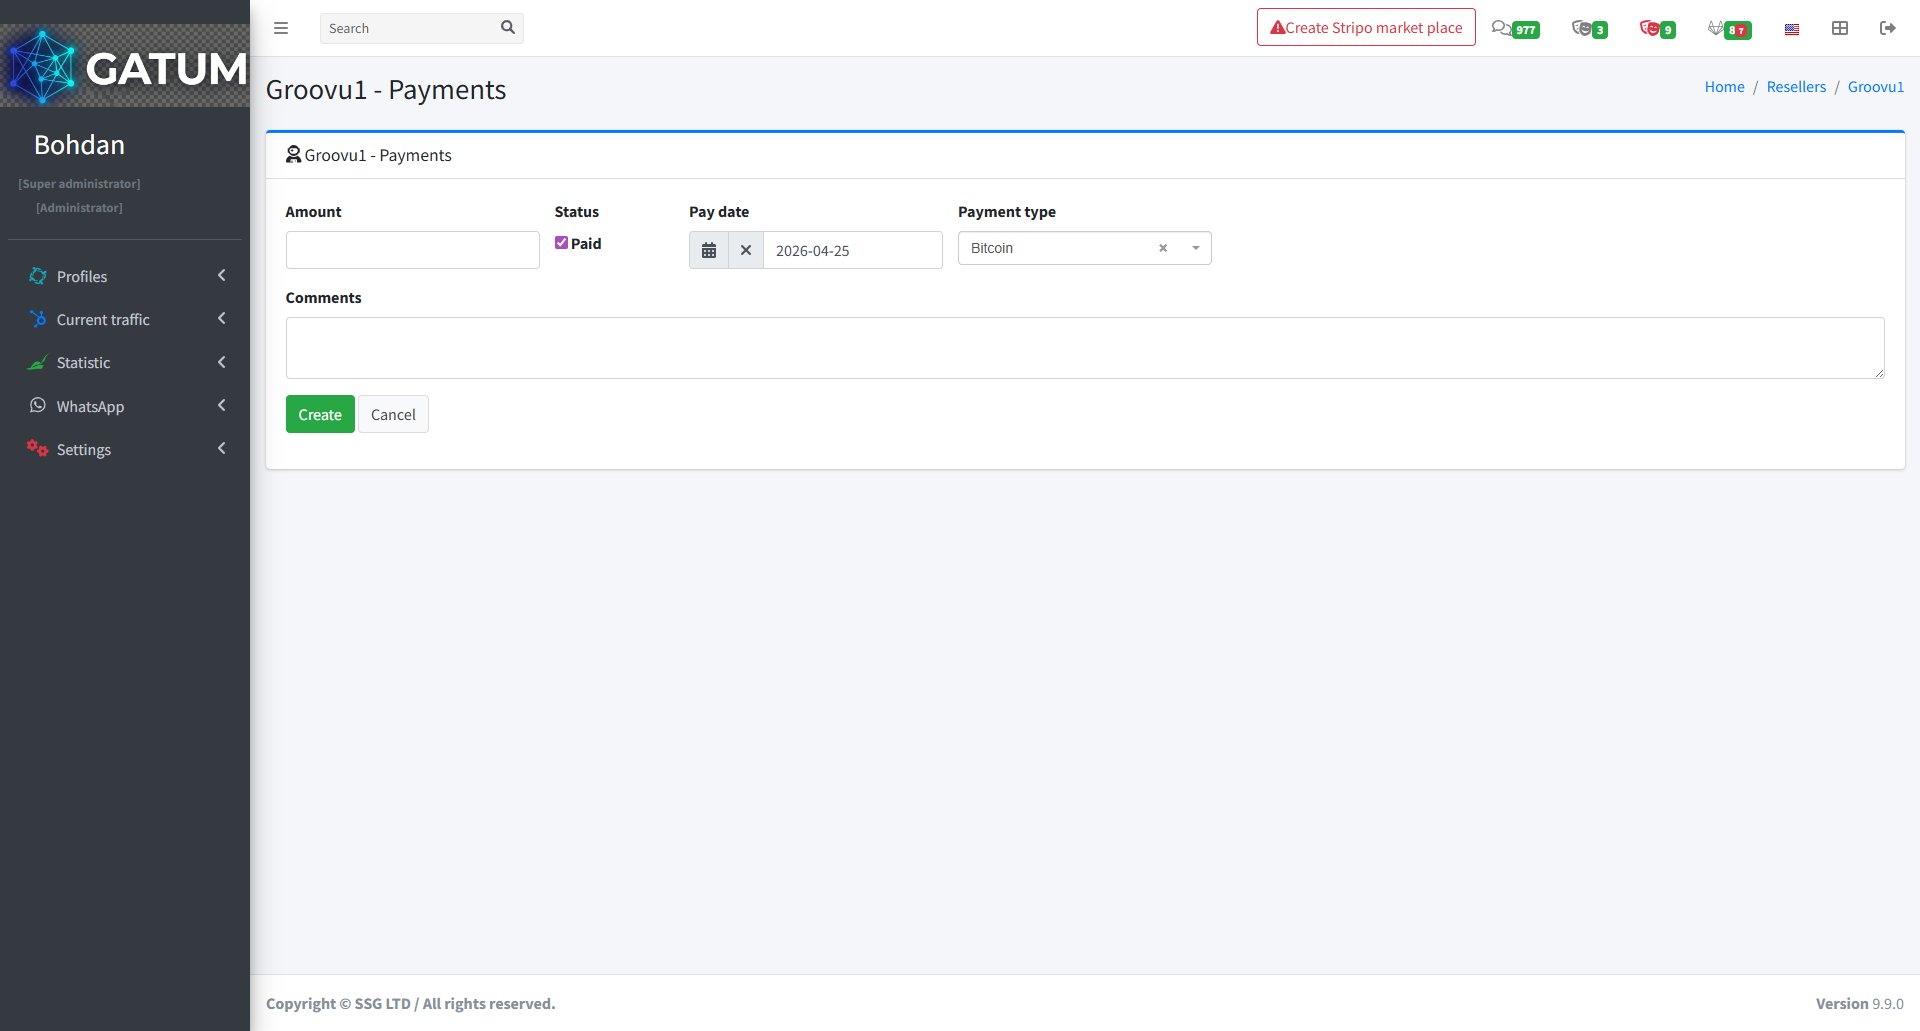
How to Add a Payment
Go to Profiles → Resellers.
Click on the reseller's name.
In the reseller's settings page, click Payments.
On the opened page, click Create:
On the page that opens:
Fill in the fields:
Field
Description
Amount
Payment amount
Status
Check Paid if the payment has already been received
Pay date
The date of the payment
Payment type
Payment method (e.g. Bitcoin)
Comments (optional)
Internal notes for this payment
Click Create.
The payment will appear in the reseller's payment history immediately after saving.
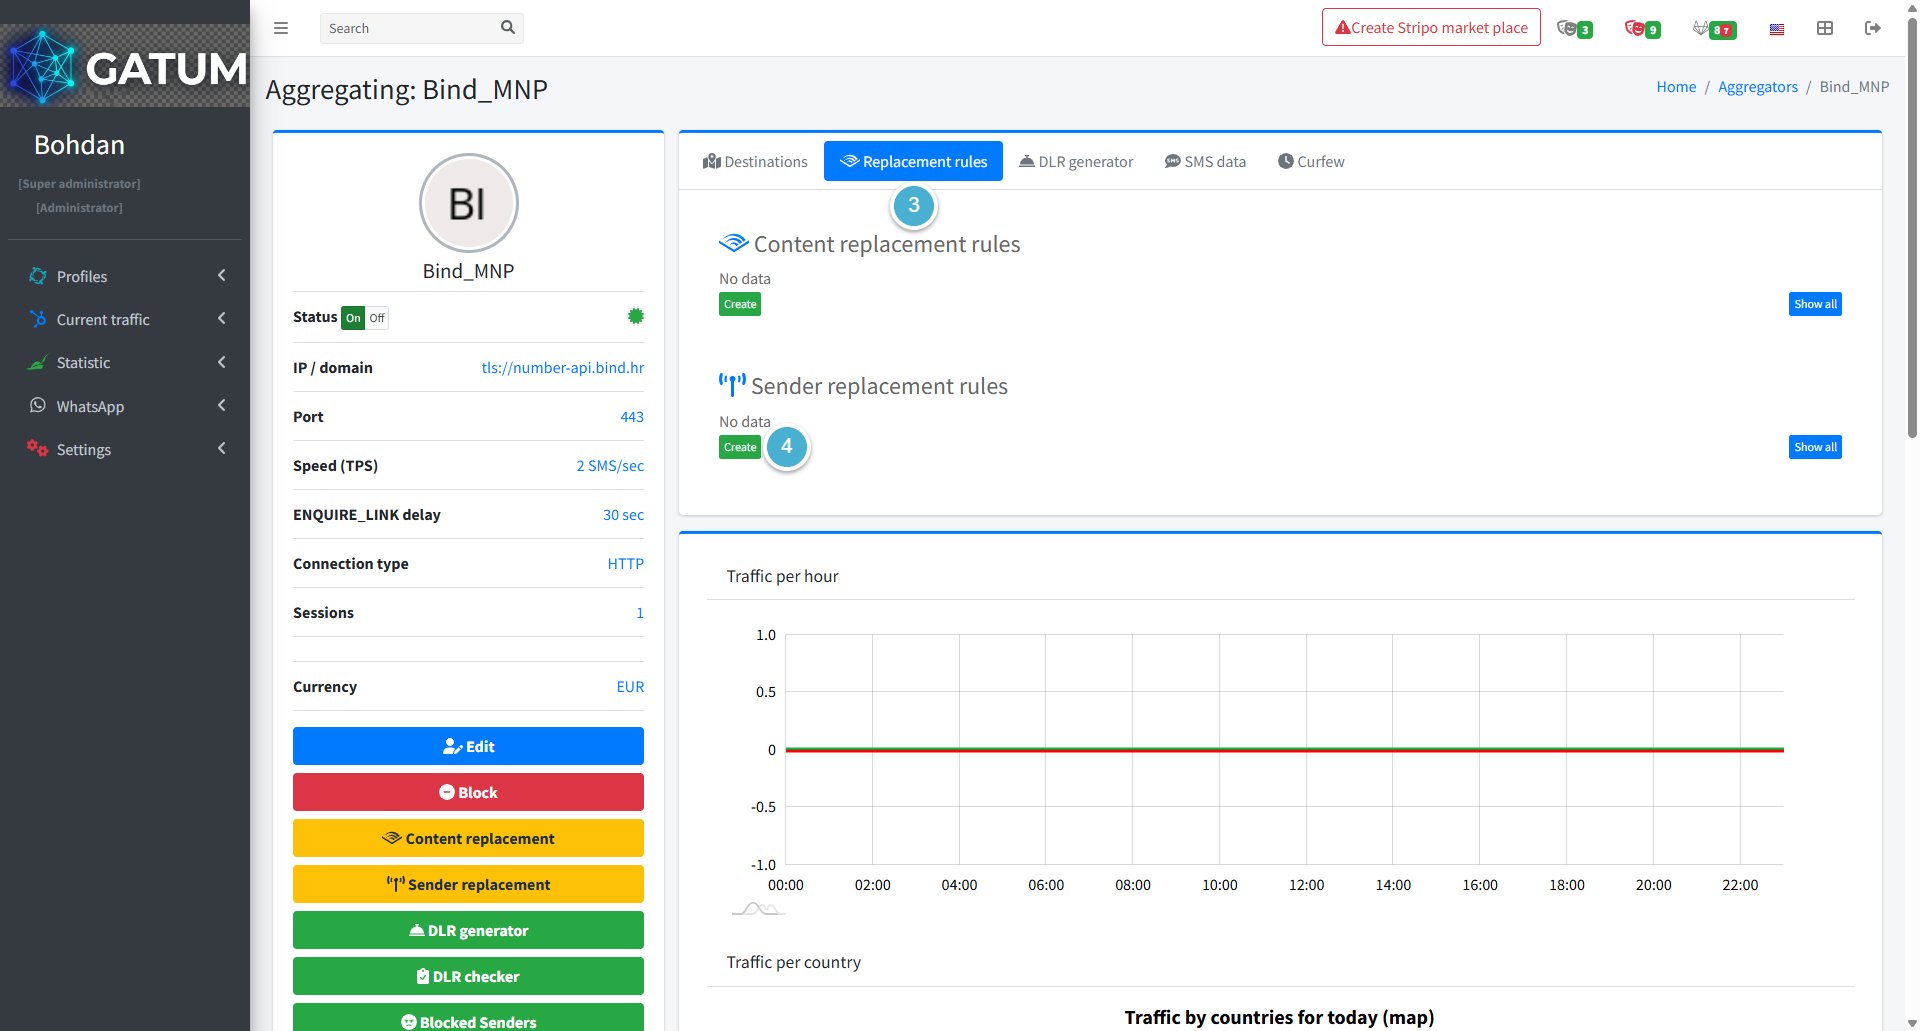
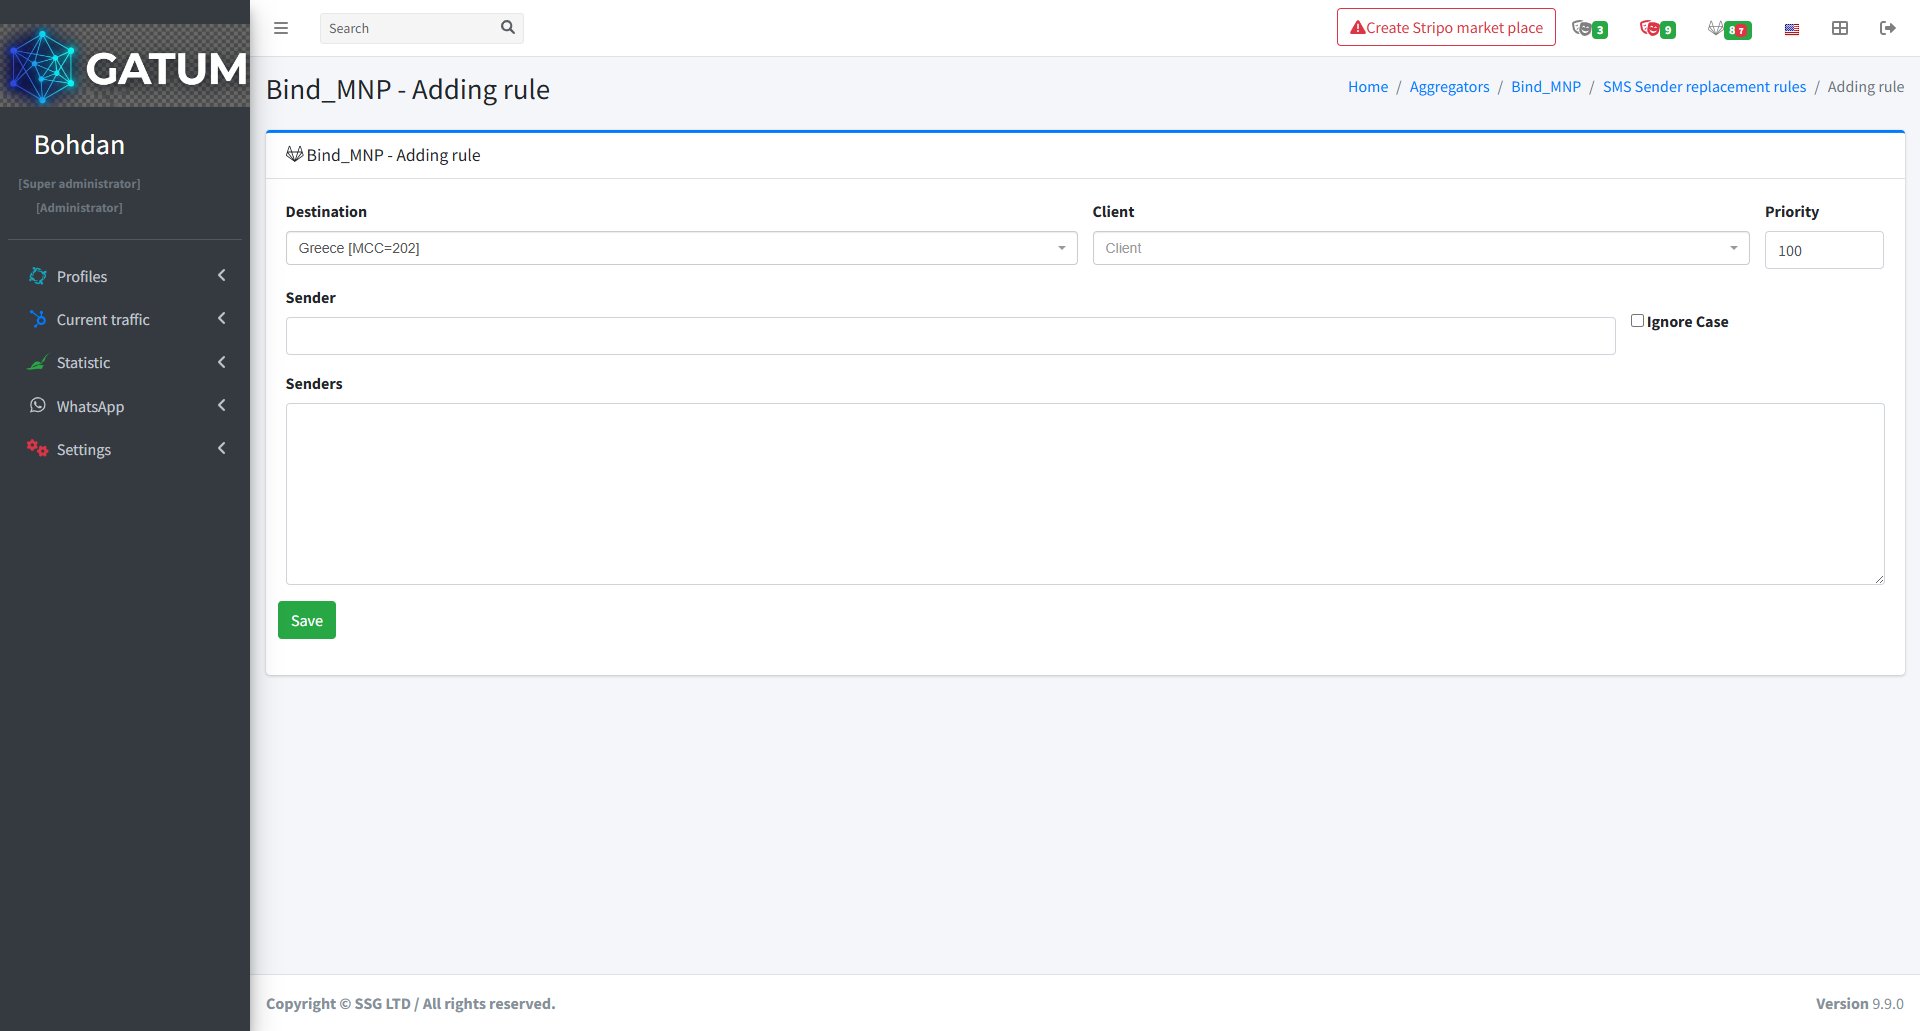
How to Create a Sender Replacement Rule for an Aggregator?
Sender replacement rules at the aggregator level work differently from client-level rules. While client rules apply to a specific client's outgoing traffic, aggregator rules apply to all traffic sent through that aggregator, regardless of which client sent it. This is useful for destinations where certain sender names are blocked or restricted by the operator.
Go to Current Traffic → Routing → Aggregators.
Click the view icon next to the aggregator you need.
Open the Replacement rules tab.
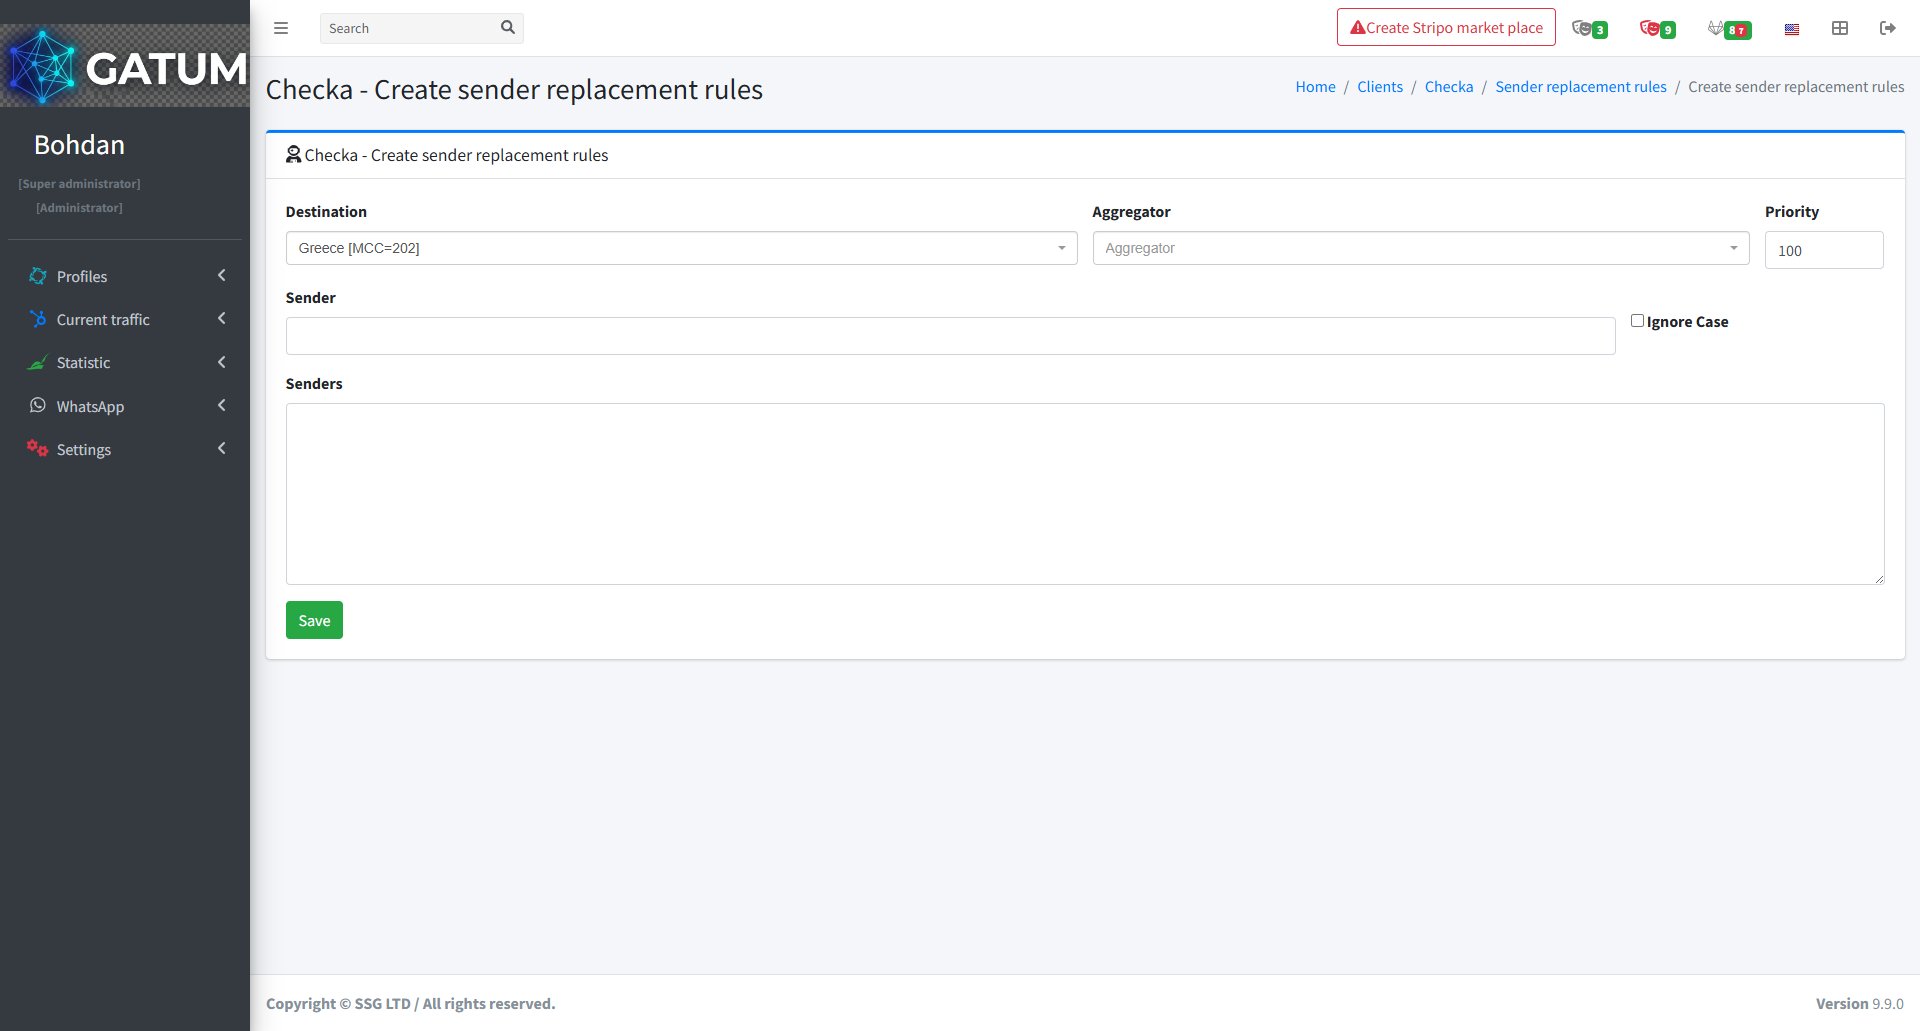
Click Create in the Sender replacement rules block.
In the window that opens:
Fill in the fields:
Field
Description
Destination
The country or network this rule applies to
Client (optional)
Apply this rule only to traffic from a specific client. Leave empty to apply to all clients
Priority
Order in which rules are checked – lower number means higher priority
Sender
The sender name to look for in outgoing messages
Senders
The name to replace it with. You can enter multiple names – one per line – and the platform will pick one at random for each message
Ignore Case (optional)
Match the sender name regardless of capitalisation
Click Save.
The rule will apply to all matching traffic sent through this aggregator from that point on. This is particularly useful for destinations where certain sender name formats are required by the operator or where specific names are blocked.
How to Create a Sender Replacement Rule?
Sender replacement rules let you automatically swap out a sender name before the message reaches the recipient. When a client sends an SMS with a specific sender, the platform checks if a rule matches and replaces it with the name you've defined. This is useful for destinations where certain sender names are blocked or restricted.
Go to Profiles → Clients.
Click on the client's name.
Open the Replacement rules tab.
Click Create in the Sender replacement rules block:
In the window that opens:
Fill in the fields:
Field
Description
Destination
The country or network this rule applies to
Aggregator (optional)
Apply this rule only when sending through a specific aggregator. Leave empty to apply to all aggregators
Priority
Order in which rules are checked — lower number means higher priority
Sender
The sender name to look for in outgoing messages
Senders
The name to replace it with. You can enter multiple names — one per line — and the platform will pick one at random for each message
Ignore Case (optional)
Match the sender name regardless of capitalisation
Click Save.
The rule will apply to all matching outgoing messages from this client from that point on.
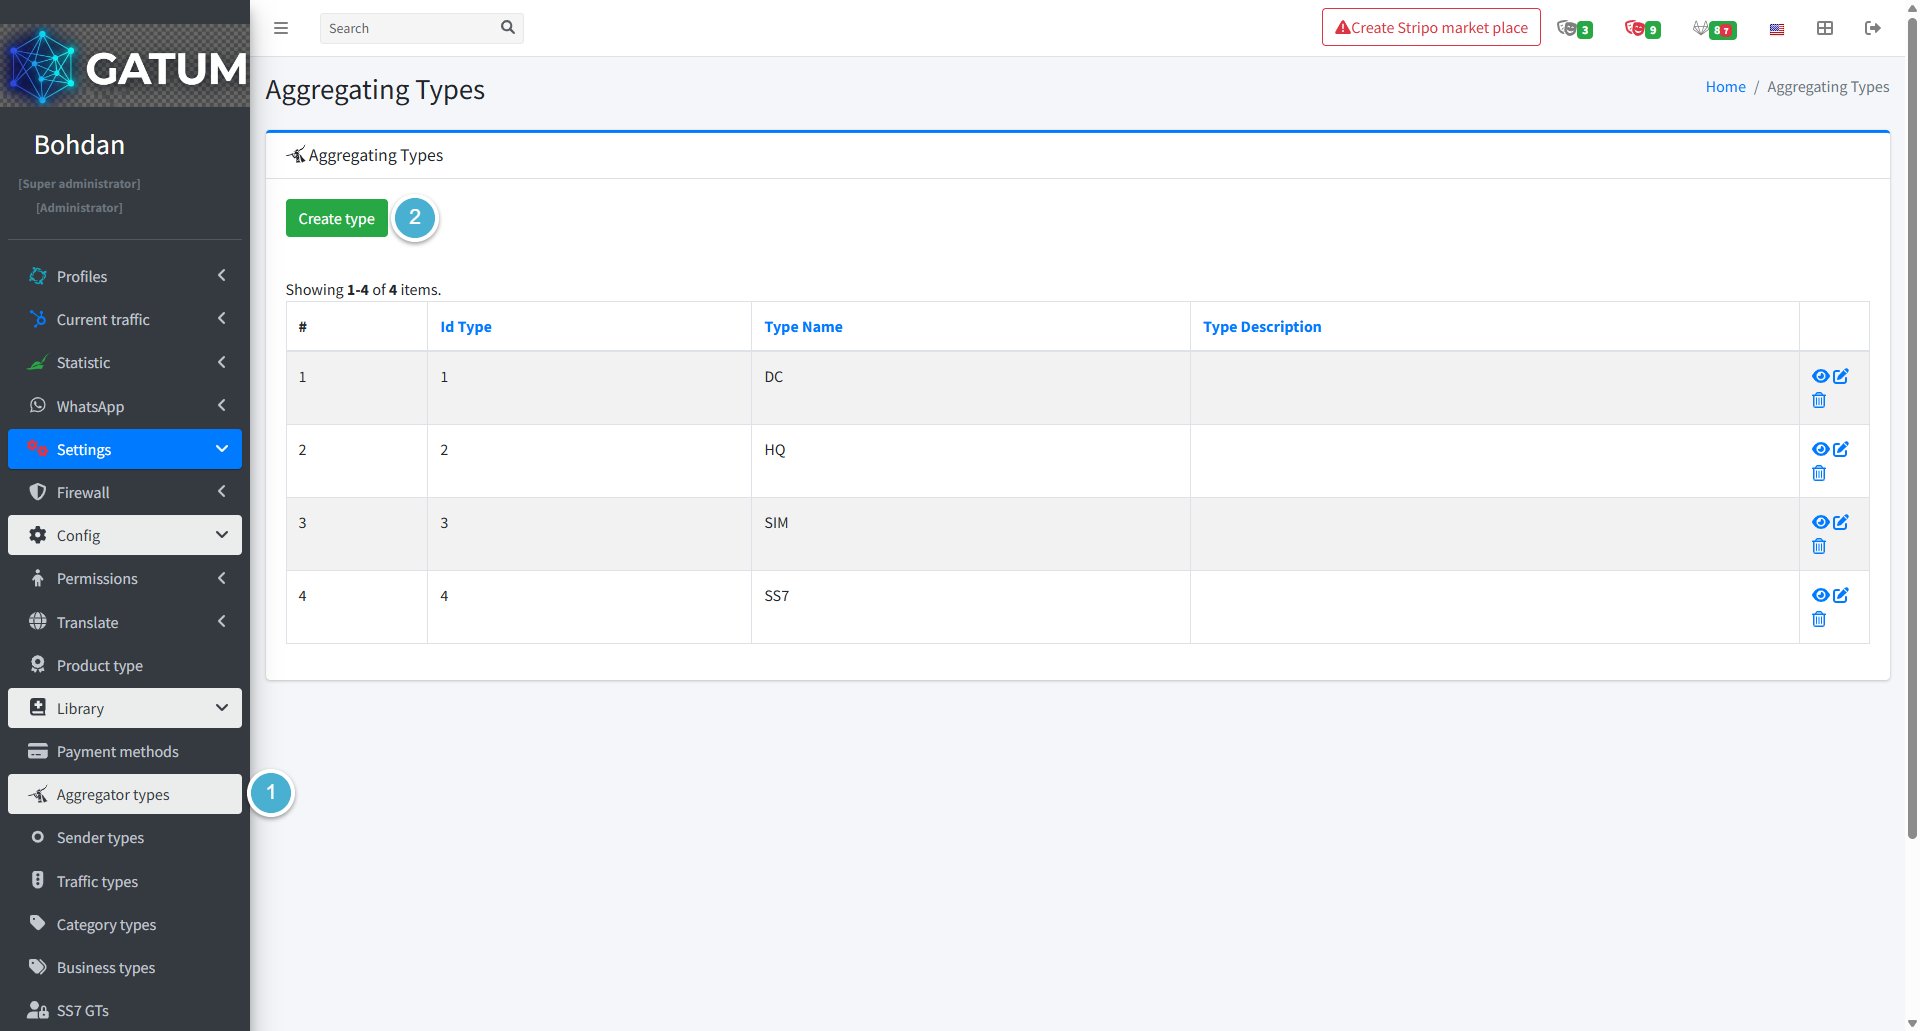
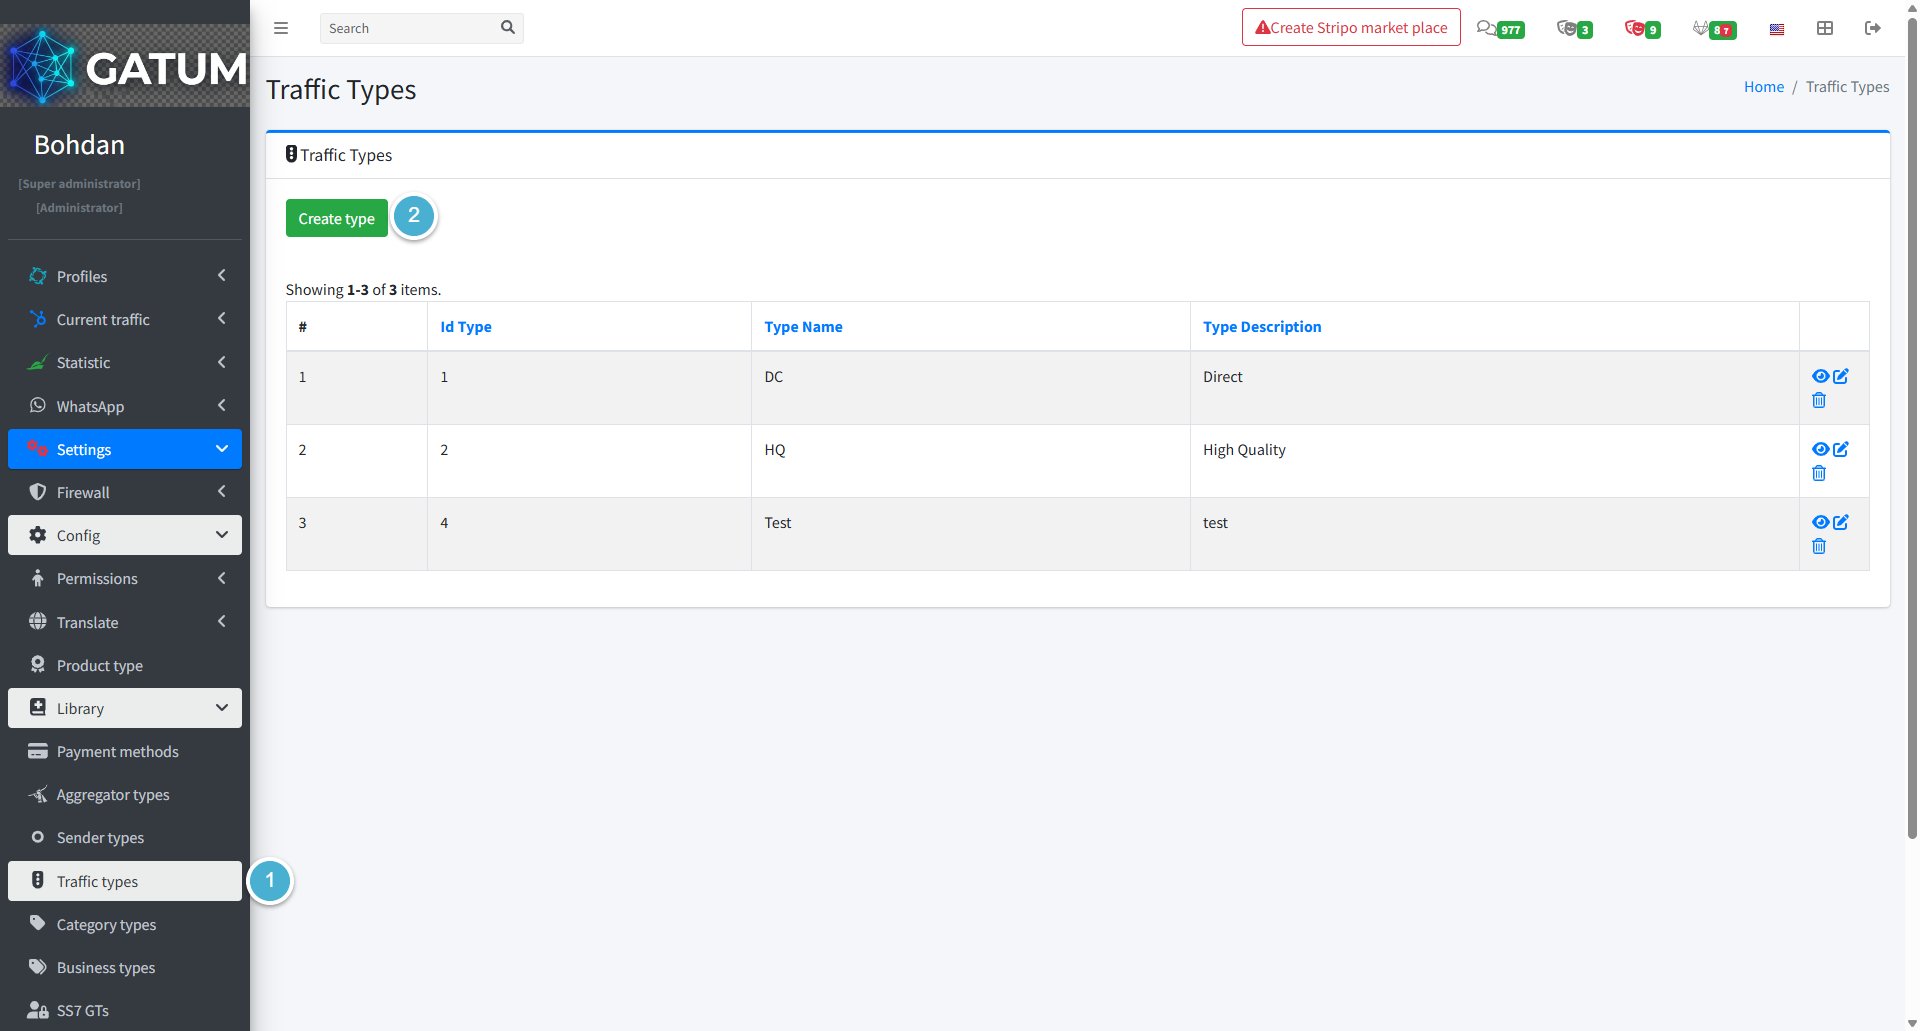
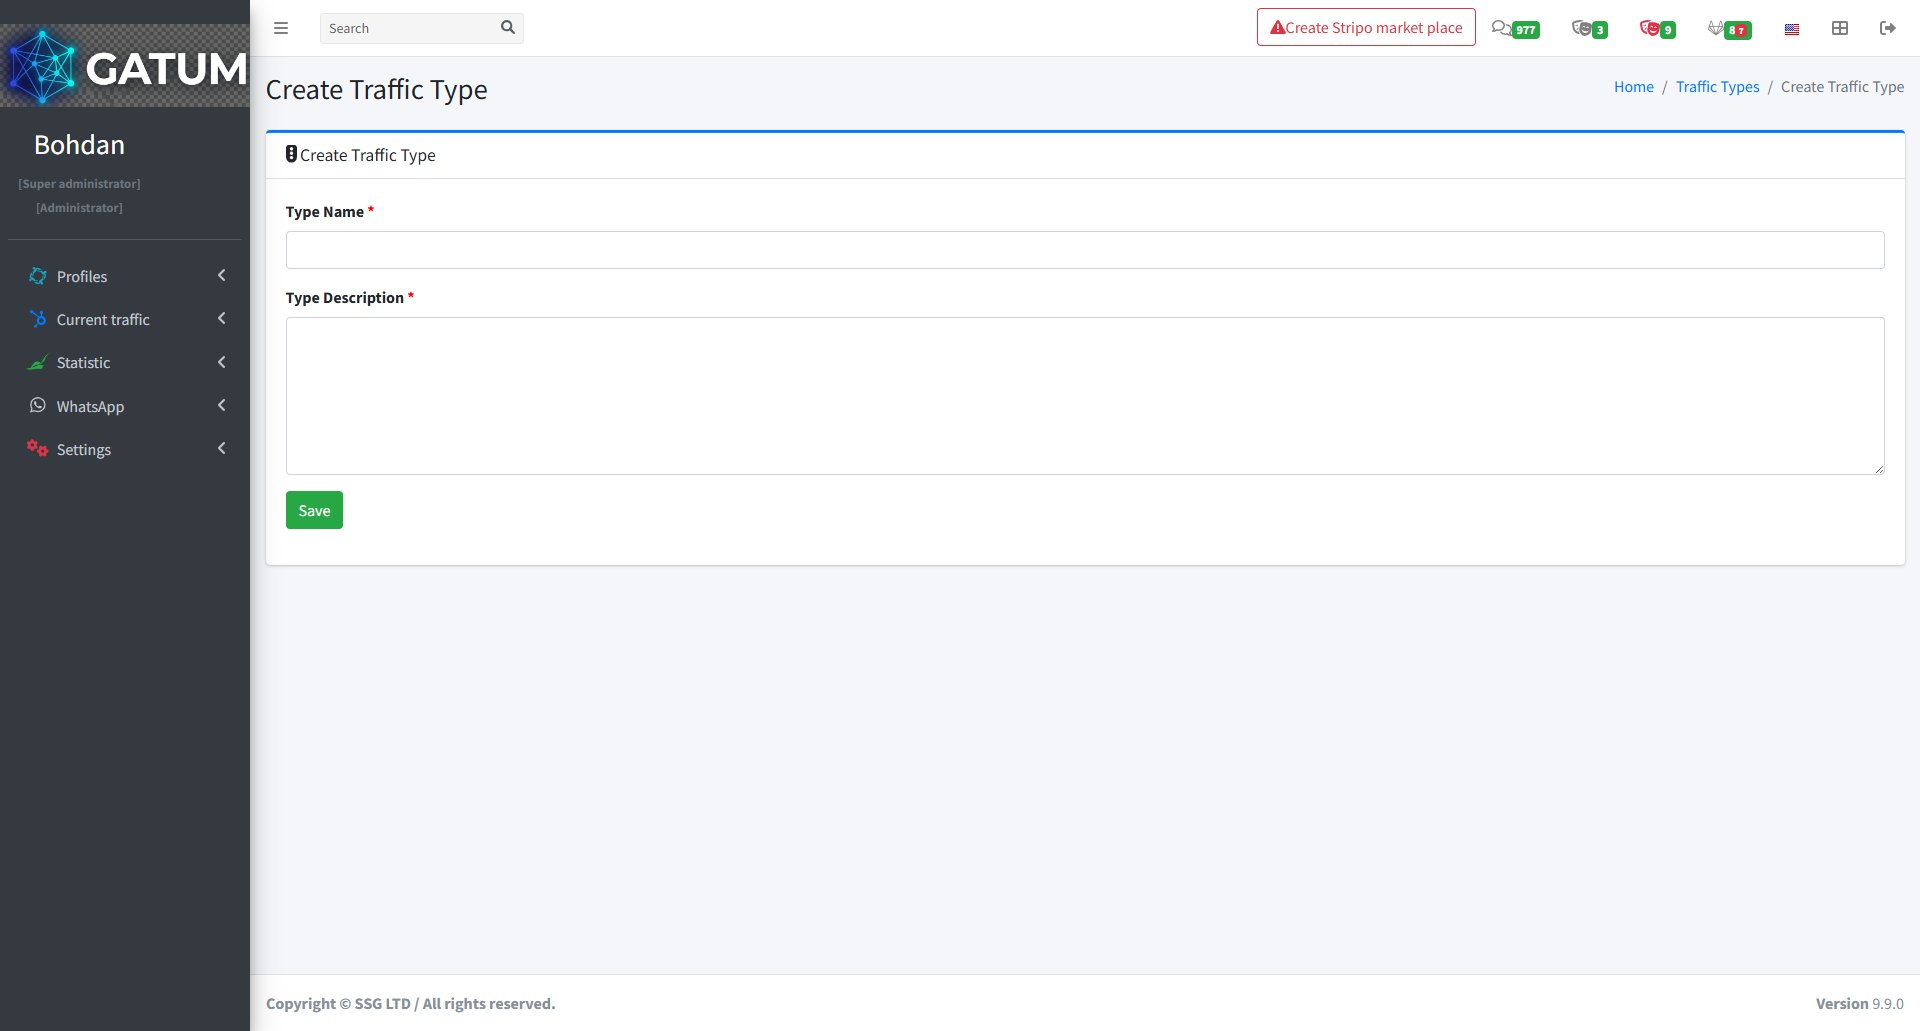
How to Create Aggregator Types?
Aggregator types are classification labels that describe the channel or infrastructure type of an aggregator connection – for example, DC, HQ, SIM, or SS7. They are used when configuring aggregators and source prices to help you organize and filter connections by traffic channel.
Create an Aggregator Type
Go to Settings → Config → Library → Aggregator types.
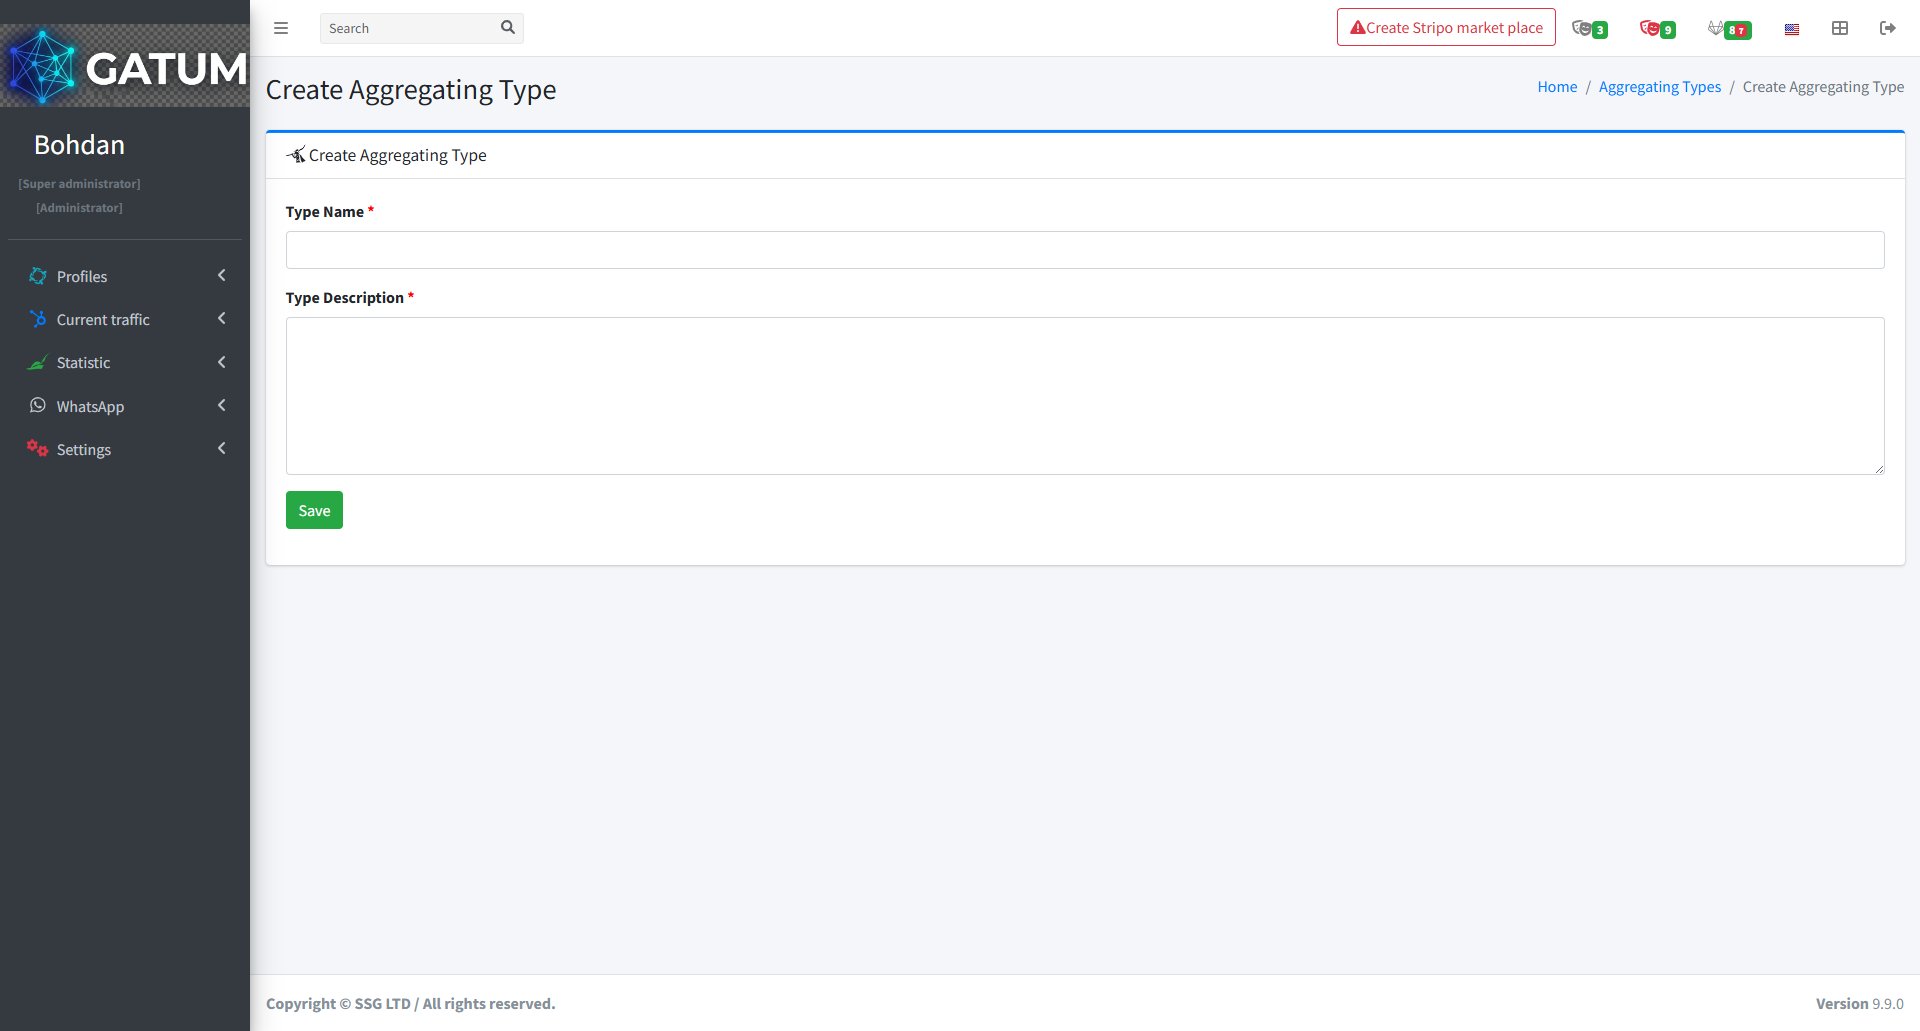
Click Create type:
In the window that opens:
Fill in the fields:
Field
Description
Type Name
The name of the aggregator type (e.g. DC, HQ, SIM, SS7).
Type Description
A description of what this type represents.
Click Save.
Once created, the type becomes available in the Type field when creating or editing an aggregator, and in the Type filter on the Source prices page.
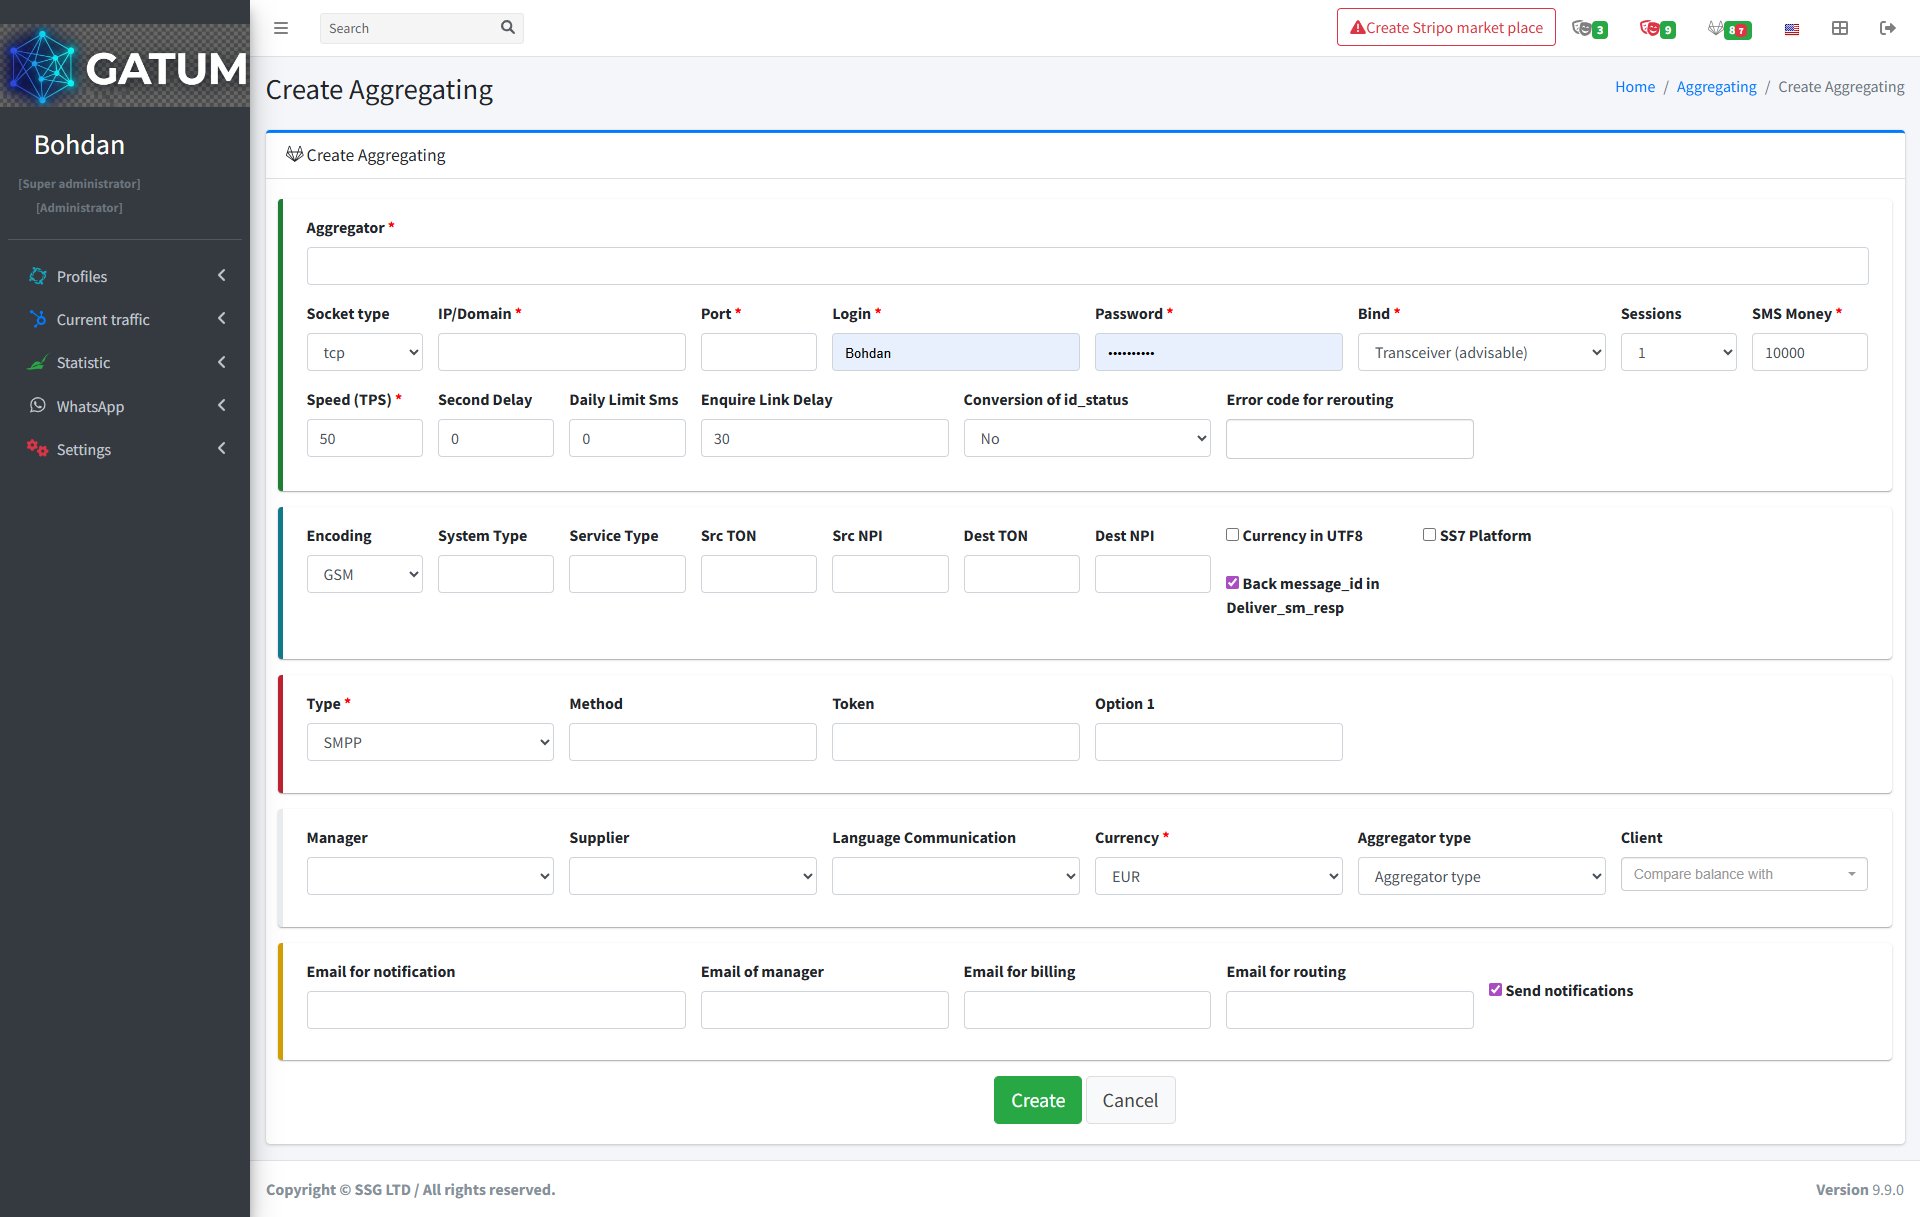
How to Create an Aggregator on the Platform?
An aggregator in Gatum represents a connection to an SMS provider. Each aggregator stores the credentials, connection settings, and sending parameters for a specific supplier. You need to create an aggregator before you can route traffic to any provider.
Go to Current traffic → Routing → Aggregators.
Click Create an aggregator.
In the window that opens:
Fill in the fields:
Field
Description
Aggregator
The name of the aggregator as it will appear on the platform.
Socket type (optional)
The socket protocol used for the connection. Leave as default unless specified by your provider.
IP/Domain
The IP address or domain name of the provider.
Port
The port used to connect to the provider.
Login
The login credential for the connection. Share this with your provider so they can authenticate.
Password
The password for the connection. Share this with your provider along with the login.
Bind
The SMPP bind type. Transceiver is recommended unless your provider requires otherwise.
Sessions (optional)
The number of simultaneous SMPP sessions allowed.
SMS Money
The starting balance for this aggregator. Defaults to 10000.
Speed (TPS)
The maximum sending speed in messages per second. Get this value from your provider.
Second Delay (optional)
A delay in seconds between sending attempts.
Daily Limit SMS (optional)
The maximum number of messages that can be sent per day through this aggregator.
Enquire Link Delay (optional)
The interval in seconds for SMPP keep-alive enquire_link requests. Defaults to 30.
Conversion of id_status (optional)
Whether to convert the message ID status format.
Error code for rerouting (optional)
Error codes that trigger automatic rerouting when returned by the provider.
Encoding (optional)
The character encoding used for messages. Defaults to GSM.
System Type (optional)
The SMPP system type value sent during the bind.
Service Type (optional)
The SMPP service type value for outgoing messages.
Src TON / Src NPI (optional)
Type of Number and Numbering Plan Indicator for the message sender.
Dest TON / Dest NPI (optional)
Type of Number and Numbering Plan Indicator for the message recipient.
Currency in UTF8 (optional)
Enable if the provider requires UTF-8 encoding for currency symbols.
SS7 Platform (optional)
Enable if the provider uses an SS7 signalling platform.
Back message_id in Deliver_sm_resp (optional)
Returns the original message ID in the deliver_sm response. Enabled by default.
Type
The connection protocol. SMPP is standard; other types are available for specific integrations.
Method (optional)
The HTTP method used when Type is set to HTTP.
Token (optional)
An authentication token, if required by the provider.
Option 1 (optional)
An additional provider-specific parameter.
Manager (optional)
The platform manager responsible for this aggregator.
Supplier (optional)
The supplier linked to this aggregator.
Language Communication (optional)
The language used for communication with this provider.
Currency
The currency the provider works with.
Aggregator type (optional)
A classification label for this aggregator.
Client (optional)
Associate this aggregator with a specific client for balance comparison.
Email for notification (optional)
Receives general notifications about this aggregator.
Email of manager (optional)
The manager's email for aggregator-related alerts.
Email for billing (optional)
Receives billing-related notifications.
Email for routing (optional)
Receives routing-related alerts.
Send notifications (optional)
Enable to activate email notifications for this aggregator.
Click Create.
After the aggregator is created, you are redirected to its detail page, where you can configure destinations, replacement rules, DLR settings, and cost prices. To start routing traffic through this aggregator, you will also need to set up a cost price – see How to Create a Cost Price.
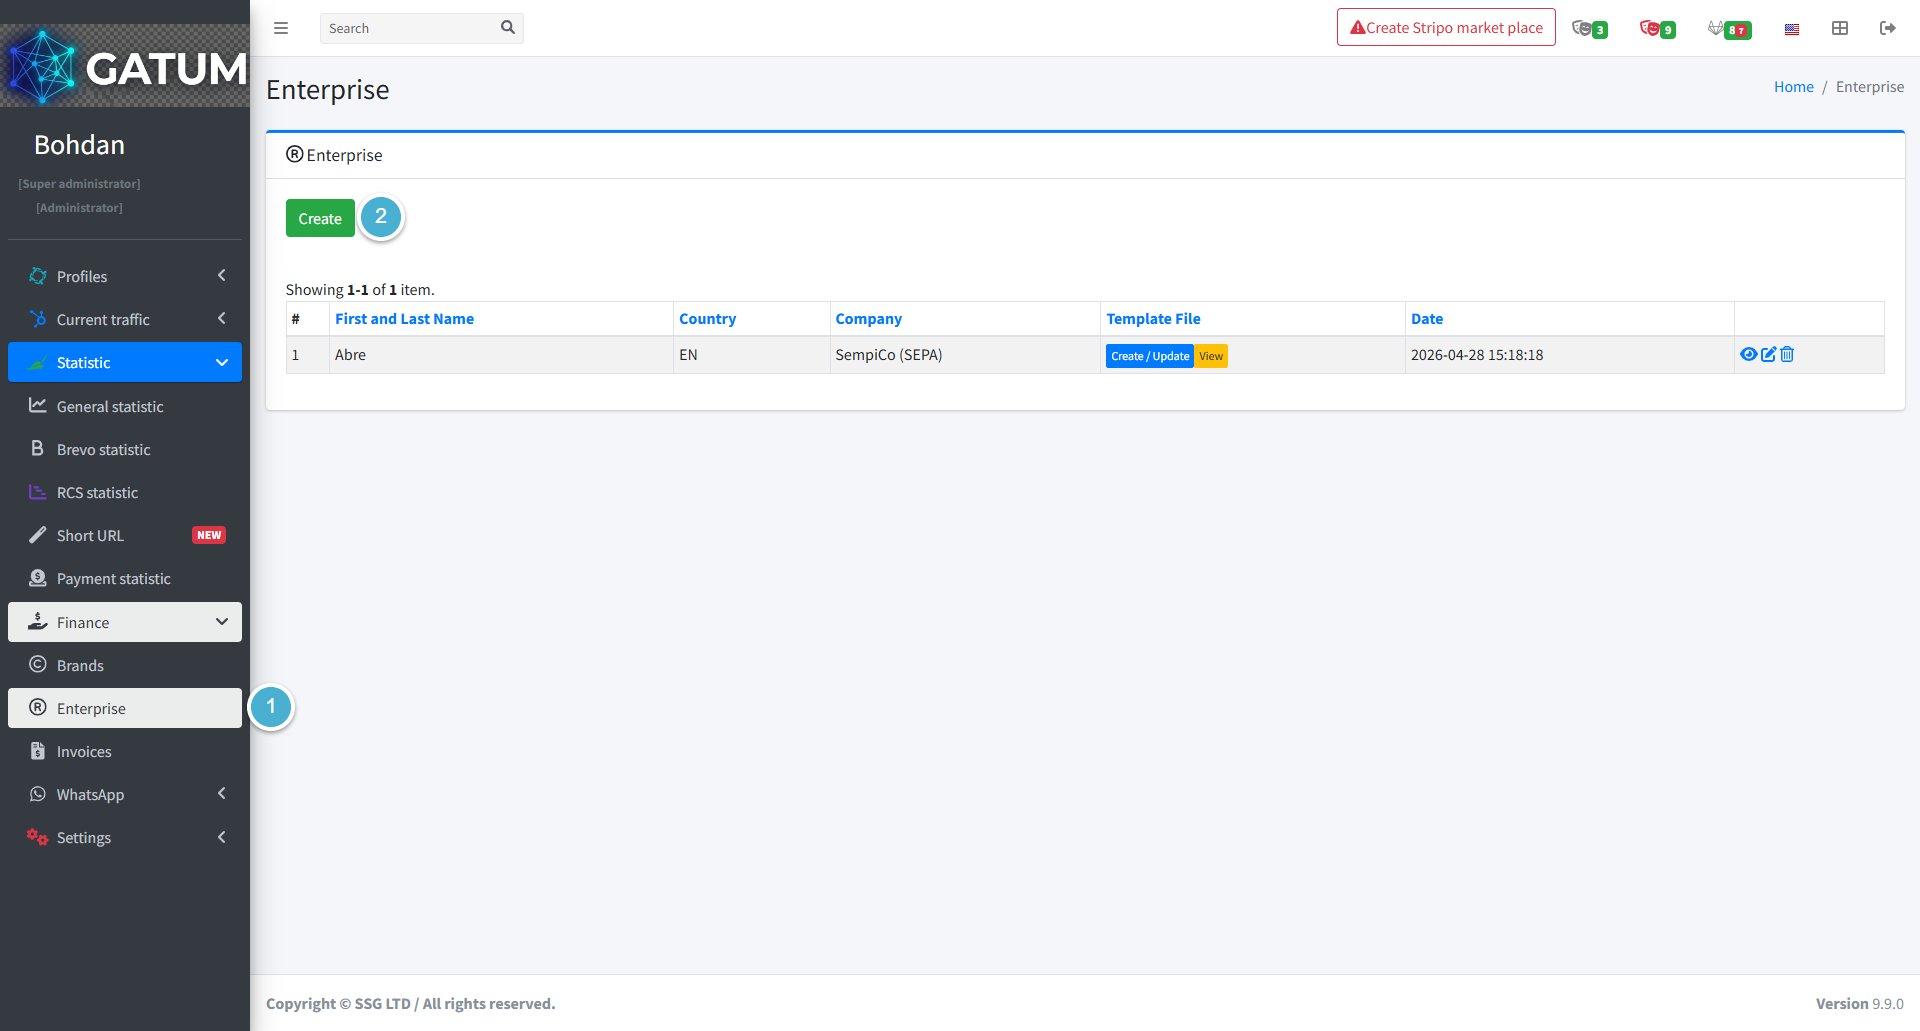
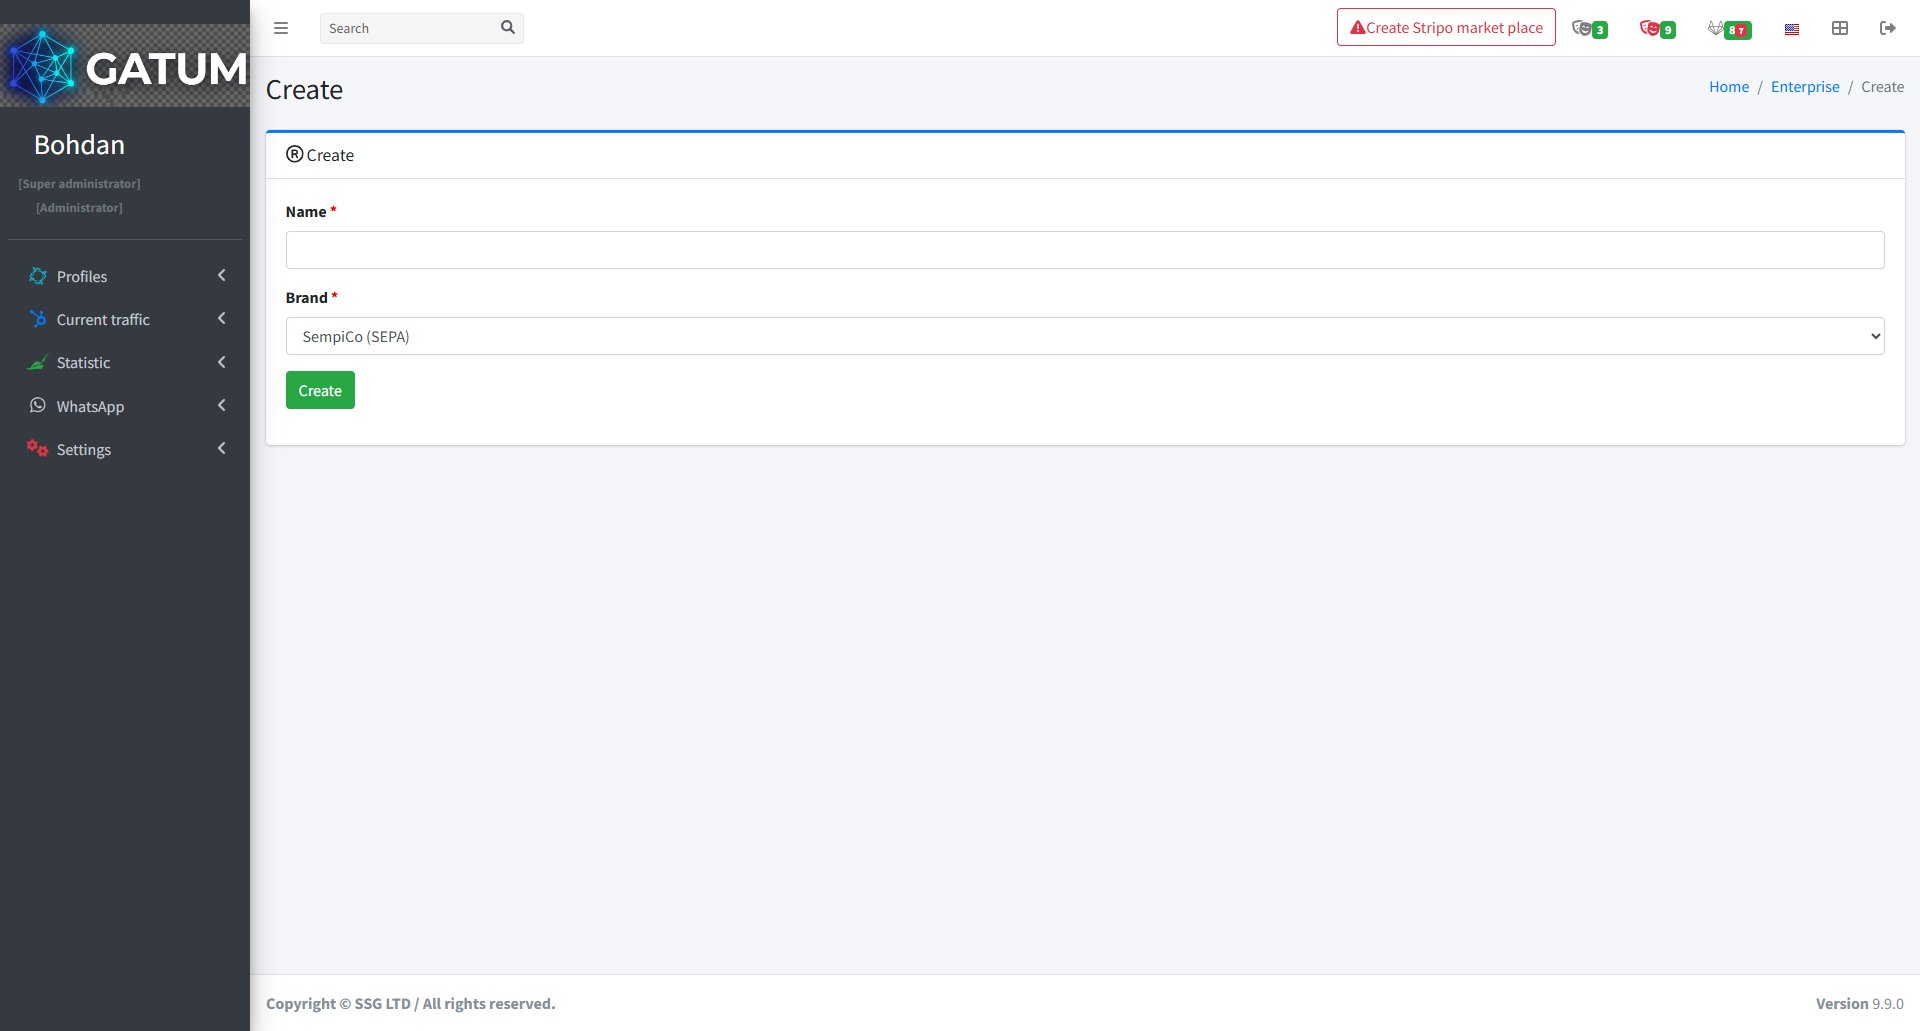
How to Create an Enterprise on the Platform?
An enterprise is the legal entity on whose behalf you bill clients. It links your operational name to a brand, which supplies the invoice template, logo, and contact details. You need at least one enterprise set up before you can generate invoices.
Go to Statistic → Finance → Enterprise.
Click Create.
In the window that opens:
Fill in the fields:
Field
Description
Name
The name of the enterprise as it will appear in the billing system.
Brand
The brand to associate with this enterprise. The selected brand's template, logo, and contact details will be used on all invoices generated under this enterprise.
Click Create.
Once created, the enterprise appears in the list with its linked brand and a Create / Update button for managing the invoice template file. To use this enterprise on invoices, assign it to the relevant clients in their billing settings.
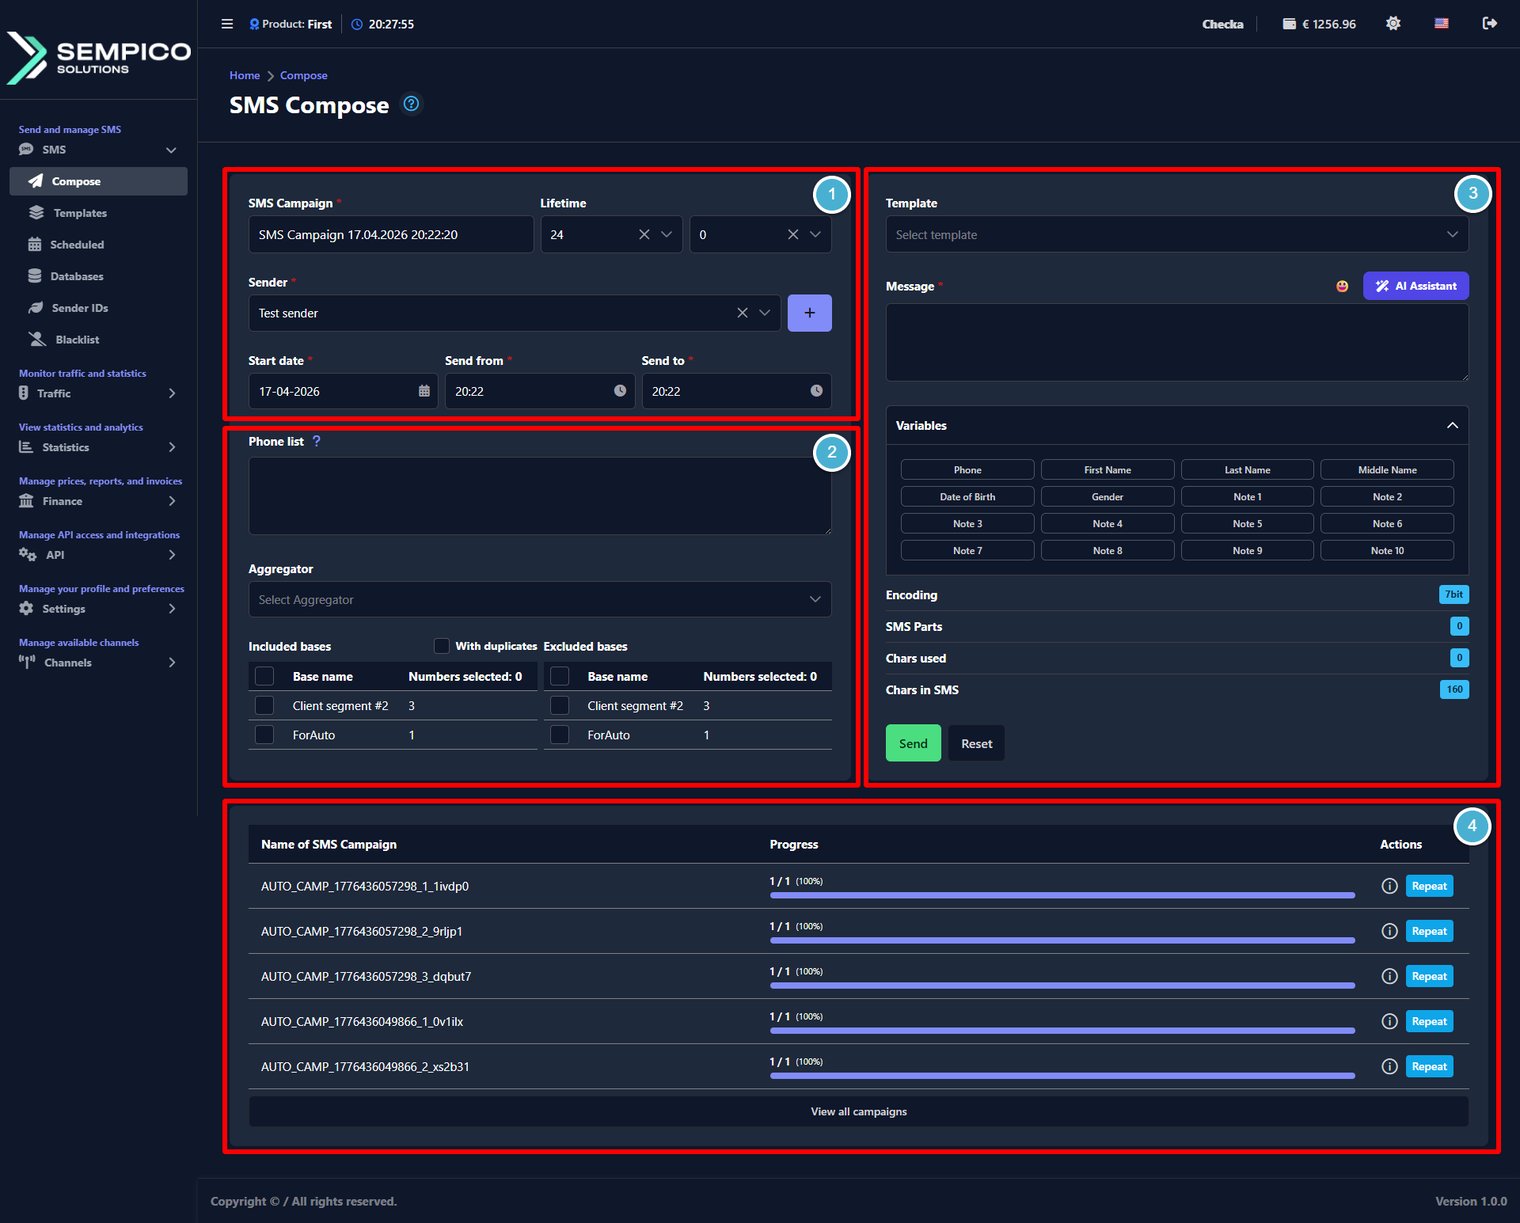
How to Create and Send SMS from the Client's Web Panel?
The Gatum web panel lets you create and send SMS campaigns manually — without any API or SMPP connection. You can send messages immediately or schedule them for a specific time.
Before You Start
SMS sending via the web panel is only possible if your account has been correctly configured by your Gatum manager. If you're unable to send campaigns, contact your manager to verify your account settings.
How to create and send SMS?
First, you define the campaign settings, then choose recipients, prepare the message text, and finally review recent sends if needed.
Let's go through these sections step by step and see what needs to be filled in to send a campaign.
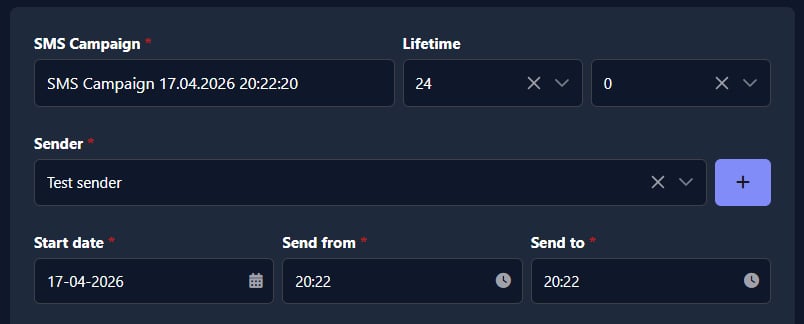
Step 1 – Configure the campaign
First, configure the basic campaign settings:
[SMS Campaign*] (required)
In the [SMS Campaign*] field, enter a name for your campaign. This name is used later in reports and campaign history, so it's worth making it clear and easy to recognize.
ⓘ
For example, you can use Promo_Austria_21.02.2026. A simple format like Purpose_Audience_Date usually works well.
[Lifetime]
Use the [Lifetime] field to set how long the campaign stays active for sending. The value is set in hours and minutes.
[Sender*] (required)
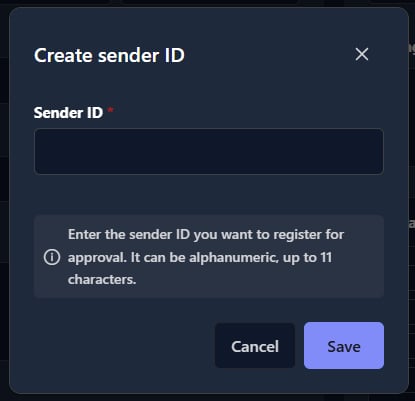
Choose a sender in the [Sender] field.
Depending on your account settings, this can be a Sender ID (alpha name), a phone number, or another available sender type.
If you need to add a new sender, click the [ + ] button next to the [Sender] field. In the opened window, add a new Sender ID, and click the [ Save ] button:
ⓘ
Depending on your account settings, a new sender may be added immediately or sent for admin moderation. If moderation is enabled, the sender becomes available only after approval.
[Start date/time*] (required)
Use [Start date], [Start from], and [Start to] fields to define when the campaign is allowed to send messages.
When you click the [Send] button, the system checks the current time against the selected window. If the time is already active, sending begins immediately. If the time is later, the campaign is scheduled.
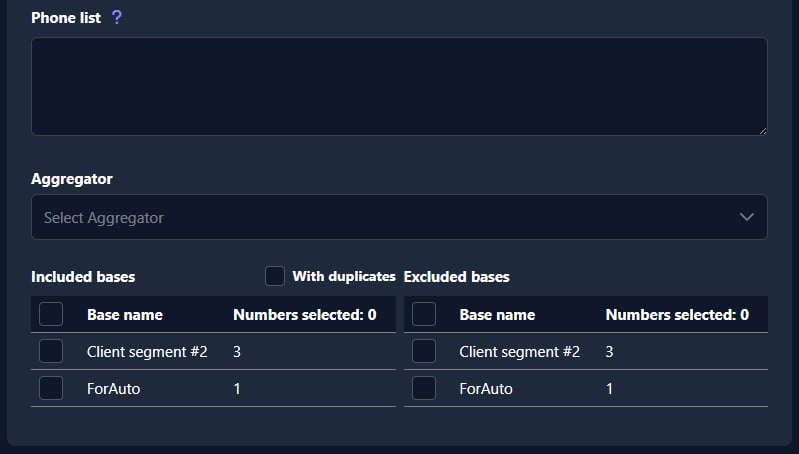
Step 2 – Select recipients and routing
Continue by choosing who will receive the message and how the campaign should be routed:
[Phone list]
Use the [Phone list] field if you want to enter phone numbers manually instead of sending to saved contact bases. The system accepts only the international format.
ⓘ
To see the formatting rules, click the small help icon [ ? ] next to [Phone list].
[Aggregator]
Use the [Aggregator] field to select a specific supplier/provider for sending this campaign.
If no aggregator is selected, the system uses the default routing configured for your account.
[Included bases]
In [Included bases], select with check boxes the contact bases you want to send the campaign to.
[Excluded bases]
In [Excluded bases], select with check boxes the contact bases that should be excluded from this campaign.
[With duplicates]
If this checkbox is not enabled, the system sends only one message per number, even if the same number appears in several bases.
ⓘ
Remember that you need to choose at least one phone number for sending. It doesn't matter, will it be from the [Phone list] field or from the [Included bases] section.
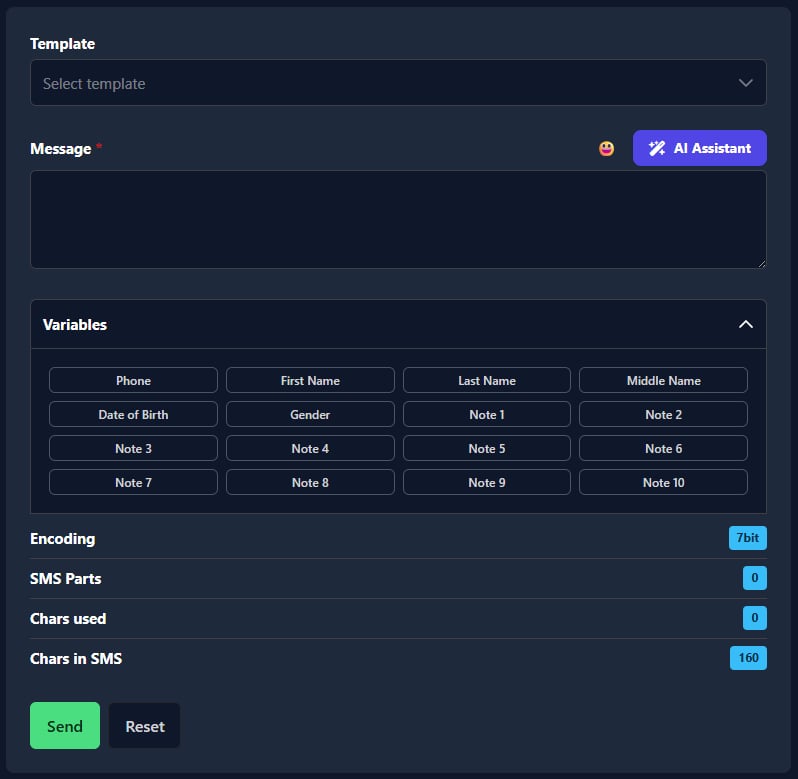
Step 3 – Create the message
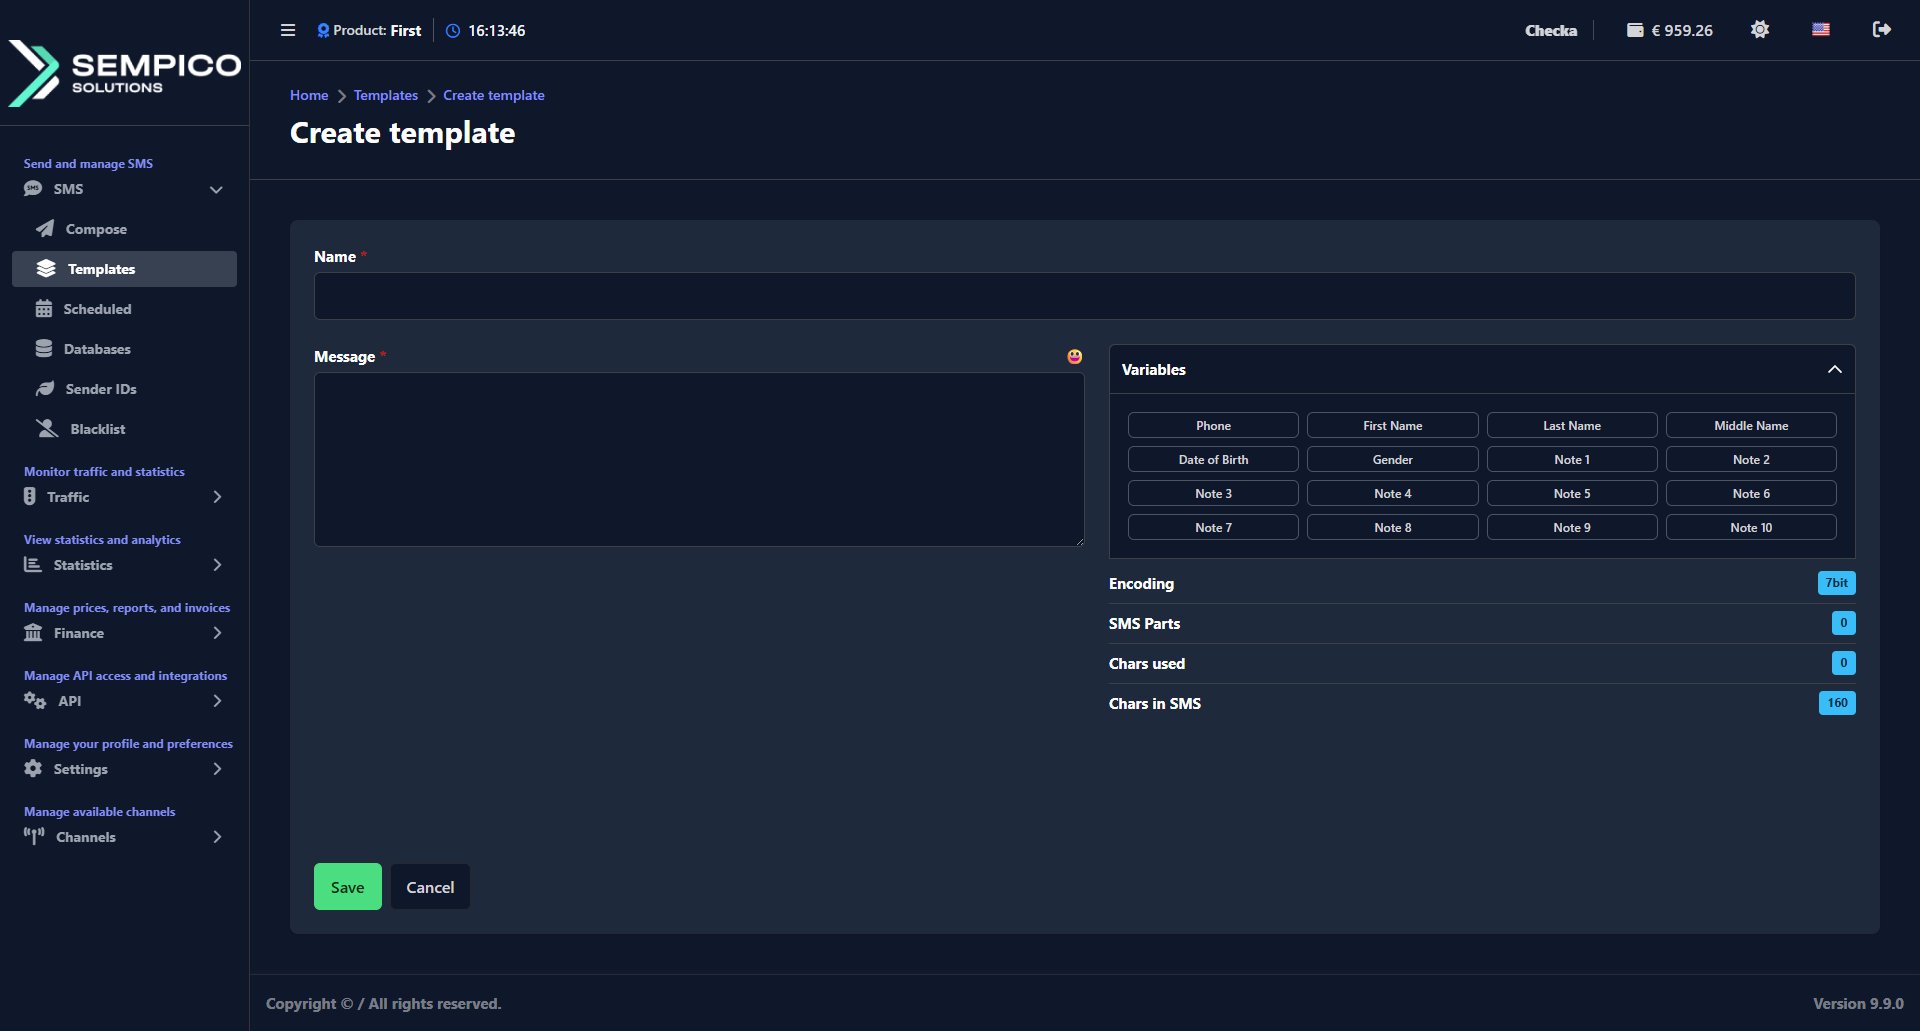
In this section, you prepare the SMS text: choose a template, write or edit the message, insert variables, and review message counters before sending.
[Template]
Use the [Template] dropdown to select a saved message template from the dropdown list.
[Message*] (required)
This is the main section where you create the text of your SMS campaign.
You can prepare the message in a few ways:
write the text manually in [Message]
select a saved [Template] from the dropdown
insert personalization fields using [Variables]
Use the emoji button next to [Message] to insert emojis into your SMS text.
If you choose a template in the [Template] field, its text is inserted into the [Message] section automatically, and you can edit it before sending.
ⓘ
A common workflow is to select a template first, then adjust the text manually for the current campaign.
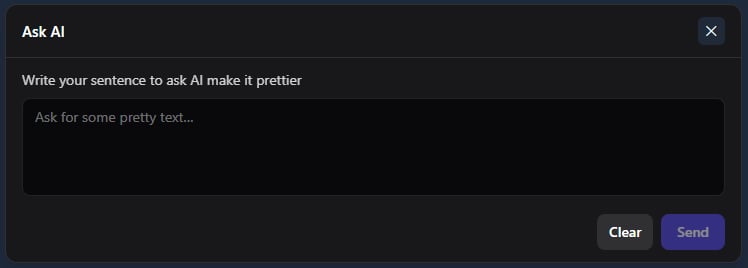
[AI Helper]
Use this feature if you want help writing or improving the text. It can help you make the message clearer and more polished.
Click the [ AI helper ] button and in the opened window, write the desired text, and click the [ Send ] button:
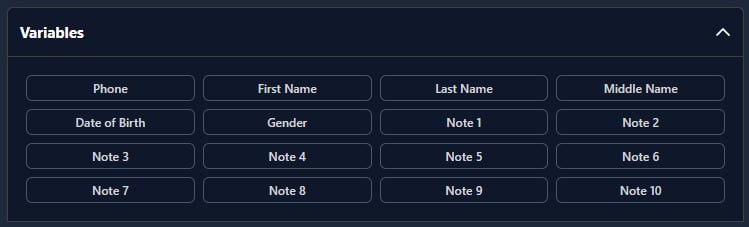
[Variables]
Use the [Variables] dropdown to insert data from your contact base into the message.
This allows you to personalize the same SMS for different recipients — for example, by inserting:
phone number
first name
last name
date of birth
and other available fields from the selected base
Click the [ Variables ] dropdown to hide or show the options:
When you choose a variable, the system inserts a placeholder into the message text. During sending, this placeholder is replaced with the actual value from each contact record.
ⓘ
Variables work correctly only when the selected recipients come from a contact base that contains these fields.
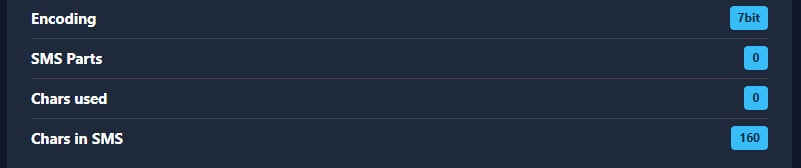
[Message counters]
These indicators help you check whether the message will be sent in the expected format and how many SMS parts it will use.
Pay attention to these values while writing your message:
[Encoding] – shows the current encoding (for example, 7bit)
[SMS Parts] – shows how many SMS parts the text will be split into
[Chars used] – shows how many characters are currently used
[Chars in SMS] – shows the character limit for the current encoding
These values update automatically when you type or edit the message.
Why this matters:
if encoding changes, the character limit per SMS will change
if the text becomes too long, the message will be split into multiple SMS parts
this affects how the final message is delivered and how many SMS are sent in total
[ Send ] and [ Reset ] buttons
When the campaign settings and message are ready, click the [ Send ] button to start sending (or schedule the campaign, depending on the selected time).
If you want to clear the form and start over, click the [ Reset ] button.
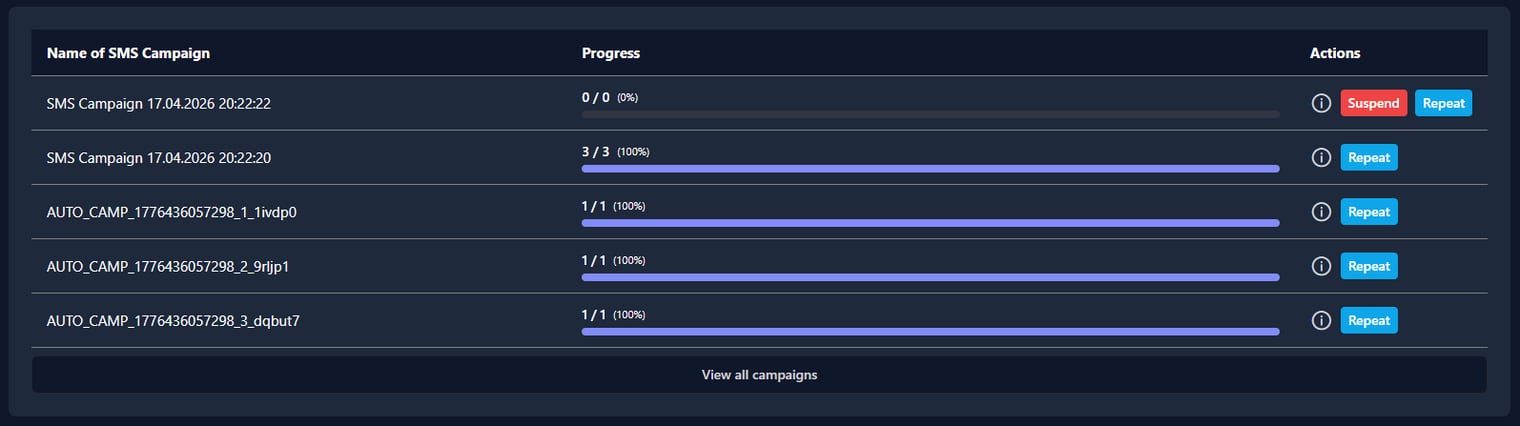
Step 4 – Review and reuse recent campaigns
At the bottom of the page, you can see recent campaigns created from the Compose section.
The table shows the campaign name, its progress, and available actions. In the [Progress] column, you can see how many messages were sent out of the total number of recipients, along with the percentage.
You can also use quick actions:
[i] to open campaign information/details
[Resend] to send the campaign again
[Restore] to restore the campaign settings (if available)
[Suspend] to stop the sending campaign
Click the [ Repeat ] button to resend a campaign or click the [ Suspend ] button to terminate sending.
To open the full campaigns page, click the [ View all campaigns ] button below the table. You will be redirected to the SMS Campaigns page.
How to Create Customizations for HLR Requests?
The HLR (Home Location Register) requests let you check whether a phone number is active and which network it belongs to — before sending an SMS. To send HLR requests through Gatum, you need to set up three things: a dedicated route, a cost price for your aggregator, and a price for your client.
Before You Start
Make sure you have an aggregator that can accept and process HLR requests. Without a vendor on your side, the setup below won't work.
Step 1: Create an HLR Route
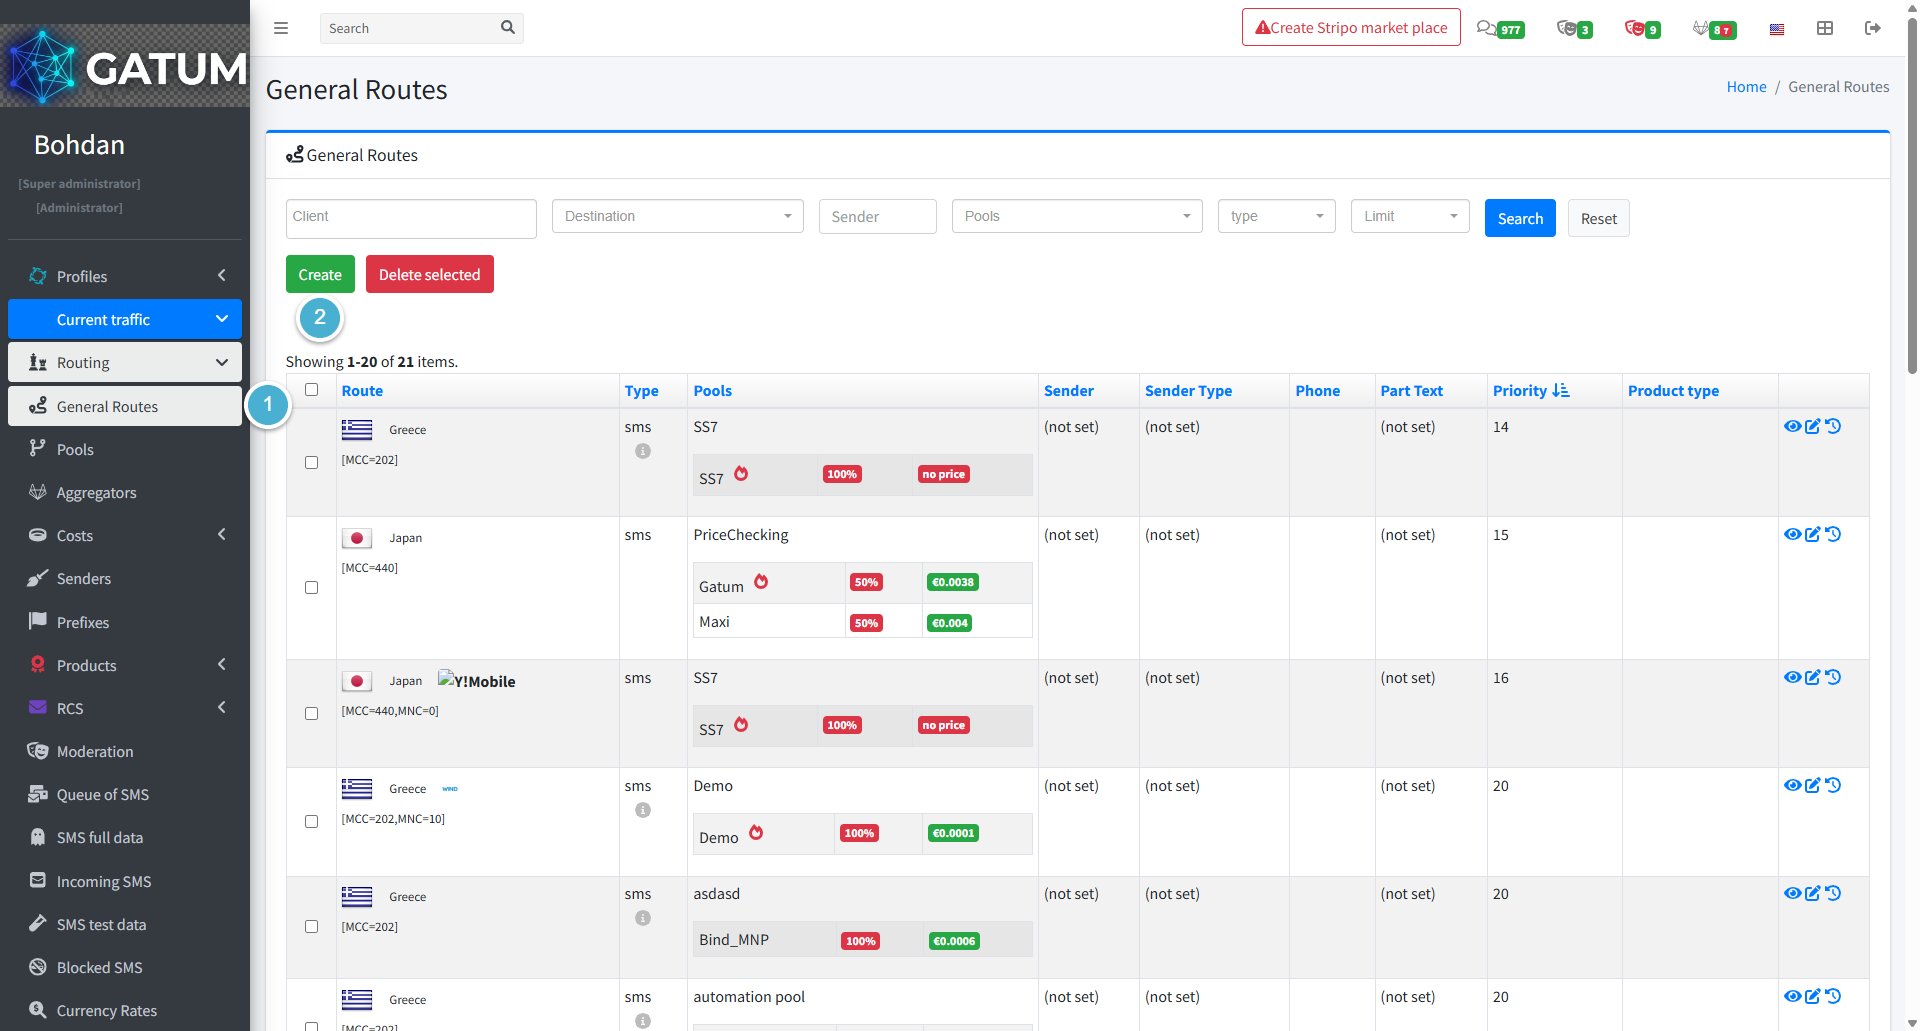
Go to Current Traffic → Routing → General Routes.
Click Create:
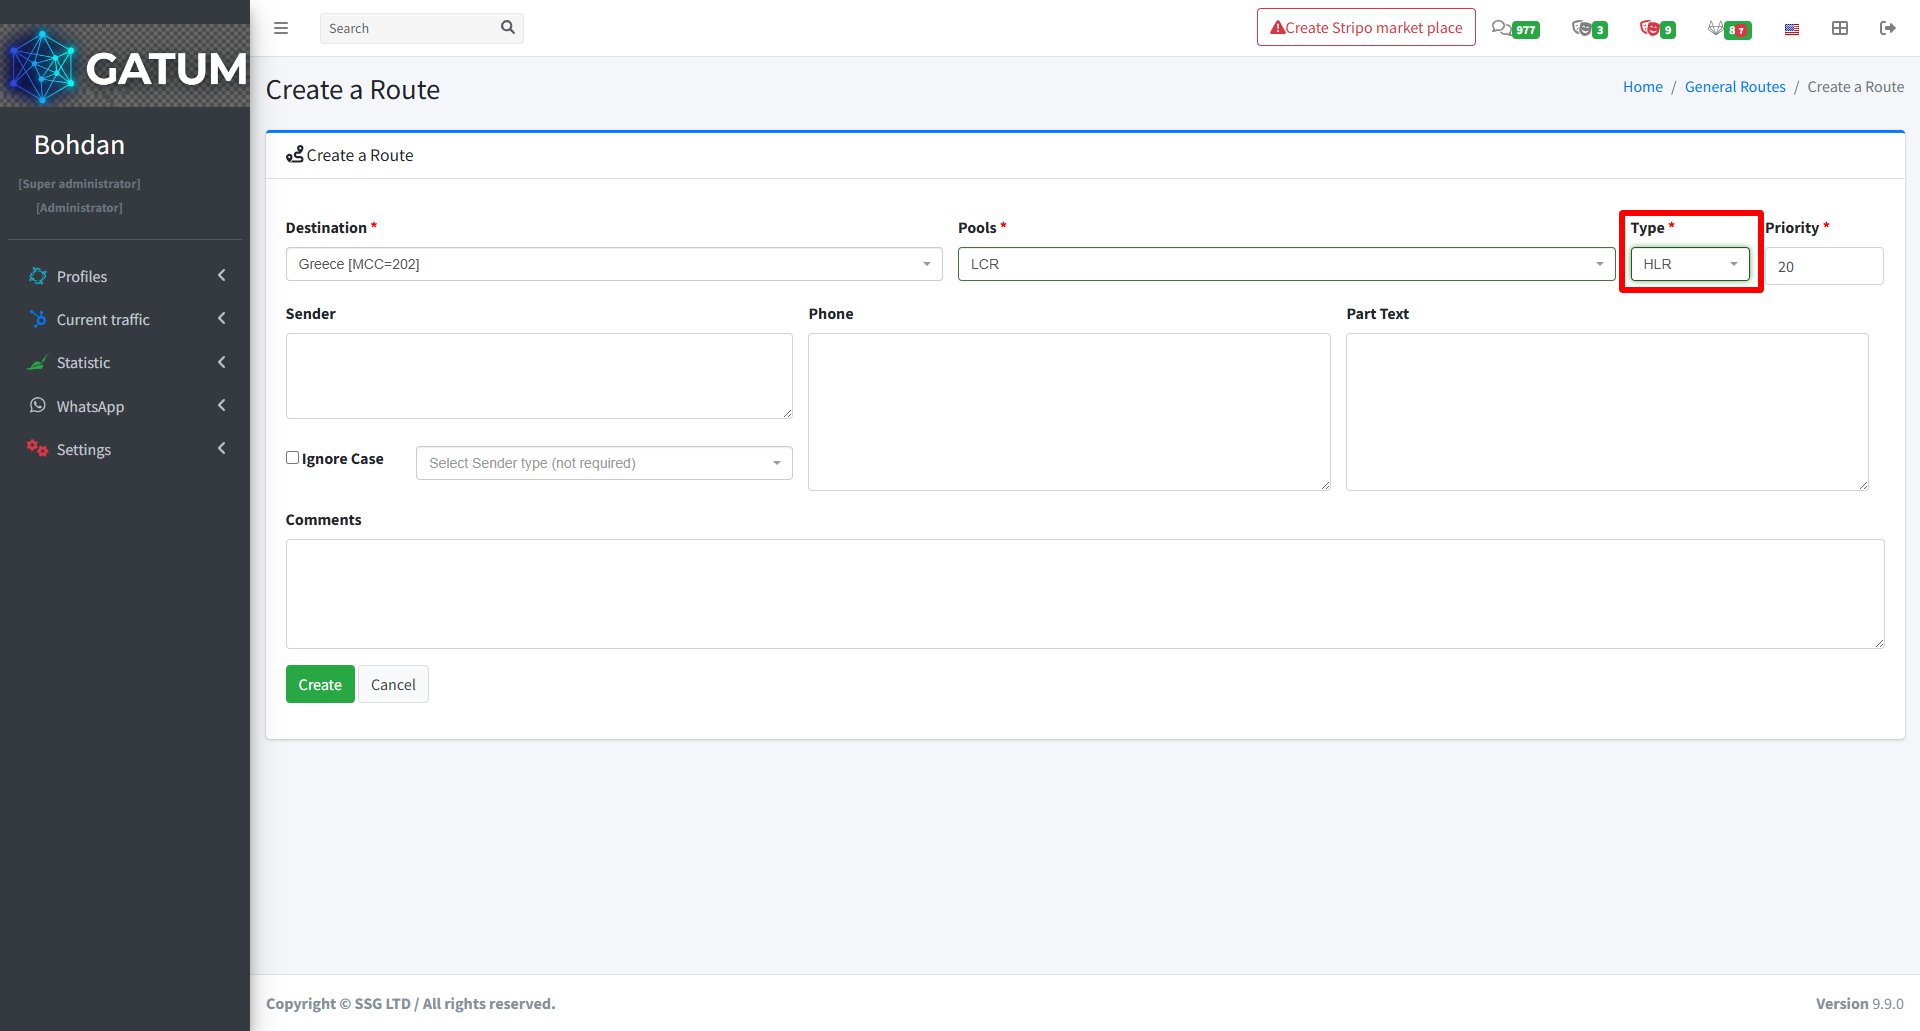
In the window that opens, fill in the standard route fields, and make sure to set Type to HLR:
Field
Description
Destination
The country or network for this route
Pools
The pool used to send HLR traffic
Type
Must be set to HLR
Priority
Route priority — lower number means higher priority
Sender (optional)
Restrict this route to a specific sender
Phone (optional)
Restrict this route to a specific phone number
Part Text (optional)
Restrict this route by message content
Ignore Case (optional)
Ignore case when matching sender or text
Sender type (optional)
Restrict to a specific sender type
Comments (optional)
Internal notes for this route
Click Create.
Step 2: Create a Cost Price for the Aggregator
Go to Current Traffic → Routing → Source Prices.
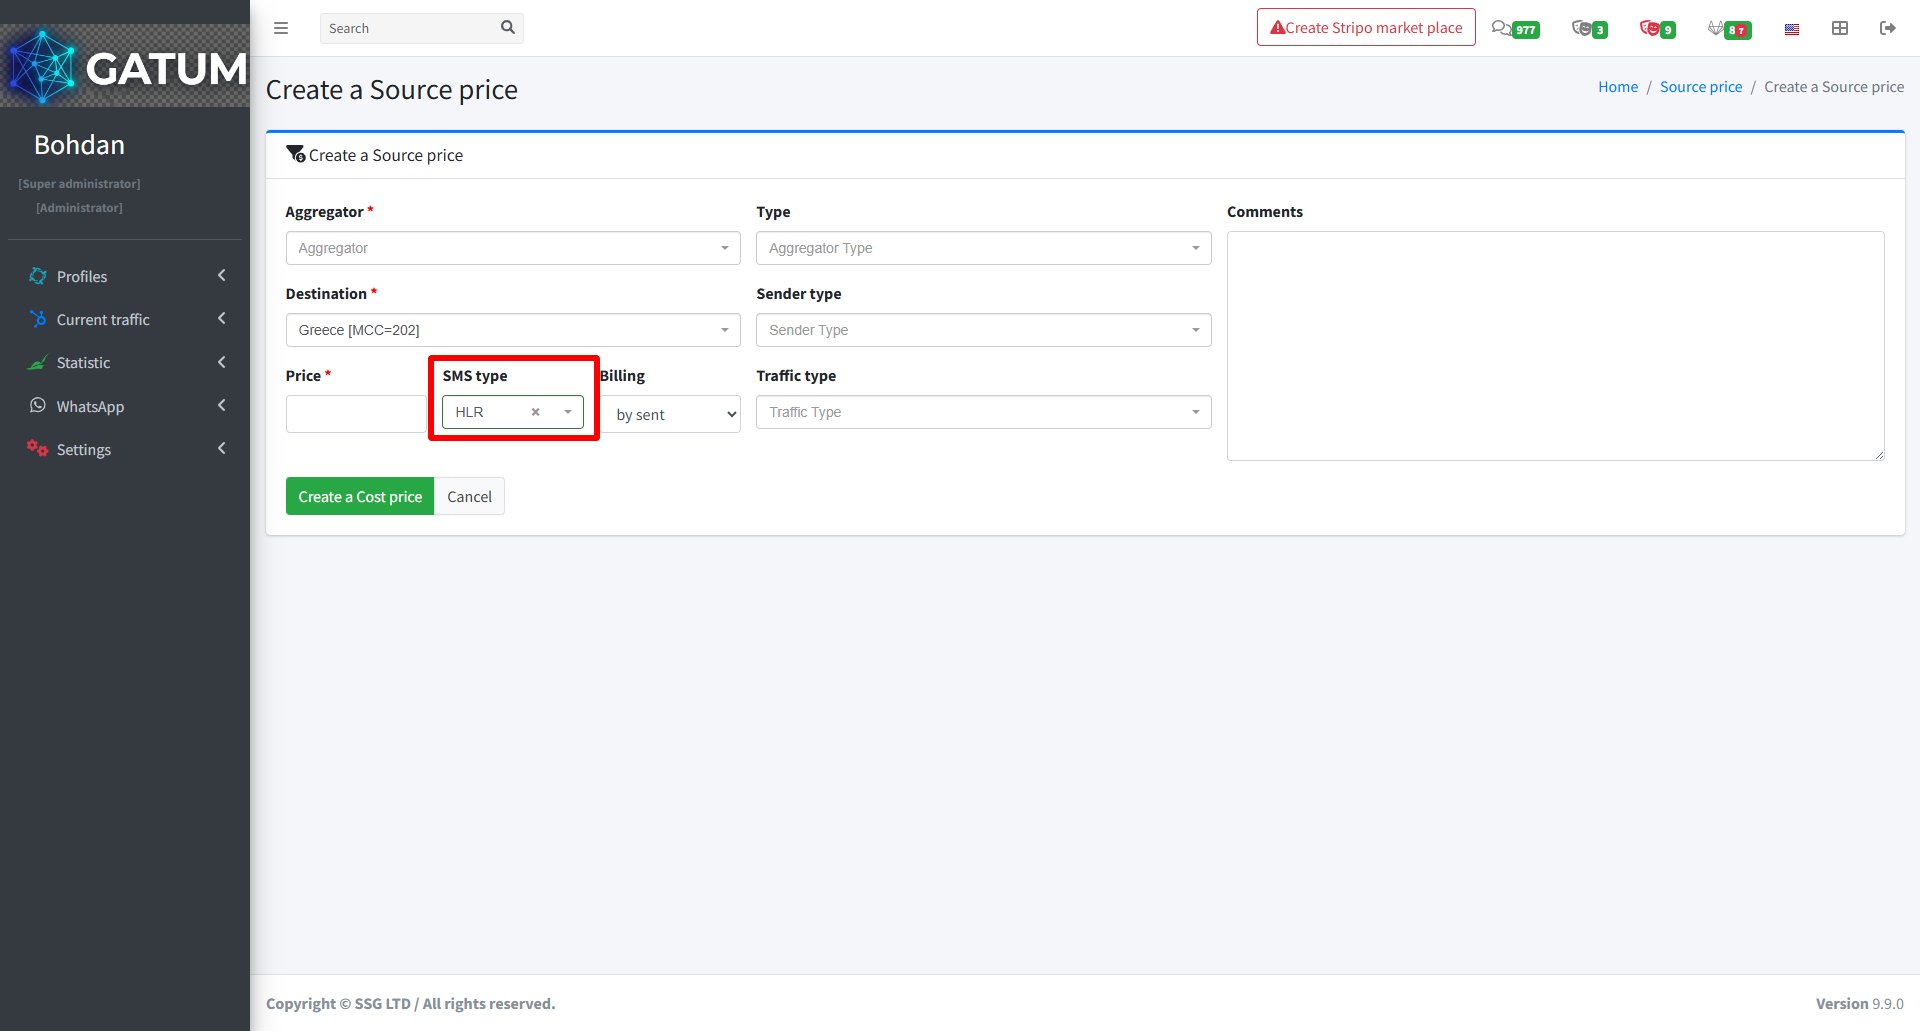
Click Create a price:
In the window that opens, fill in the standard price fields, and make sure to set SMS type to HLR:
Field
Description
Aggregator
The aggregator that will process HLR requests
Destination
The country or network this price applies to
Price
Cost per HLR request
SMS type
Must be set to HLR
Type (optional)
Aggregator type
Sender type (optional)
Restrict to a specific sender type
Billing (optional)
Billing method (e.g. by sent)
Traffic type (optional)
Traffic type for this price
Comments (optional)
Internal notes
Click Create a Cost price.
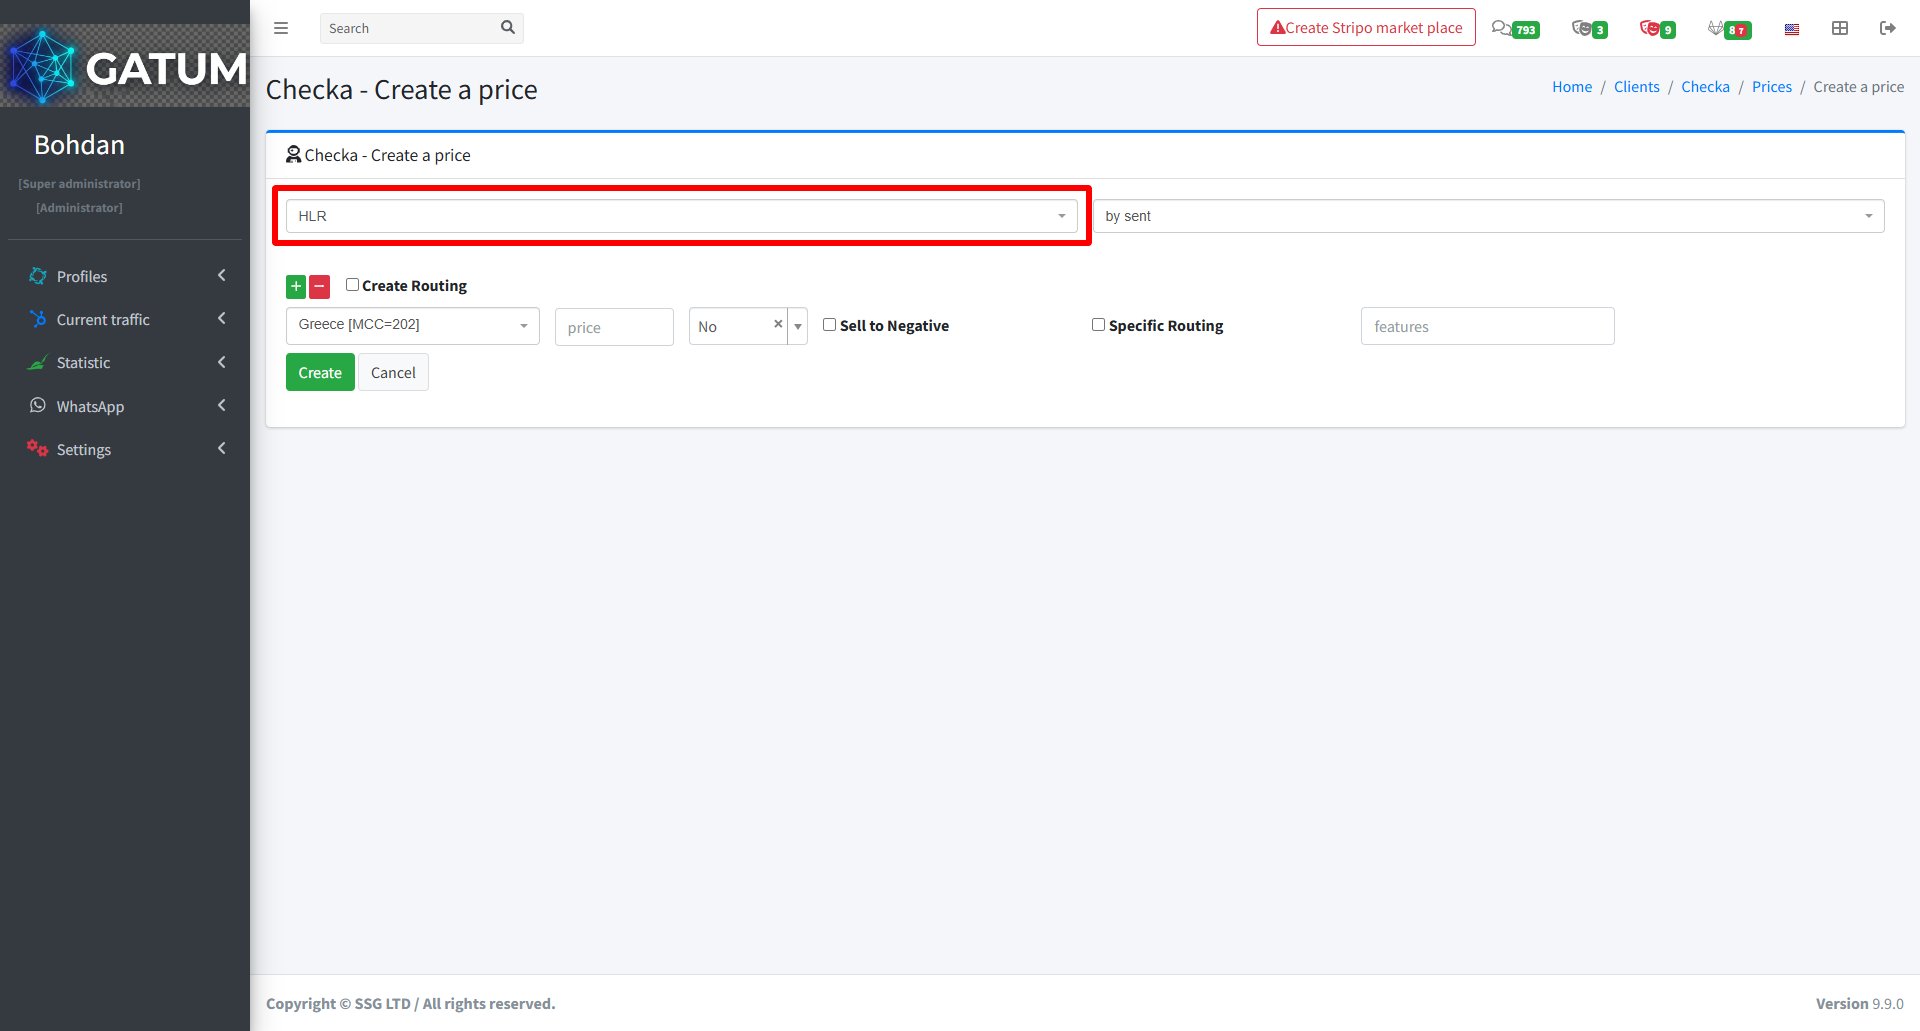
Step 3: Set a Price for the Client
Go to Profiles → Clients.
Click on the client's name.
In the Prices block, click Create:
In the window that opens, fill in the standard price fields, and make sure to set the SMS type to HLR:
Field
Description
SMS type
Must be set to HLR
Billing (optional)
Billing method (e.g. by sent)
Destination
The country or network this price applies to
Price
Price per HLR request charged to the client
Sell to Negative (optional)
Allow requests even if the client's balance is negative
Specific Routing (optional)
Use a specific route for this price
Features (optional)
Additional routing features
Click Create.
Once all three steps are complete, your clients will be able to send HLR requests through the platform.
How to Create New Traffic Types?
Traffic types are labels you use to categorize routes and connections in the platform. Creating your own types lets you organize traffic the way that makes sense for your business.
How to Create a Traffic Type
Go to Settings → Config → Library → Traffic Types.
Click Create Type:
On the page that opens:
Fill in the fields:
Field
Description
Type Name
A short name for the traffic type (e.g. DC, HQ)
Type Description
A brief explanation of what this type represents
Click Save.
You'll be taken back to the Traffic Types list where your new type will appear.
How to Create Payment Methods?
Payment methods are labels that record how a client made a payment – for example, Bank transfer, Bitcoin, or USDT. They are used when logging top-ups, so you can track the payment channel for each transaction.
Go to Settings → Config → Library → Payment methods.
Click Create:
In the window that opens:
In the Name field, enter the name of the payment method (e.g. Bank transfer, Bitcoin, USDT).
Click Create.
Once created, the method appears in the Payment methods list with a status of Active and becomes available as an option when recording a client payment.
How to Create Products on the Platform?
Products are presets for routing and pricing that you can apply to multiple clients at once. Instead of configuring routes and prices individually for each client, you create a product once, define its settings, and assign it to as many clients as needed. Any client with a product assigned inherits all its routing and pricing rules automatically.
Go to Settings → Config → Product type.
Click Create a Product.
In the window that opens:
Fill in the fields:
Field
Description
Name Product
The name of the product as it will appear in the platform and in the client's web panel.
Description Product
A description of the product. Shown to clients if the product is visible in their panel.
Priority
The order in which this product is applied when a client has multiple products assigned. Lower numbers take precedence.
Default (optional)
Set to Yes to apply this product automatically to all new clients.
Show for clients (optional)
Whether clients with this product assigned can see it in their own web panel. Defaults to Yes.
LCR sending (optional)
Enable Least Cost Routing for traffic sent under this product. When enabled, the platform selects the cheapest available route for each message.
Click Save.
Once the product is created, it appears in the Product types list. To make it functional, configure its routes and prices under Current traffic → Products → Common routes and Common prices. You can then assign the product to clients from their edit page – see How to Assign a Product to a Client.
How to Create Templates for SMS Campaigns?
Templates let you save message texts and reuse them across different campaigns. This saves time when you regularly send similar messages — just pick a template and adjust it if needed.
Go to SMS → Templates.
Click the Create button:
In the window that opens:
Fill in the required fields:
Field
Description
Name
A clear name for the template so it's easy to find later. For example, "Autumn sales" or "Welcome message"
Message
The text of your template. Can include variables for personalization
If you want to personalize messages for each recipient, use Variables — click any variable button on the right to insert it into the message text.
During sending, each placeholder is automatically replaced with the actual value from the contact record.
Available variables include: Phone, First Name, Last Name, Middle Name, Date of Birth, Gender, and Note 1–10.
A personalized template might look like this:
Hello dear #first_name#, don't miss our seasonal sale — up to #note1# off!
ⓘ
For variables to work correctly, the contact base you use for sending must have the corresponding fields filled in.
Click Save.
The template will appear in the list on the SMS Templates page.
When a message is held for review instead of being sent immediately, it means it was caught by one of the platform's moderation mechanisms. Understanding why this happens helps you manage traffic more effectively and configure moderation to match your workflow.
Reason 1:...
Why do SIDs get moderated, and how to set it up?
Sender ID moderation lets you control which sender names your clients can use. When it's enabled, a client can't send SMS with a new sender until you approve it. This helps you keep traffic clean and avoid unexpected sender names going out.
Go...
Why Do SMS Get Into the Waiting List?
When there is not enough balance to send all messages in a campaign, the platform automatically moves the unsent SMS to the Waiting SMS queue instead of dropping them. Once you top up your balance, you can resend them manually.
For example, if...
Cookie declaration last updated on 01/01/2025
This website uses cookies
We use cookies to enhance your browsing experience, provide social media features, and analyze our traffic.
You consent to our cookies if you continue to use our website.